A Tour
Field aims to be full of unexpectedly fun features that help you interact with code. This page is going to be a long list of things that delight, things that you didn't think you'd need, and things that help when you are puzzled.
You don't have to read it straight through. Start with running and displaying things, or jump to AI support, drawing on the canvas, or making bigger things. If you want something to run before you look around, Your First Five Minutes begins with a moving drawing. The next stop on the Tour is Frames and the Animation Loop, where a box keeps drawing as time passes.
The Welcome page
The first page of Field is the Welcome page: the first tab in our desktop app, and at https://localhost:9092/welcome in any web browser:
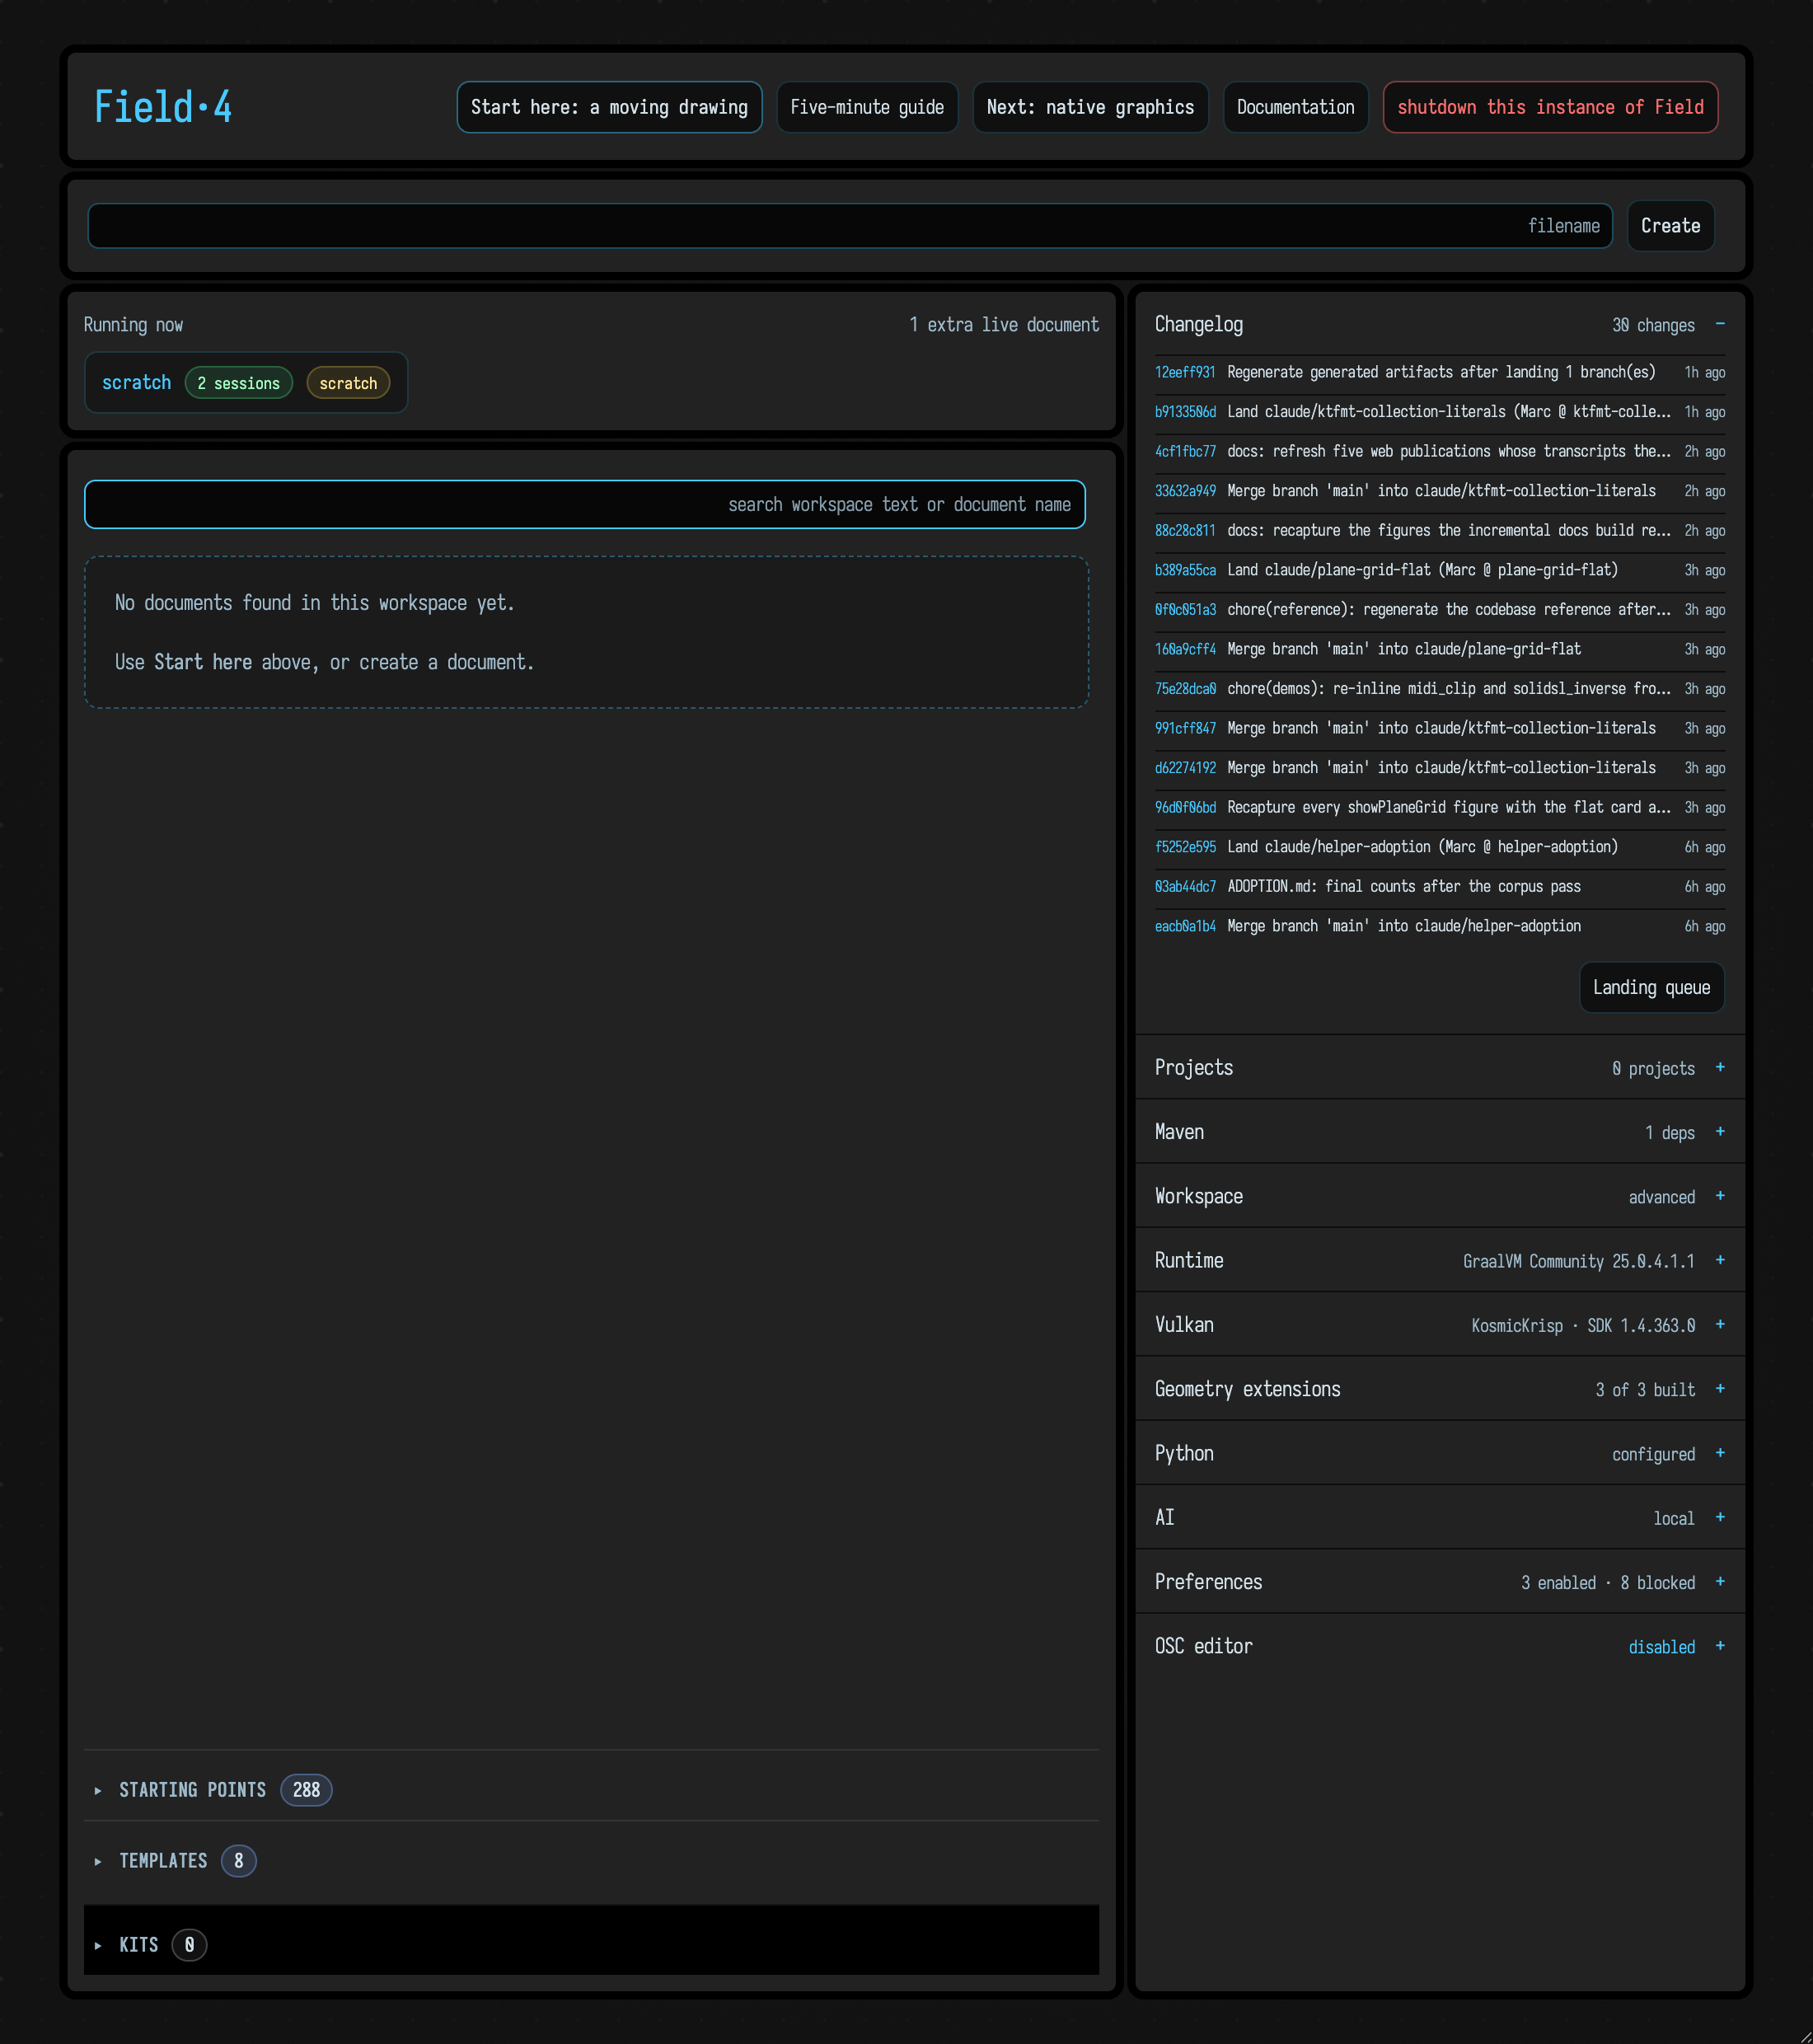
On the left you can make new documents or find that document you just know you edited last week; below the list are Starting points and Templates, curated scenes and scaffolds that open as an editable copy in your workspace. Kits adds reusable packages and their starting points in another disclosure. On the right is a stack of collapsible panels for the rest of Field: the changelog, projects, Maven dependencies, the workspace, the runtime, Vulkan and Python status, AI settings, preferences, and the OSC editor. The search box does full-text search over the whole workspace:
To help you find that snippet of code.
Running things
A Field document is a canvas of boxes. Each box holds a piece of code (and, often, its output); you edit one box at a time in the editor. You can run that code in the following ways (from the commonplace to the rare):
alt/option-enter— runs the line or block that the cursor is in.- Or,
alt/option-enter— runs the currently selected code. alt/option-up arrow— launches the currently edited box.alt/option-down arrowstops.alt/option-clickon a box — launches it for as long as you hold the mouse button down, and stops it when you let go. To keep it running after you let go, drag upwards before releasing. To stop it later,alt/option-clickit again and drag downwards. For example:
alt/option-0— runs everything in a box (but doesn't launch it)
What's the difference between 'running' and 'launching'? Running executes the code once. A box can end with an object that keeps going by itself, such as a loop { }; launching the box hands that object to Field's animation loop, which calls it once every frame until you stop it. When several boxes are launched, they are called in the same order every frame. The idea of installing code into, and removing it from, the animation cycle is fundamental to making sound, image and data visualizations, so this idea is right at the heart of Field.
That's everything you need to know — with these shortcuts you can have a fun time in Field. Go! Write and run some code against your favourite libraries, in Kotlin (on the JVM), Python, Clojure, even Lua.
But... since running code is very important, we actually have quite a few more ways of doing this. Sometimes just for convenience's sake, sometimes because of subtle differences in what you actually mean by 'run' and 'code'.
For completeness, we'll list them here:
alt/option-shift-up arrow— immediately launches the box without recompiling if that's possible. Handy if your box has some long, complicated startup and then an animation or something at the end that you are playing with.ctrl/command-alt/option-korctrl/command-alt/option-jincrements or decrements the number under the cursor and then acts like you pressed alt/option-enter.alt/option-double-clickin the editor. Doing this totrue,false,disable { ... }orenable { ... }in the editor flips that word to the opposite and thenalt/option-enters the block. Think of this as a toggle, but hanging out in your source code.alt/option-double-clickon the name of a function in scope with the signaturefoo()just runs the function. Buttons everywhere!alt/option-1— relaunches just the selection, or the line or enclosing block under the cursor (i.e. the same codealt/option-enterwould run), without running other parts of the box again. See Running code in a box. You get a handsome stripe in the margin that shows the launched code that's ongoing.- Writing code that launches other boxes. For example
root.named("progress").begin()launches a box called "progress".
Some of these effects are language-dependent. For example, if you are editing a GLSL shader property, alt/option-enter recompiles and reloads the shader instead.
Printing things
Often your code does something — draws a line, loads a model, makes a sound. But when you are puzzled as to what is actually running, and where, and when you are confused about how your variables are varying, nothing beats a good old print statement. Like its facilities for running code, Field has a few different ways of doing this.
print(...) — 'print here':
print (and println) always prints next to, or underneath, the line containing the print. If what you print fits on a single line, it sits beside that line; if it doesn't, you get a little block under the line instead:
var x = 10
var y = 20
print(x + y)
var z = 30
println((1..6).joinToString("\n") { "row $it: ${it * it}" })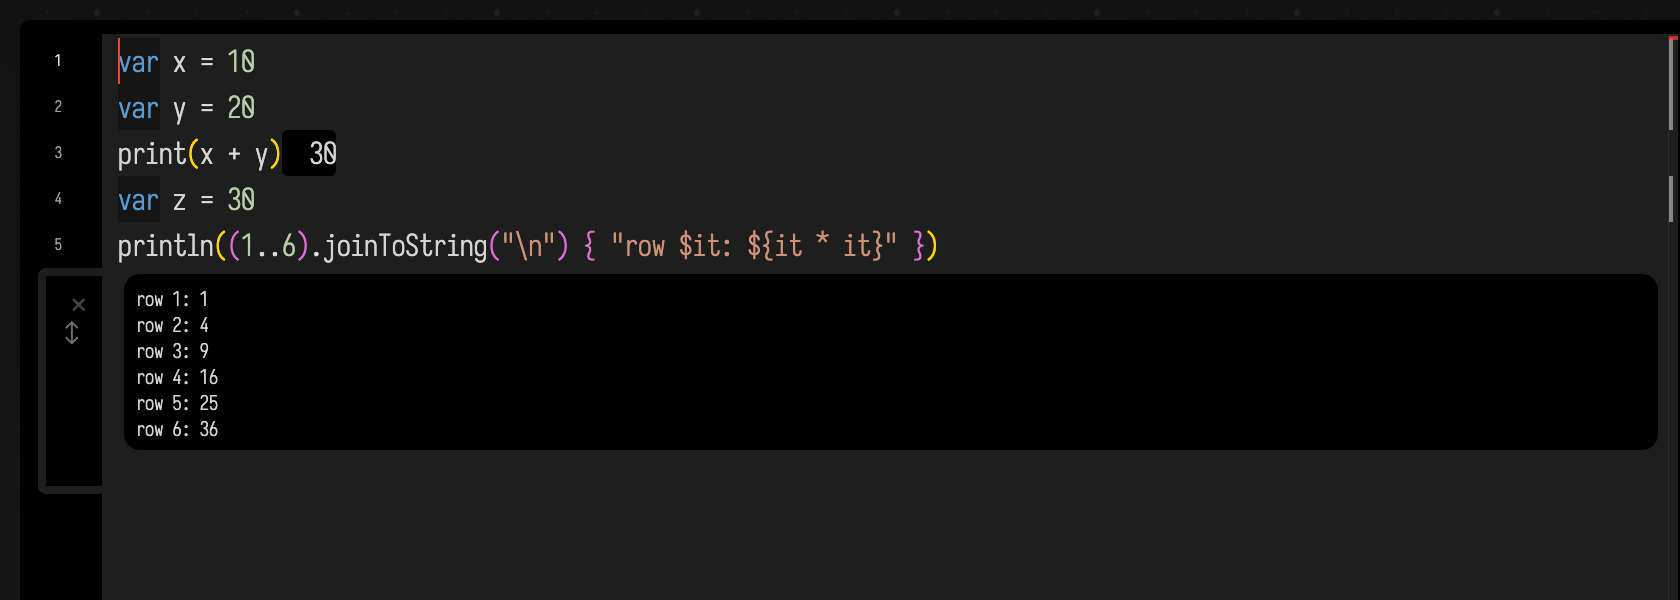
You can close blocks with the 'x' symbol in the margin, or by double-tap Esc, which you'll likely be pressing a lot. triple-tap Esc will get rid of all the outputs inside the current editor. You'll be doing that a lot.
print isn't an ordinary function: it's a macro (see below) that knows which line it was written on.
This can be handy in longer, more interesting code, for example:
And it is quite performant, so you can just use these prints as output:
There's a little bit of design here — if they're printing but not changing, they turn white; otherwise, the thought is that the text changing is enough for you to draw your attention to the line.
So, if you don't know what that variable is, drop in a print() and find out.
Printing, but try harder
Appending .h or even .h2 to the thing that you are printing will cause Field to work much harder to make the thing that you are printing a pretty piece of HTML. Here a map holding a list goes to an output area with .h:
val l = [1.0, 2.0, 3.0, 4.0, 8.0, 7.2]
val m = mapOf("a" to "b", "c" to l)
display("m", m.h)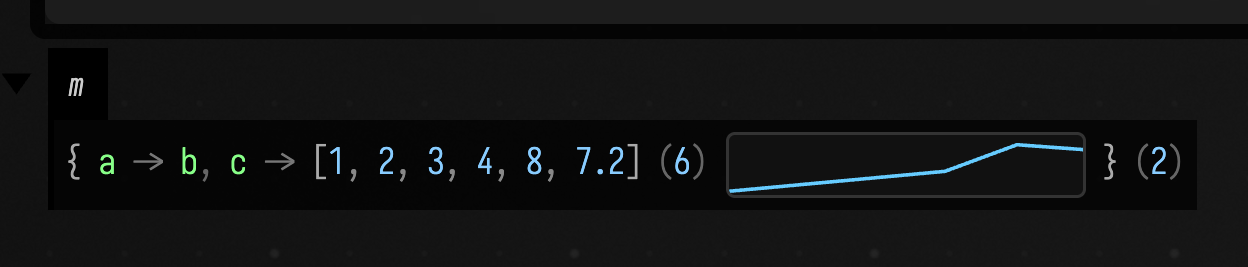
.h2 is particularly suited to lists and maps with lots of data in them — Field intelligently pages in and out just the parts of the data that you are actually looking at, so you can explore gigantic FloatBuffers, for example:
val buffer = java.nio.FloatBuffer.allocate(100_000)
for (i in 0 until buffer.capacity()) buffer.put(i, (Math.sin(i * 0.01) * 10.0 + Math.random()).toFloat())
display("buffer", buffer.h2)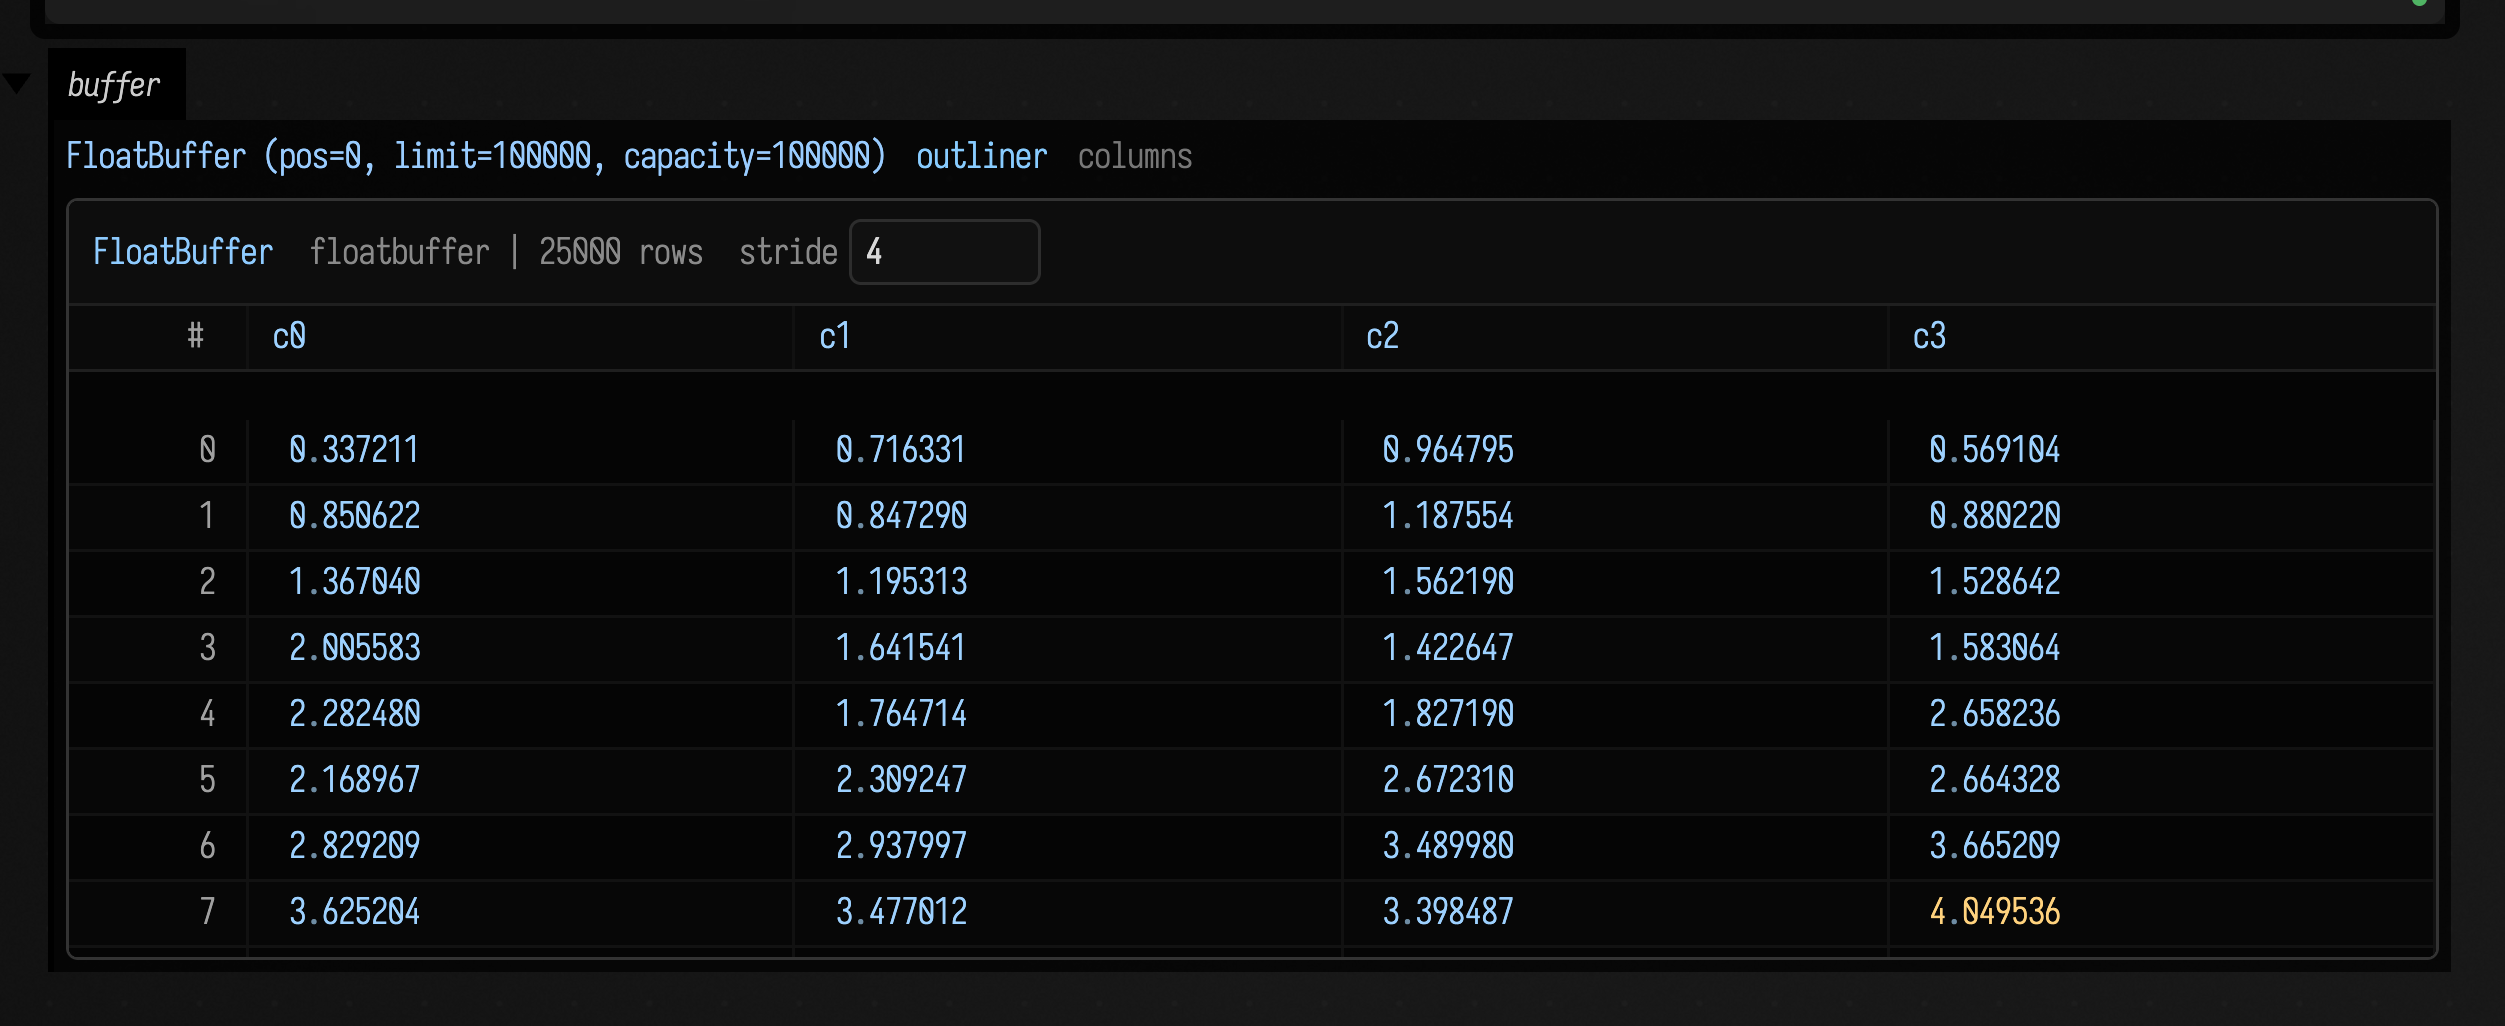
Visualizers covers .h, .h2 and the rest.
displaying things — print where everyone can see it
We can also 'print' to the canvas using display. For example:
val l = [1.0, 2.0, 3.0, 4.0, 8.0, 7.2]
val m = mapOf("a" to "b", "c" to l)
display("m is equal to ", m.h)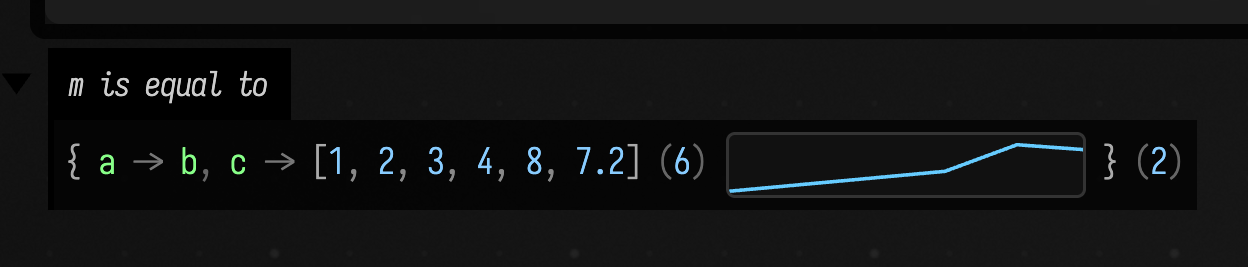
puts an output panel, named by the first argument, underneath the box we're writing code in.
Subsequent calls to display overwrite the previous one, giving you a way of 'animating' the output on the canvas.
While the .h and .h2 visualizers try hard to make things pretty, all they are really doing is making some complex HTML in response to what they are trying to visualize. You can make your own as well:
val l = [1.0, 2.0, 3.0, 4.0, 8.0, 7.2]
val m = mapOf("a" to "b", "c" to l)

display("m is equal to ", m.h)

display("just some html", "<div style='font-weight:900'>foo!</div>")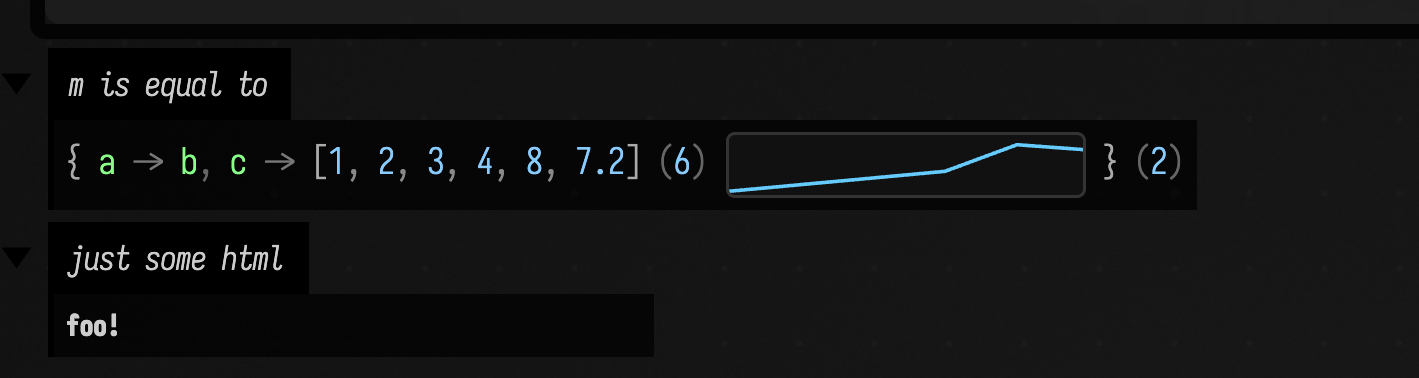
Browsing things — print where I can interact with it
There are a few more elaborate visualizers for more tangled structures. The "column" visualizer is loosely modelled after Smalltalk's browser:
val l = [1.0, 2.0, 3.0, 4.0, 8.0, 7.2]
val m2 = mapOf("foo" to "bar", "gux" to l)
val m = mapOf("a" to "b", "c" to l, "m" to m2)

column("m", m)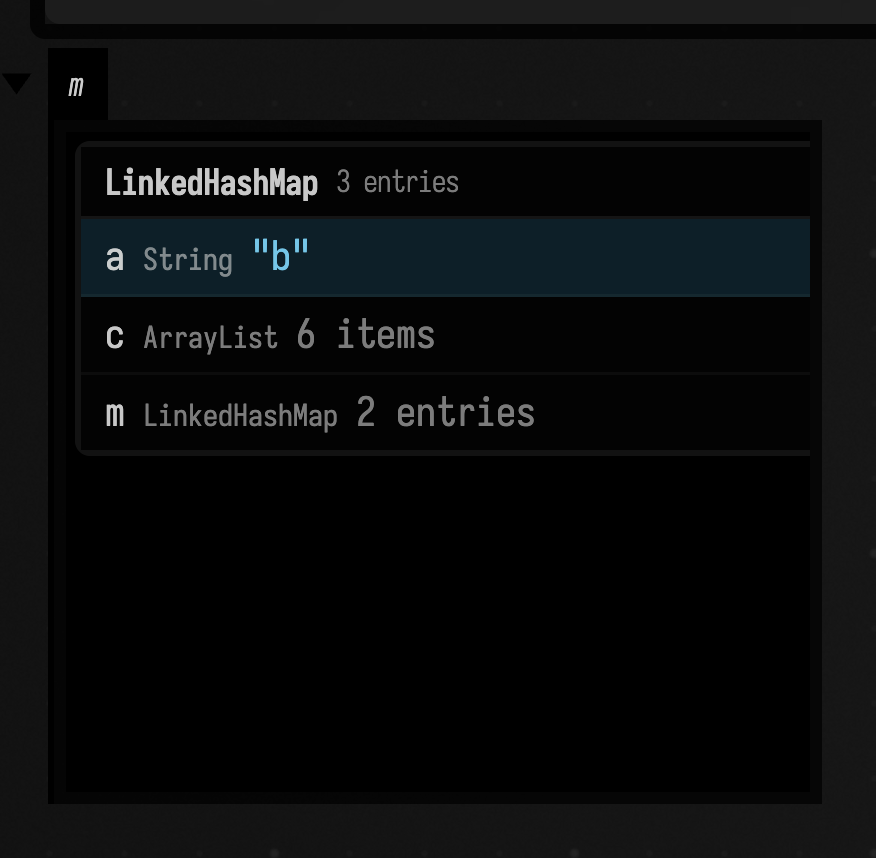
This structure updates live if m changes. Similarly, there is tree, which shows the same values as an outline:
val l = [1.0, 2.0, 3.0, 4.0, 8.0, 7.2]
val m2 = mapOf("foo" to "bar", "gux" to l)
val m = mapOf("a" to "b", "c" to l, "m" to m2)

tree("m", m)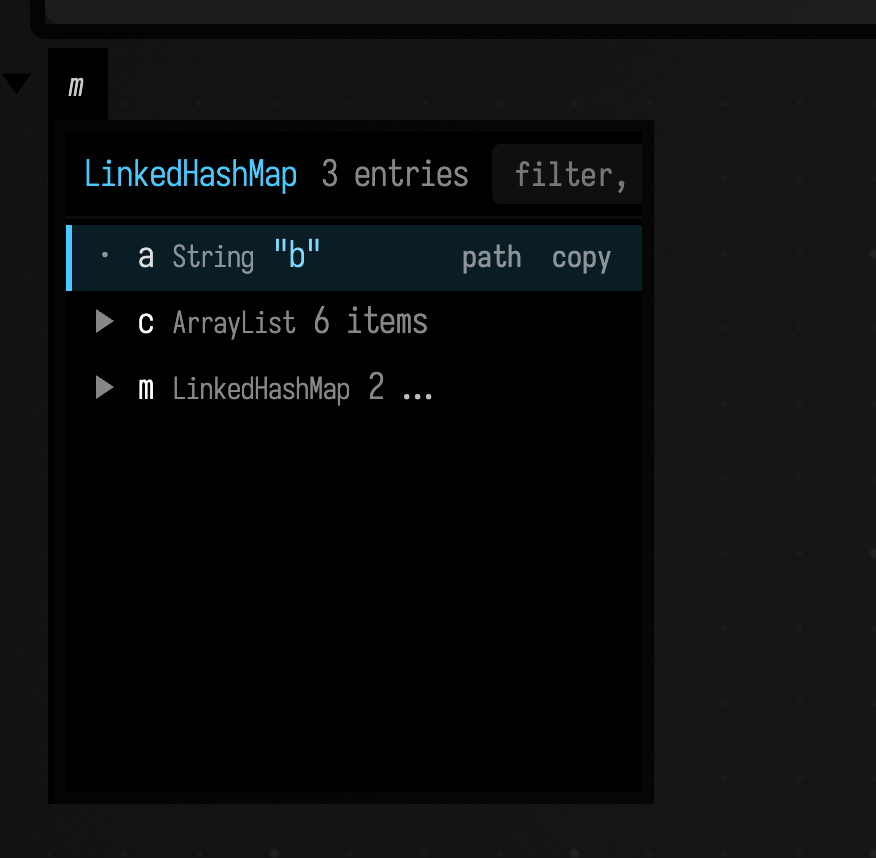
and a viewer for Field's own log, logs(), which shows what the server is logging as it happens:
logs()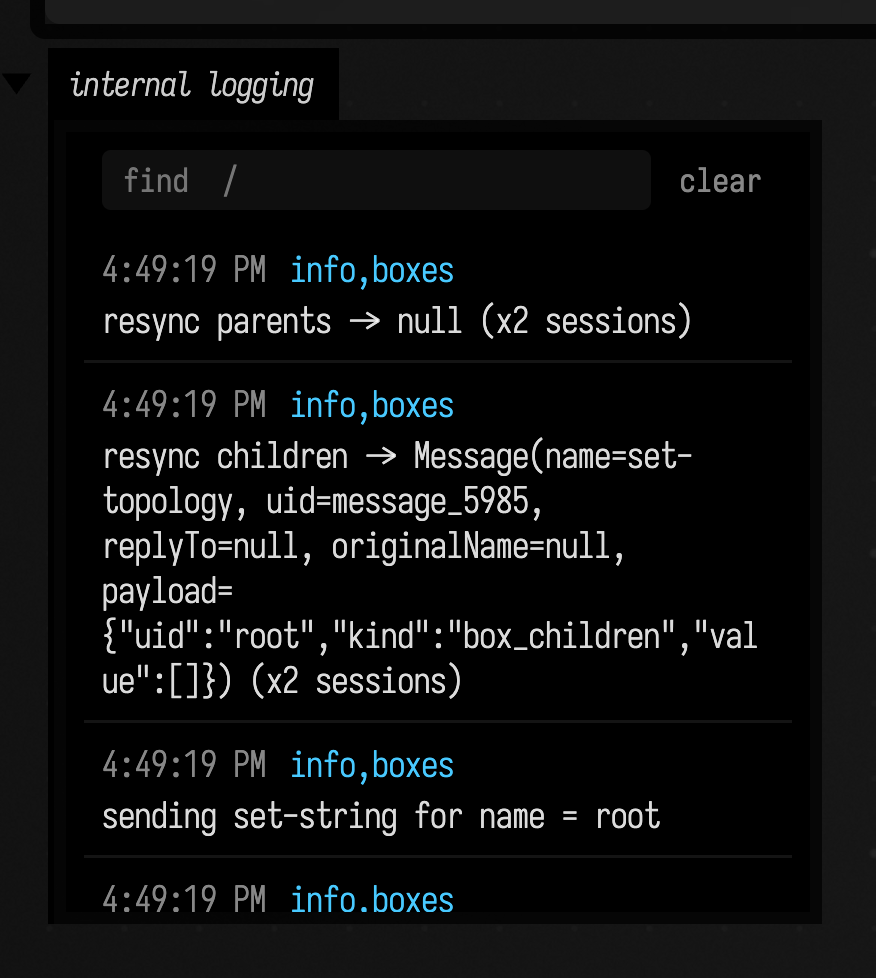
Visualizers has more on tree and column.
'printing' (editable) geometry
Field has extensive support for generating 2D and 3D geometry and adding this to the canvas, essentially by displaying bundles of FLine objects. You can see fline_examples for a lot more information. But here's a taste:
:::static
val petal = fline {
    moveTo(0, -120)
    cubicTo(90, -100, 140, -20, 0, 120)
    cubicTo(-140, -20, -90, -100, 0, -120)
    close()
    filled = true
    stroked = true
    thickness = 2.5
    color = vec(0.95, 0.42, 0.6, 0.34)
}

val stem = fline {
    moveTo(0, 120)
    cubicTo(10, 180, -20, 230, 0, 300)
    thickness = 5.0
    color = vec(0.45, 0.95, 0.62, 1.0)
}

lines([petal, stem], w = 420.0, h = 420.0, fitToSize = true, editable = true)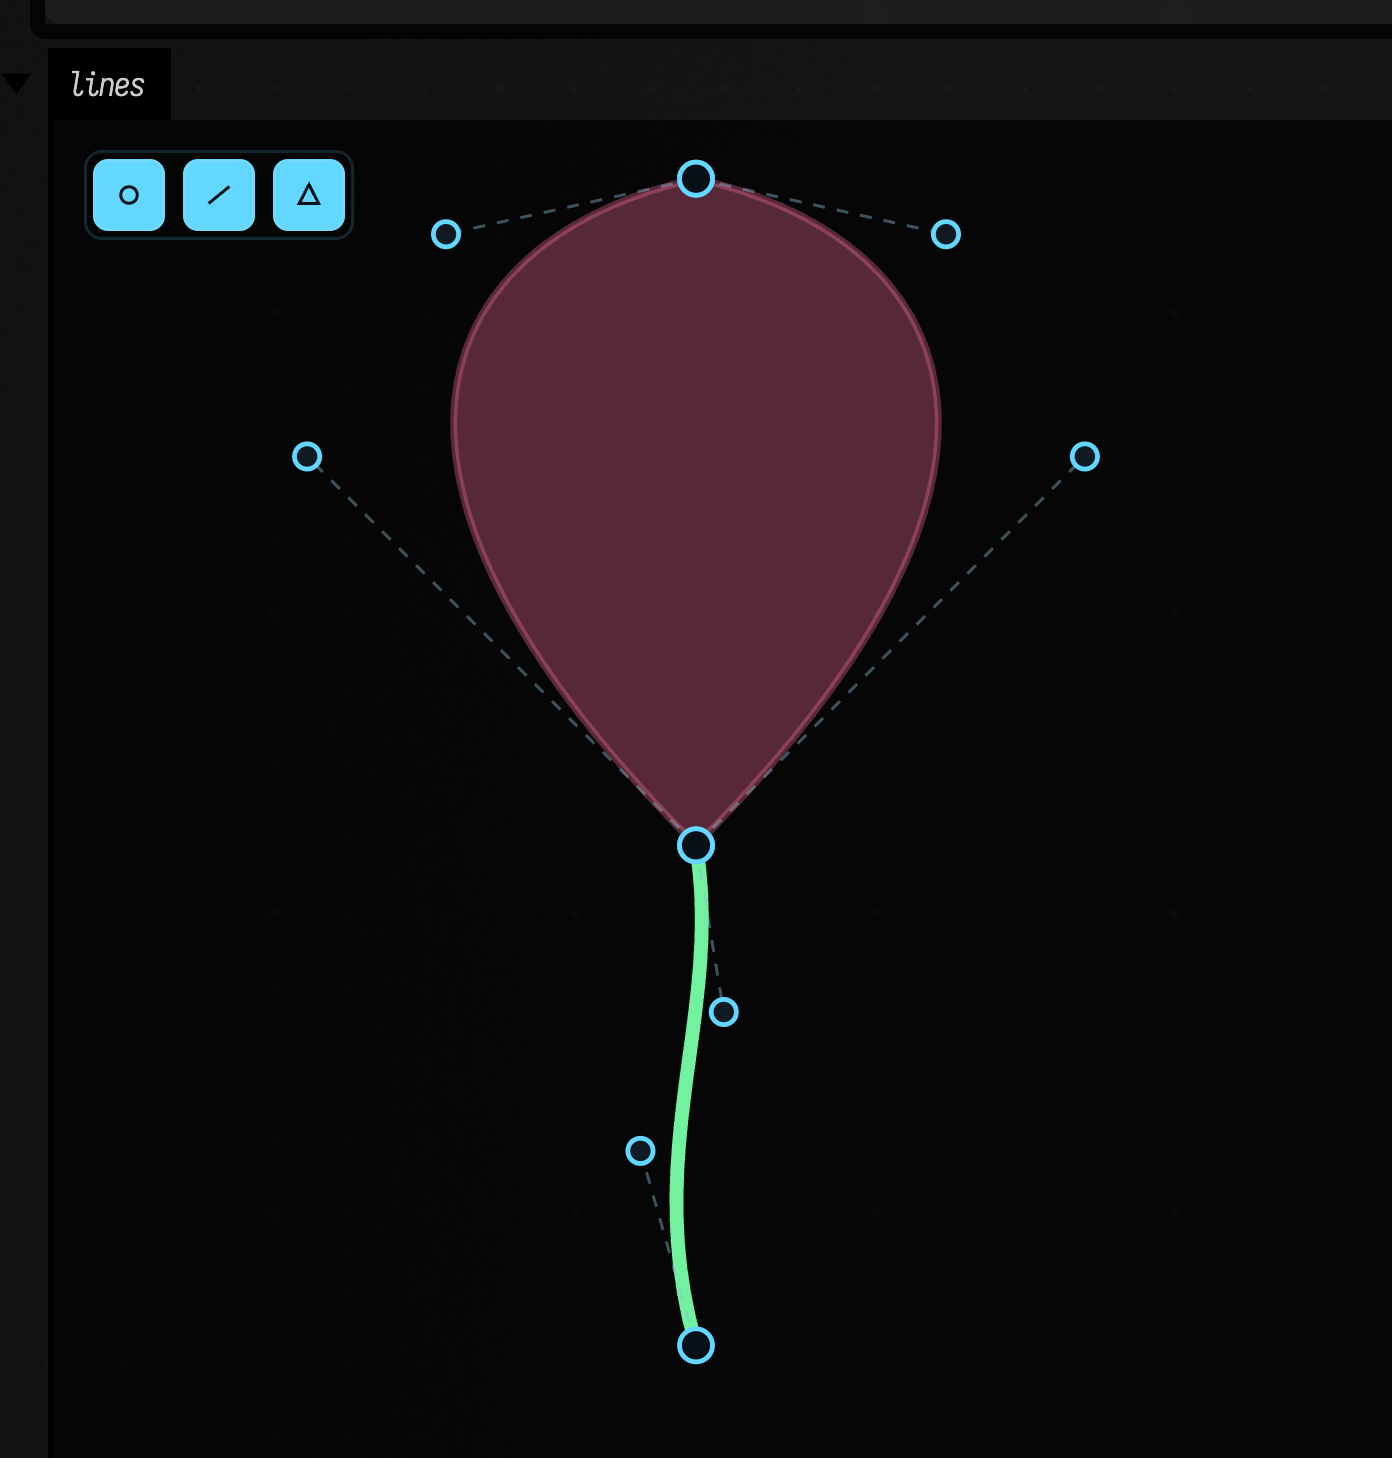
It's important to note that you're not just editing a copy of the FLine. This editor mutates the actual FLine object that you passed in — so this is a way of interacting with code, not just witnessing its effects.
3D (and indeed 3D editing) works as well:
See fline_examples for much more.
"Printing" chunks of UI
Sliders, checkboxes, colour pickers and other input controls can be 'printed' into a box's output area too; Visualizers shows how.
Hints as you type
As the cursor moves around the editor, Field shows a hint built from types and current values: what you might type next, the parameters of the function you are in, and the value a variable has right now:
Decorating the editor
Box code can also extend and decorate the text editor itself. In the video below, a musical pattern written in the editor is drawn over as it plays, much as in Strudel, though the language is different:
Other output-area-related things
You can remove output areas you no longer want to see by alt/option-clicking their disclosure triangles; while alt/option is held over one, the triangle turns into a red ✕.
Programmatic control over output areas is through these functions (see Box Output for what each one does, and for the other mouse gestures):
displayOpen("foo")
displayClose("foo")
displayClear("foo")
displayClearAll()
And output areas without content are handy — progress bars are useful for showing you how a box is getting through its processing:
var z = 0
loop {
    z += 1
    progressBar("progress", (z % 10000) / 10000.0)
}
This yields (when launched):
progressBar is the low-level primitive — you drive it and you clear it. For the common cases, there are friendlier helpers that manage the bar for you and clean up after themselves:
// Wrap any iterable / range / count — the bar tracks the loop and removes itself at the end:
for (i in tqdm(0 until 10000)) {
    // ...heavy work...
}

// For routines: report a fraction (with a tqdm-style rate + ETA)...
withProgress("solving") { p ->
    repeat(steps) { i -> /* ...work... */
        p.update(i + 1L, steps.toLong())
    }
}

// ...or .pulse() when there's no known total (an indeterminate "still working" bar):
val p = progressReporter("reducing")
while (notDone()) {
    stepOnce()
    p.pulse()
}
p.finish()
A bar appears only for work that takes longer than about two seconds, and removes itself shortly after the work finishes. Some long-running library routines show one without you asking.
Turn them all off with ProgressBars.enabled = false, or tune ProgressBars.showDelayMillis (the grace period) and ProgressBars.lingerMillis (how long a completed bar sticks around).
AI support
Obviously, it's 2026, so it gets its own page.
Simply put, we no longer expect to sit and write code without AI assistance, and the amount of fun that we can have is partly gated by the number of ways we can interact alongside AI and our code. Field has lots of ways of doing this. We can include agents inside our documents, we can build tools for them, they can inspect, write, compile, execute, screenshot, traverse data structures, fork, rewind, launch, harvest and ask for help. We've launched weeks-long Field processes that build, monitor and reap results from 200 other Field documents.
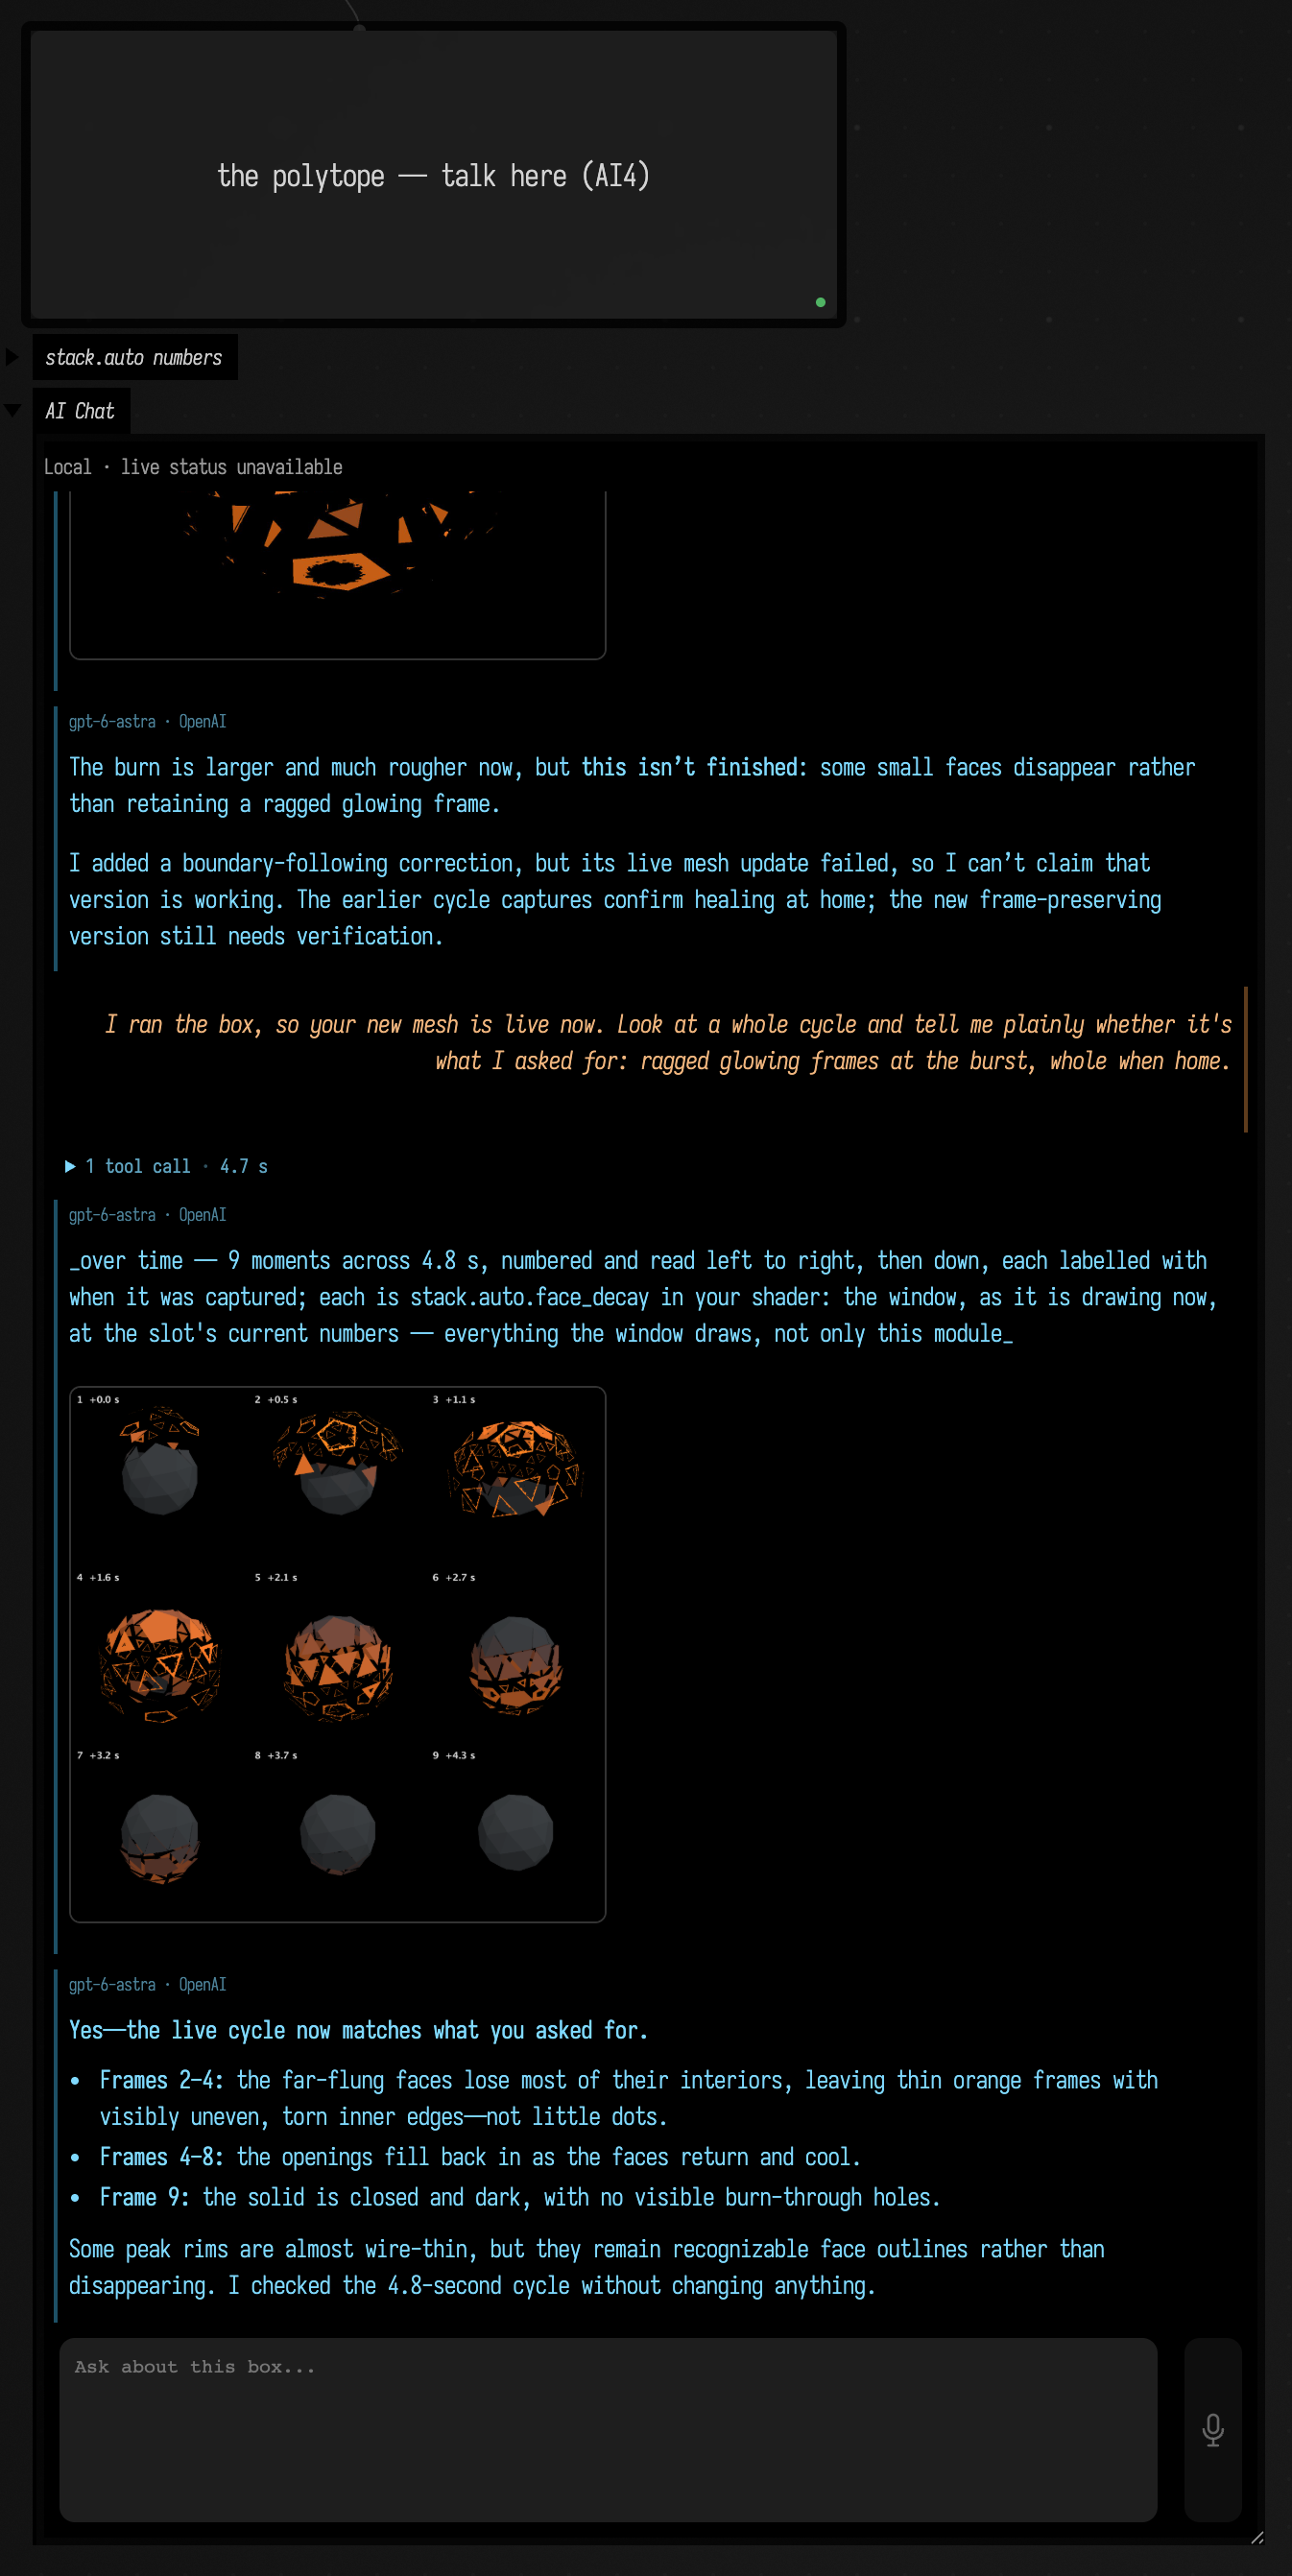
In Field you can talk code and data structures into existence. Below, a polytope's vertex and fragment shaders each have a small StackSL program in them; six turns of chat made the faces burst outward in a wave and burn out to ragged glowing frames, and in its last reply the model is checking nine real frames of the window before saying yes. That whole conversation, step by step, is Talking to the StackSL in your shader. The same thing works for a function, a shader in a window of its own and an animated RectSL scene.
How this documentation is made
This documentation is part of the agents' search context and Field's test system, and is mostly AI-generated. Almost every screenshot under a piece of code is produced by running that code, and reproduced when the codebase changes. Agents extend and revise the prose nightly; see How Field is built.
Multi-language, multi-paradigm
Field's primary language for live coding is Kotlin, which we've found to be expressive and fun (but by no means flawless). We've added a compile-time macro system to it for extra flexibility and joy, and the graphics system does some GLSL-driven code generation. All in all, it's working quite well. Being on the JVM also gives us access to some other options.
Kotlin, with macros
To cure some of the challenges of deploying Kotlin in a live-coding context we've gently extended the language with a macro system. A handful of things that look like function calls in a Kotlin box are really macros, rewritten before the compiler sees them. You have met one already: print knows the line it sits on. prop and the graphics system's moduleHere { } are macros too; Running code in a box goes through them in detail.
This isn't just internal gymnastics: you can write your own macros. A rewrite { } block in a box is a rule over the shape of your source:
rewrite { x: Expr ->
    from { neg(x) }
    to { -x }
}

neg(10) // →  -10
Rules can have guards, bind runs of arguments, run Kotlin at expansion time, and are inherited by child boxes; Rewriting your own syntax is the whole story.
Python
Via the JEP project, Python works splendidly in Field — who among us doesn't need some PyTorch in-process every so often? Python in a box is the full account. Autocompletion is driven by Jedi, and Field's central concept of launching (and stopping) boxes is supported by a custom async runner.
This means, in effect, that you can live code things like OpenCV and Torch with Jupyter-level autocomplete and Field-level AI support. We'd like Field to be good enough to end some people's use of Jupyter. Thanks to JEP, interoperation between NumPy and Field's memory buffers is perfectly reasonable. And code like this:
:::static
from afield.lang.python import PythonInterface

box = PythonInterface.thisBox
box.setName("property access from boxes")

box.setPropertyRaw("foo", 10, False)
This works as you'd expect. We remain ever-so-slightly sketched out by Python's threading model's interaction with ours, in particular its obvious incompatibilities with Kotlin's coroutines — so there may still be bugs here.
Notebook interop (.ipynb)
Because we'd like Field to be an alternative to Jupyter, the notebook loop goes both ways. Drag a .ipynb onto the canvas and choose Import as Python cells: a fresh "python root" box is created, each code cell becomes a Python cell wired under it, and each Markdown/raw cell becomes a notes box indented alongside the code so the prose reads inline. To go the other way, select the Python-root box and run Export notebook (.ipynb) from the command palette (or send the export-ipynb RPC with the box's uid): Field walks the column top-to-bottom and writes a valid nbformat-4 notebook — Python cells back out as code cells, notes boxes back out as markdown cells. Round-tripping (import → edit → export → re-import) preserves cell count, types, and source text.
Clojure
Clojure is another wonderful JVM language that we have a lot of respect for:
:::static
;; Each line of output lands beside the form that made it.
(println "clojure" (clojure-version))

(def modules {:app [:ui :store], :ui [:util], :store [:util]})

(println (count (mapcat val modules)) "edges")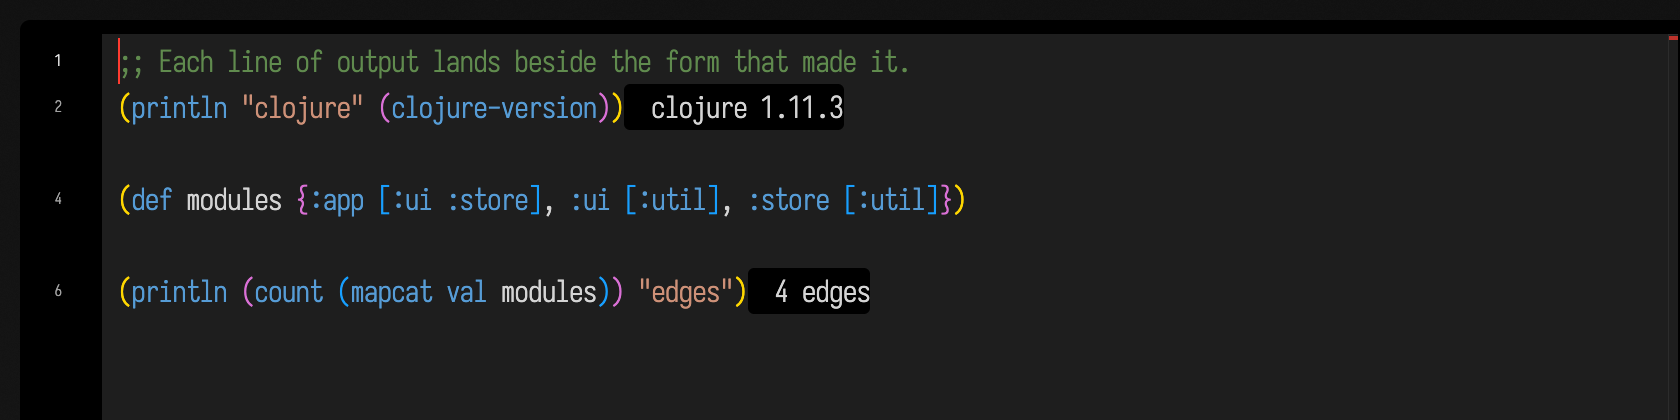
Same idea as Python, one runtime further in: Clojure 1.11 is a JVM language, so a Clojure box and
a Kotlin box are two objects in one process with nothing between them. (.getChildren (box)) walks
the document, an FLine you build in Clojure is the same FLine Field's renderer draws, and
returning an animation launches it by the same rule a Kotlin box follows. Printed output lands
beside the form that printed it, and so does the exception when a form throws.
And yes, we have rainbow parens. Clojure in a box is the whole story.
Lua
Lua, the scripting language inside norns, Renoise, Reaper and LÖVE, runs in a box through LuaJIT, loaded into Field's own process. A Lua box prints, draws lines, reads and writes box properties, makes sliders, and, launched, gets an update(dt) every frame. Lua in a Box is the full account.
RemoteJS
A JavaScript box runs in a browser tab that Field keeps connected, which can sit right on the canvas
beside your code. print and console.log land beside their lines, errors are marked where they
happened, launch loops stop when you press Stop, and display, slider and checkbox fill the
box's outputs the way they do in Kotlin. The tab is a Three.js scene, so an FLine assigned into
stage is drawn there. JavaScript in a browser tab is the whole story, and the same
head on a phone or headset is RemoteJS and WebXR.
ForthField & a-Nano
Primarily for teaching purposes, a bizarrely useful live-coding dialect of Forth: stack words, dictionary inspection, recursion, return-stack tricks, helpful diagnostics, Field-native visualization, and full JVM interop:
a-Nano is a little teaching assembly language with completely over-the-top integrated visualizers. We're using (a GPU-accelerated) version of this language for a little ALife research — small enough to run Core Wars-style simulations on GPUs.
Spreadsheets!
The most successful and important programming paradigm of all time — the spreadsheet — has deep integration into Field.
Supported features include integration with other boxes' variables — changing a dependent variable inside a box magically causes an auto-update sweep of the spreadsheet (next animation frame). And a complete, understanding type system: while the expression language for the spreadsheet is Kotlin, there's a very carefully wrapped pseudo-numeric type that auto-promotes gleefully, understanding scalars, scalars with physical units, Field's linear algebra types, and even Field's FLine. If you ever wanted a spreadsheet that could do formulae with drawings, this is it.
Spreadsheets in a Box shows how to make one, what formulas can do, and the editing keys.
Actors / Message-passing
We can think about 'the box' as taking on the role of "an actor". This marries very well with animation in general (the choreography of things over time) and Kotlin's flexible coroutine system. Given two boxes:
:::static
onMessage<Vec2> {
    reply(payload.lengthSquared())
}
:::static
onMessage<Vec3> {
100.alphas {
/// animate from payload up to something sle
frame()
}
reply(payload.lengthSquared() + 10) // reply
}We can start sending messages around. Messages propagate upward until they find a box that has an onMessage<T> of the correct type.
Where am I? How did I get here?
Field keeps document backups as you work. The history view lets you inspect those saved versions and restore an earlier state.
You can open history in two ways:
- run
Show Document Historyfrom the command palette - or open
/history?file=<document-name>directly on the Field server
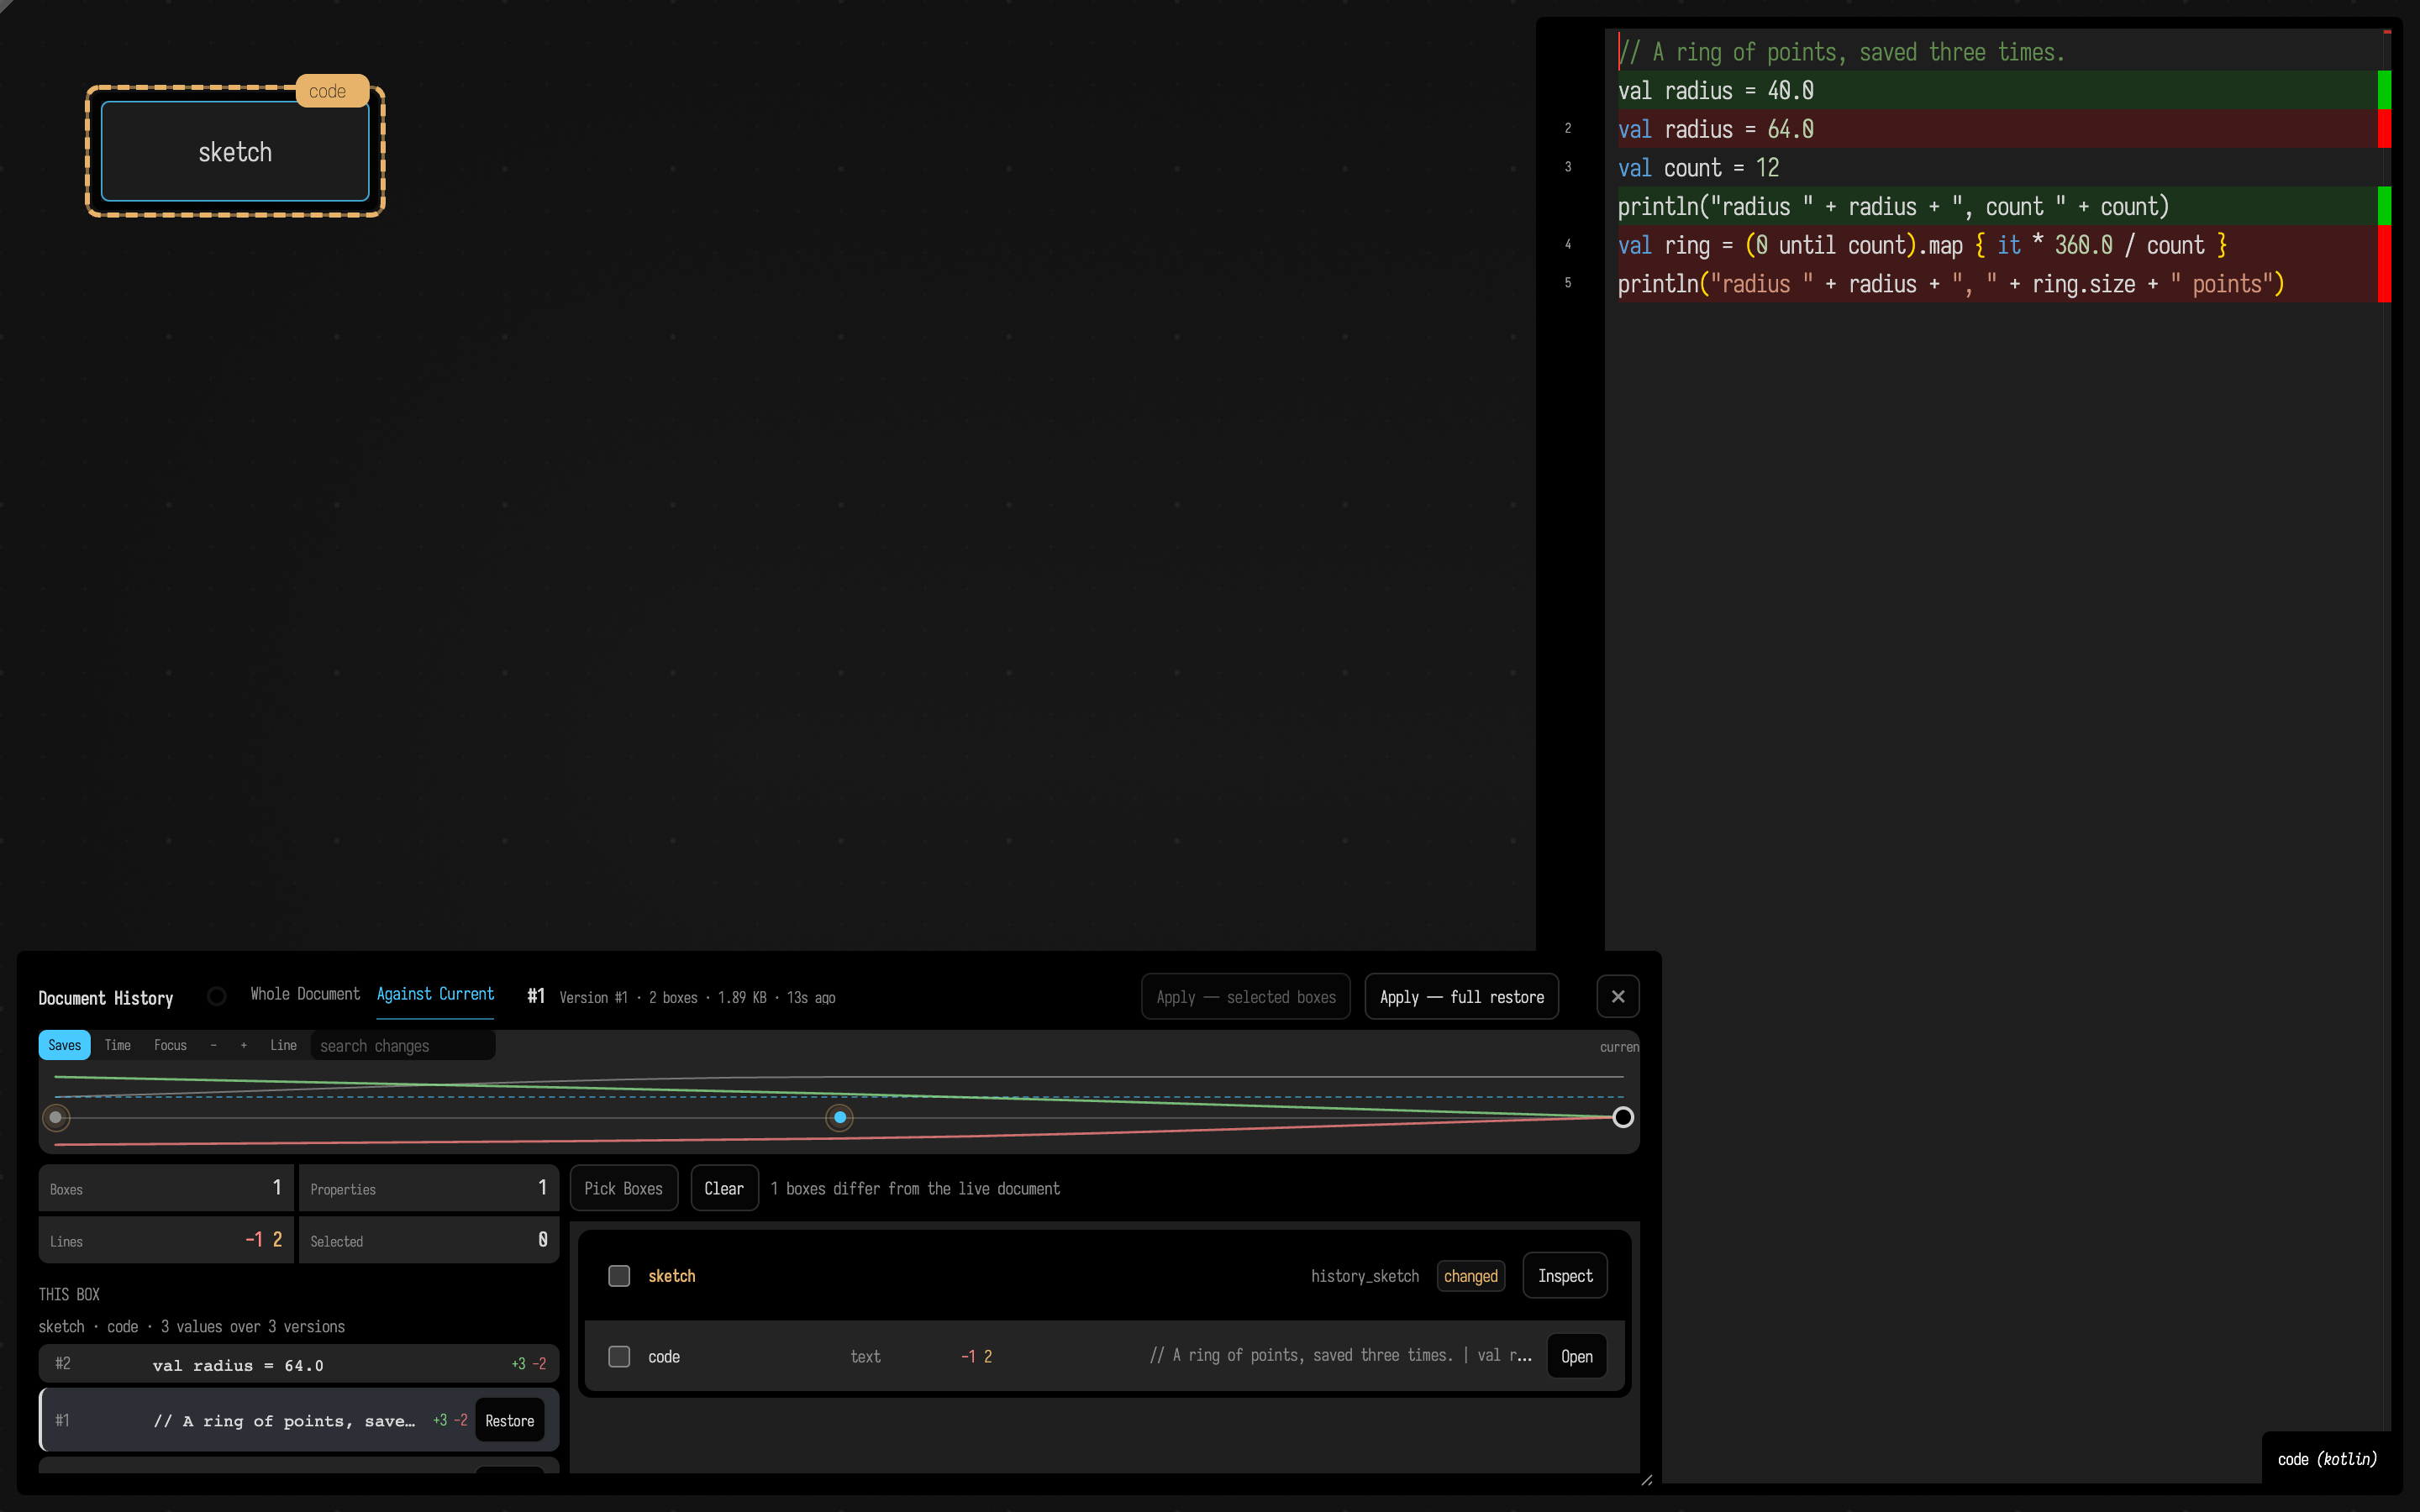
Along the top is a timeline of every saved version, which you can scrub and view by save or by real time. You can compare each version against the current document or against the one before it, narrow everything to the selected box, search for the versions that touched a piece of text, blame a line, and name a version so you can find it again. Restoring can take the whole document back or cherry-pick just the boxes you select, and every restore is itself recorded, so it can be undone. Document History walks through all of it, and Code History scrubs a single line back through its versions without leaving the editor.
Documentation browser
In some weird inception move, Field has a documentation browser (Browse Documentation or ctrl/command-/):
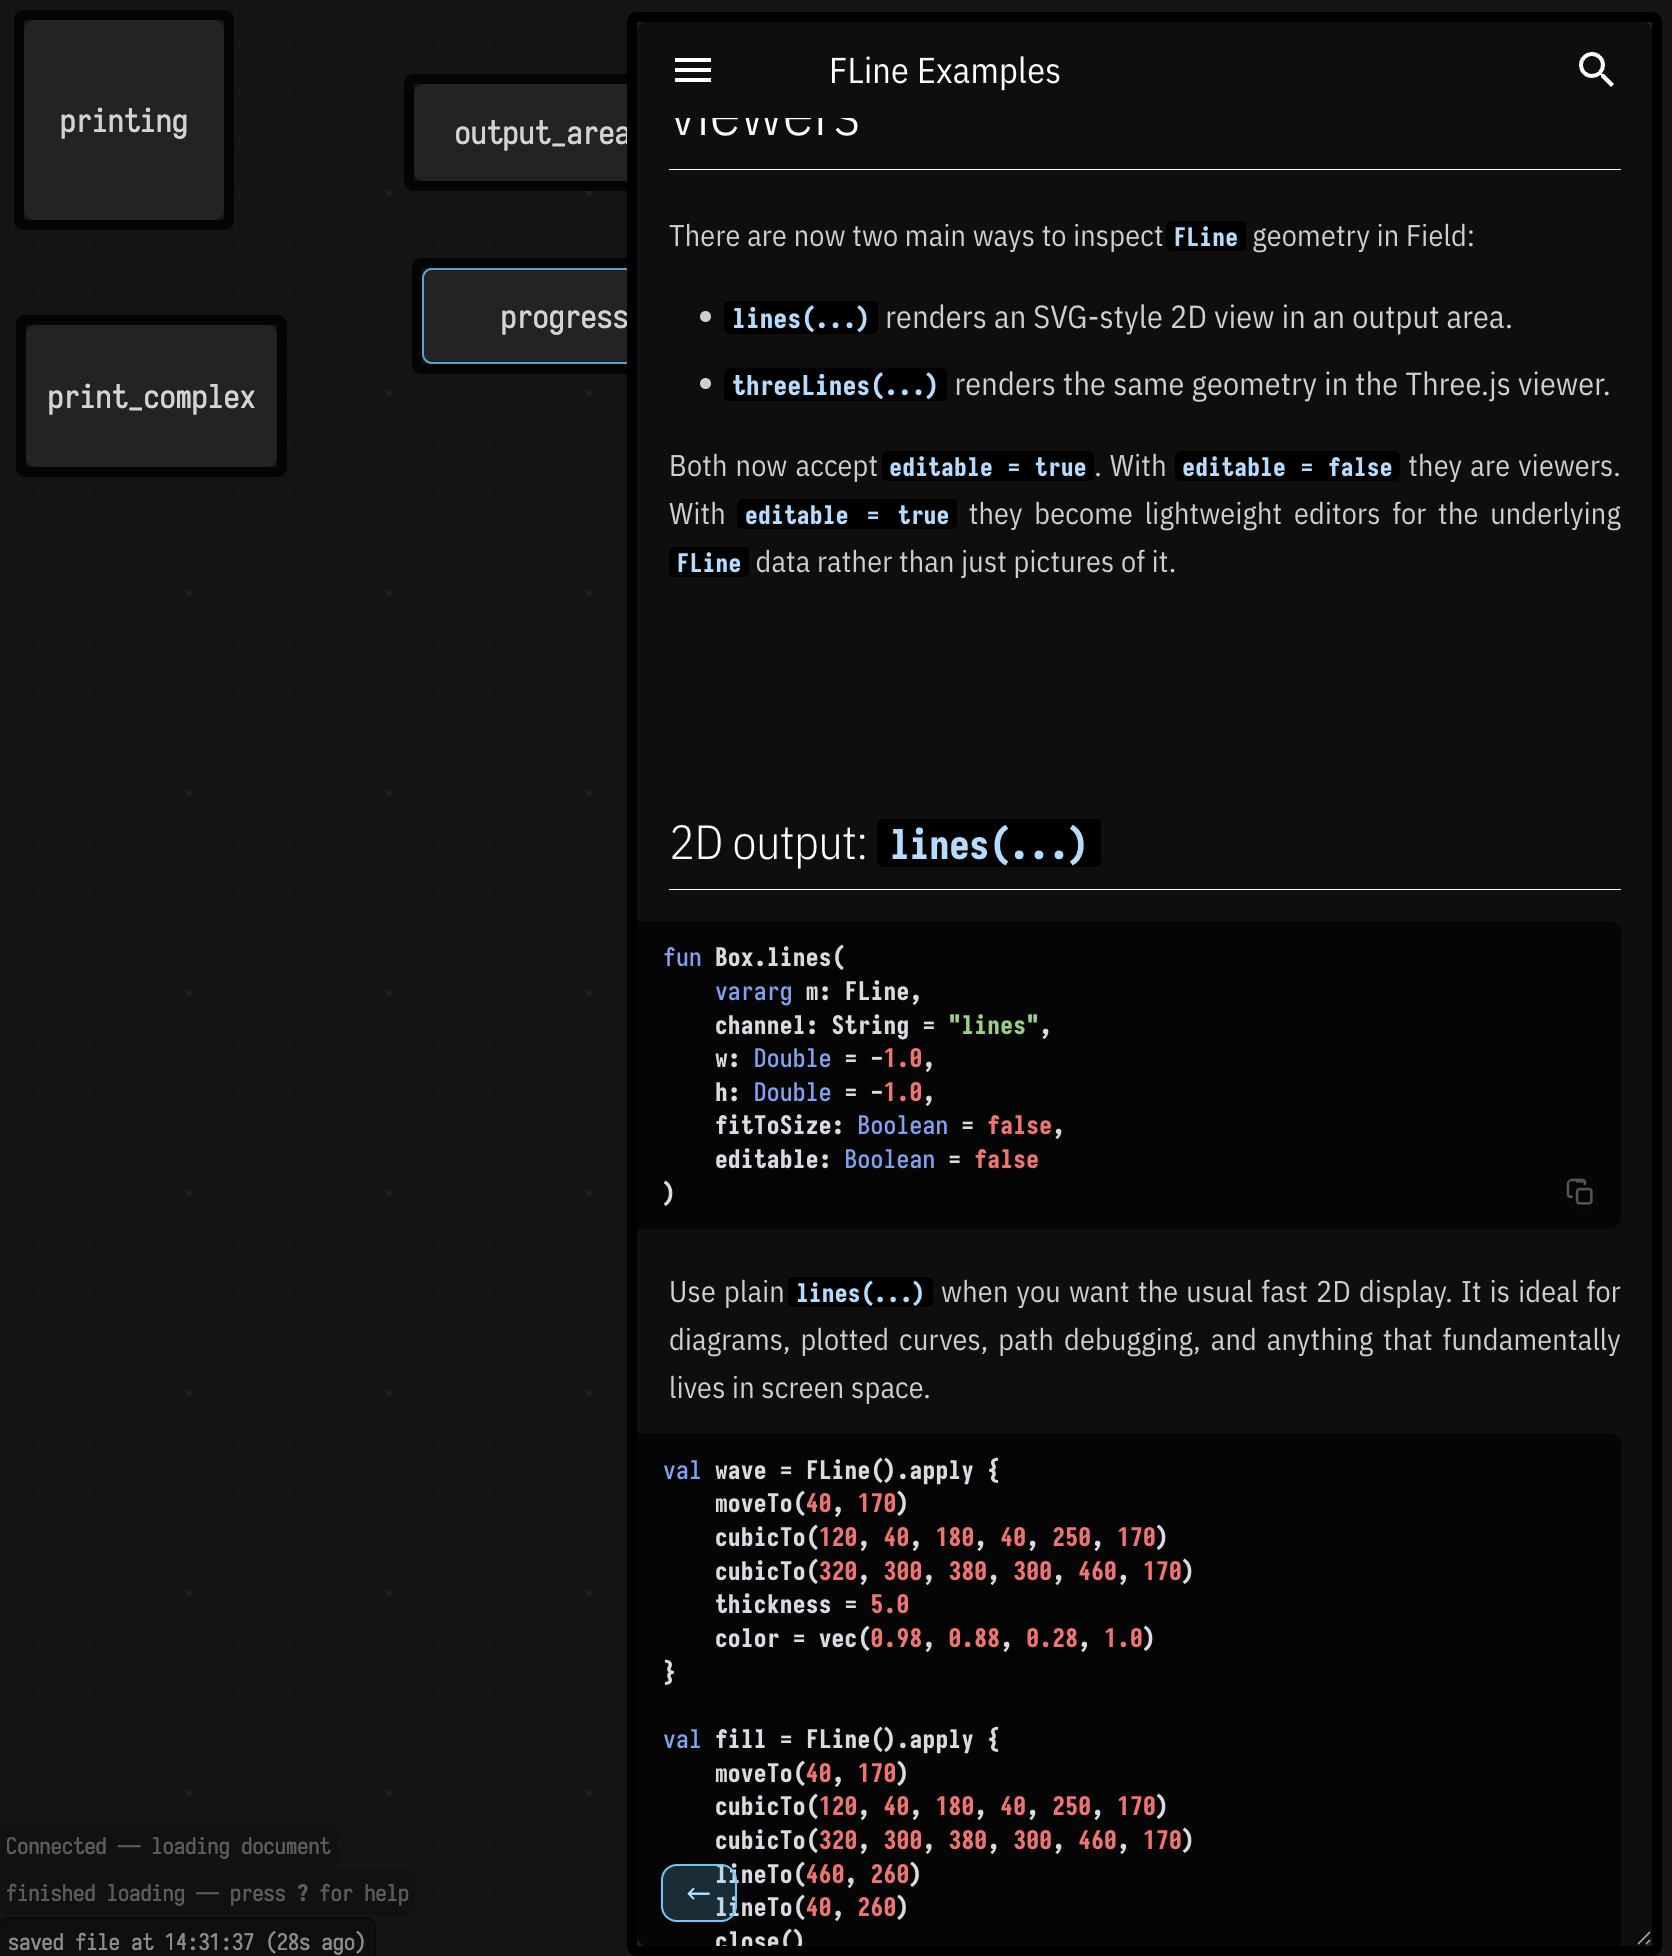
Press that cyan arrow to get back to the text editor.
Beside the page is a DOC NOTES panel. Select a sentence, press Ctrl+Shift+A and say what's wrong with it; your note joins a queue that agents, one per page, work through: they revise the Markdown behind the note and leave a record of what they did, or a question for you. Notes on the Documentation explains the loop.
Presenting with Field
Your talk can be a Field document too. Put Markdown, images, real webpages, YouTube and live Field documents on a separate audience display, with crossfades between slides and simple fade-in builds. When it's time to demonstrate something, run a saved macro or an interactive guide in the document on screen, and edit the code while the audience watches. Slides, CSS themes and shared media stay in ordinary files you can keep in Git.
Long talks get a collapsible outline and incremental search over slide titles and their text, including reveals. Type a phrase, choose a match with the arrow keys, and press Enter to jump there; searching leaves the audience on the current slide until you're ready.
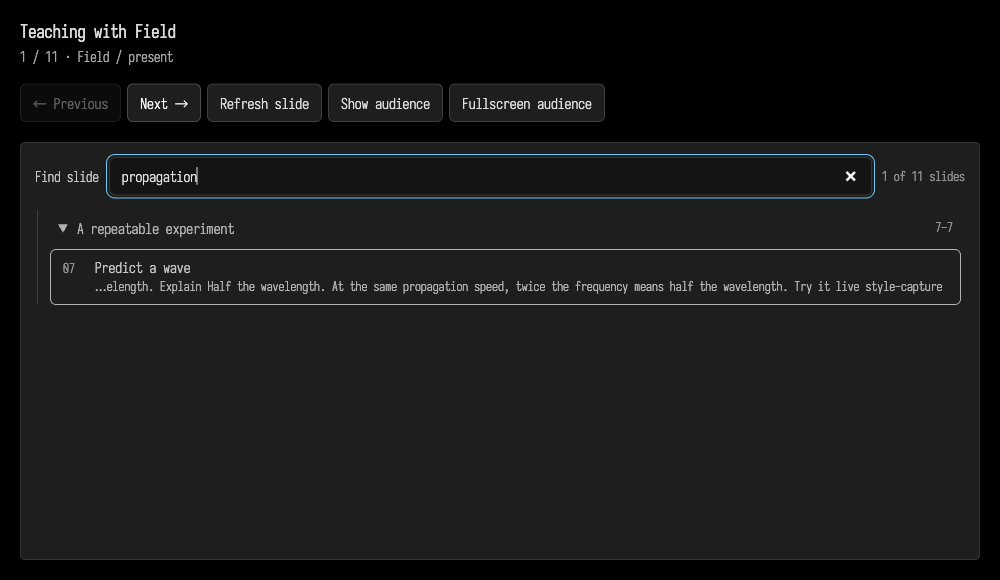
Start with the Presentations kit on Welcome. Presenting with Field walks through making a talk, styling it and teaching from the live material.
Navigating
A few keyboard shortcuts for getting around Field.
ctrl/command-shift-P — pressed in the editor, this brings up the command palette for that box; press it again and you get the command palette for the document as a whole:
Double-tap command/control (command on Mac, control on Windows/Linux) in the editor gives you an affordance that lets you use the cursor keys to switch boxes:
Double-tap shift opens the 'open anything' search box:
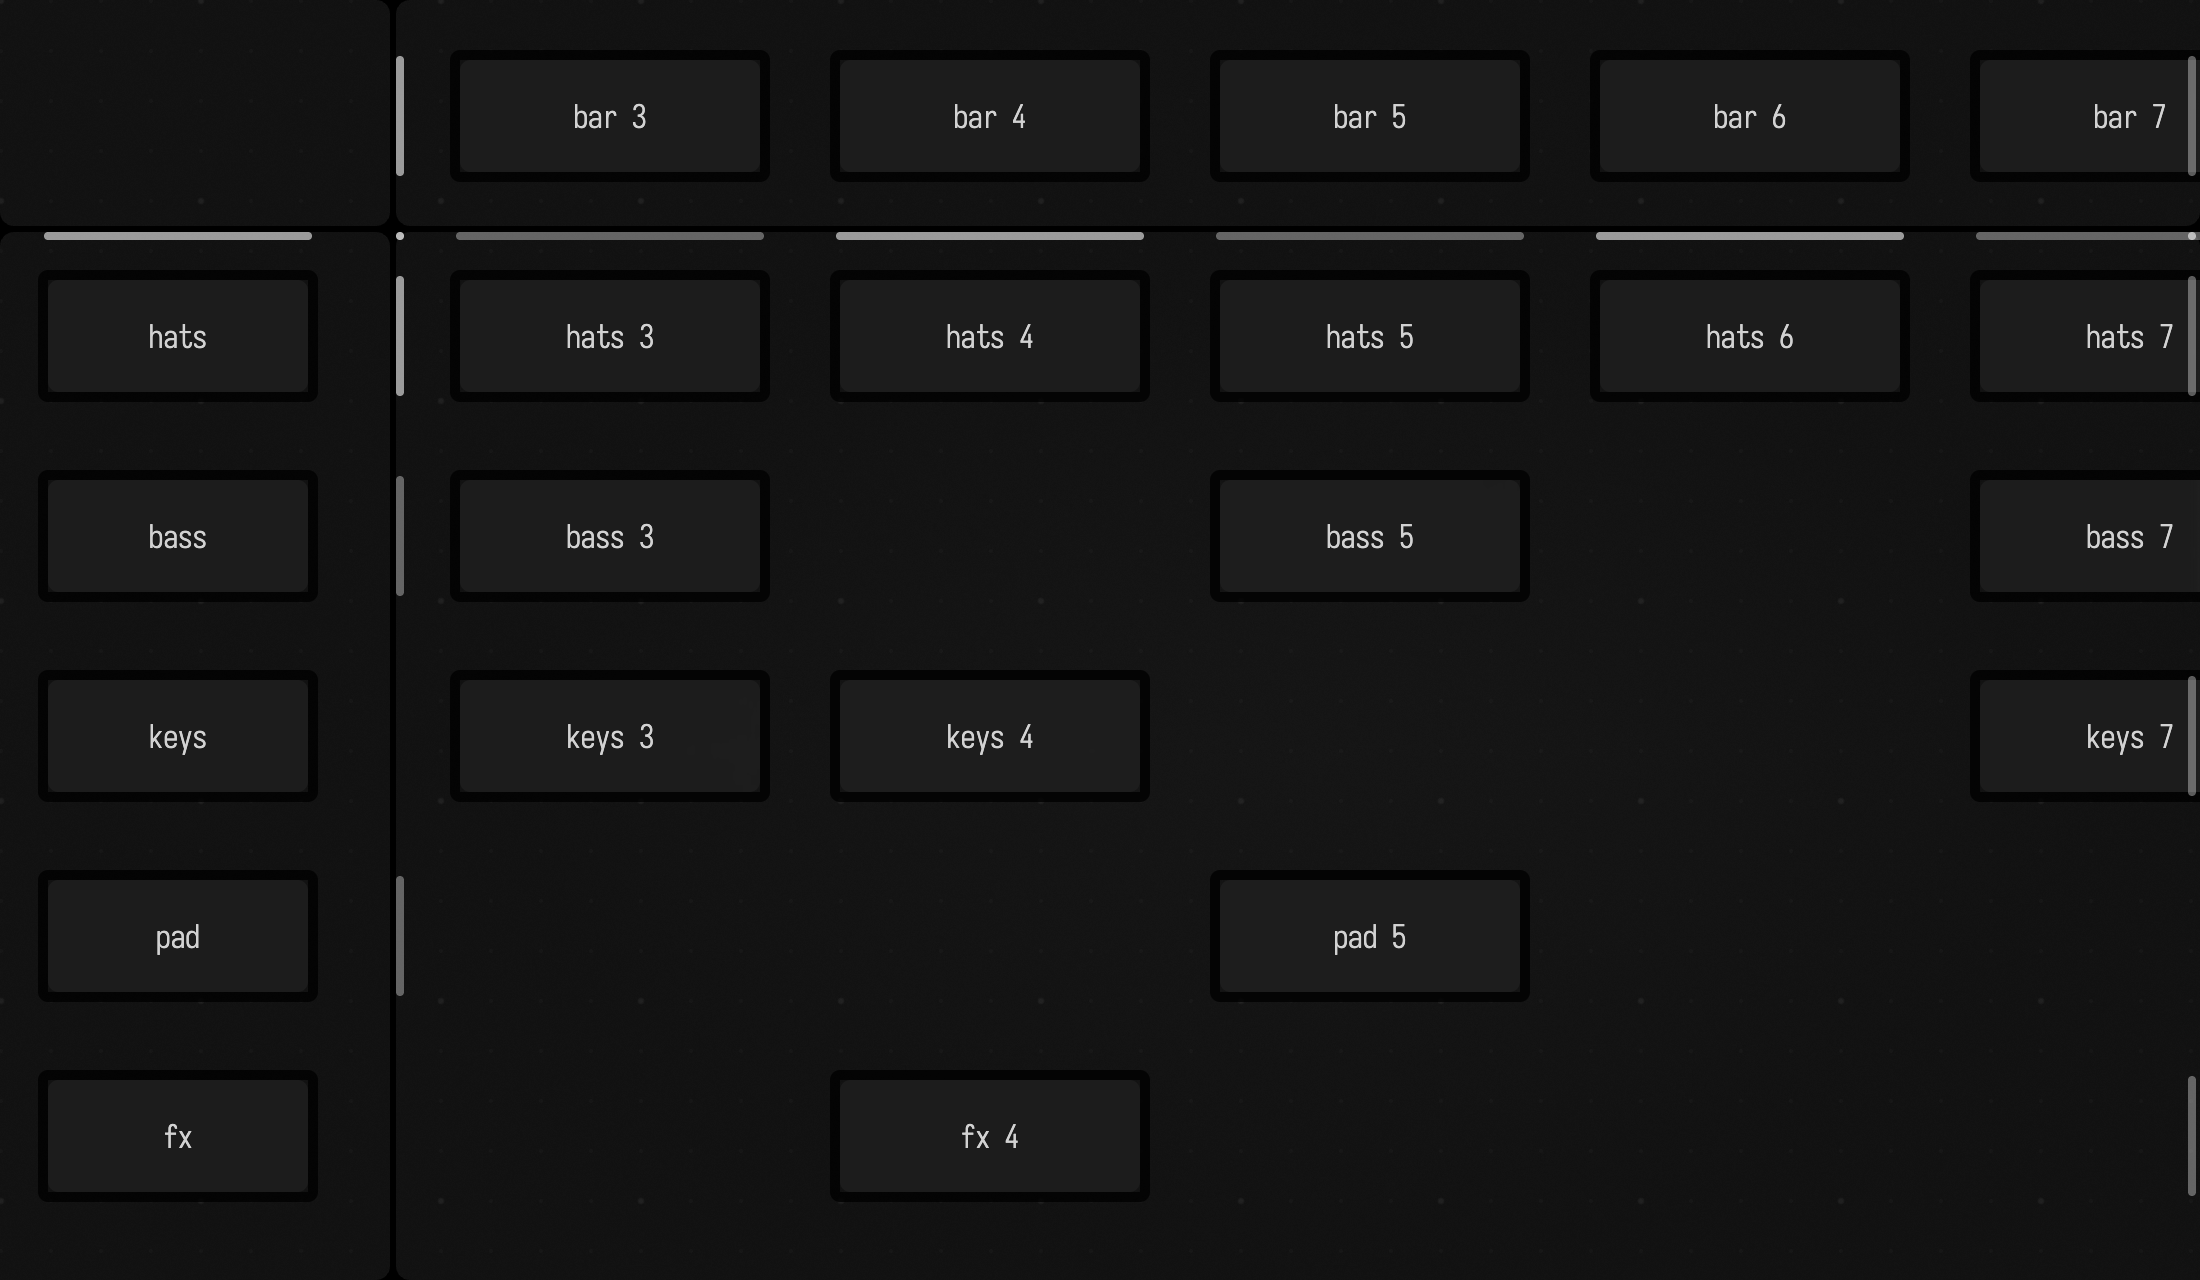
Drag the little grip in the top-left corner of the canvas to split it into panes, like a spreadsheet's split. Panes in a row scroll up and down together and panes in a column scroll side to side together, so a row of headings or a column of labels stays lined up with the boxes it belongs to while you move around the rest. Drag a divider to move it; drag it to the edge to get rid of it. Moving around the canvas has the details.
ctrl/command-f does the Find you'd expect inside the editor; but with the keyboard focused on the whole document, finds over the contents of all of the boxes:
Layers
Field boxes exist in layers, and boxes' visibilities and positions are per layer. Inside a box,
you assign it to layers with layers:
layers = "default,secondLayer"A box that names no layer is on default. alt/option-L (Show Layers Panel in the command palette)
opens the layers panel, which lists every layer some box is on:
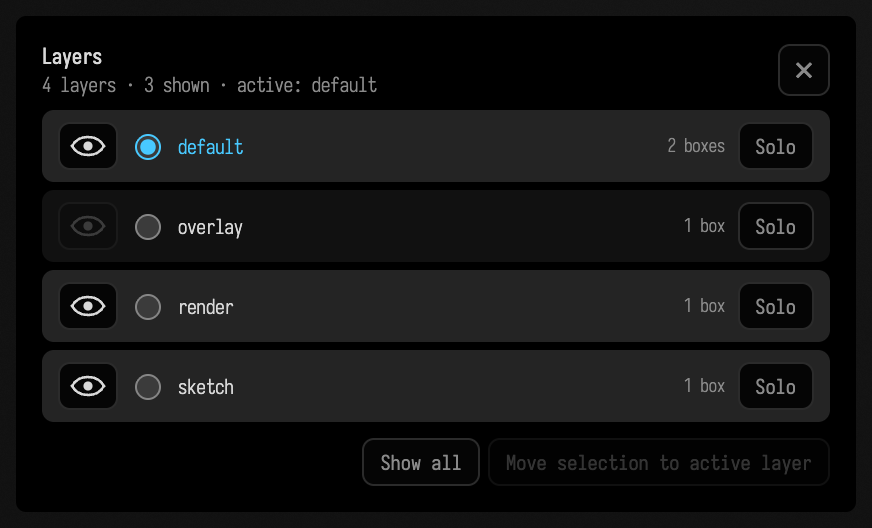
Each row has:
- an eye, which toggles whether the layer's boxes are on the canvas. Shift-click it to show that layer alone. The last visible layer cannot be hidden.
- a radio button for the active layer. The active layer decides which set of frames you are moving when you drag boxes about. Making a layer active also shows it.
- the number of boxes on the layer
- Solo, which shows only this layer and makes it active
Once the drawing has anything on it, it gets a row too, called
drawing, with an eye to show or hide it and a count of its marks. It has no radio button or
Solo, since boxes can't go on it. Show all brings it back with the rest.
Show all brings every layer back, and Move selection to active layer puts the selected boxes
on the active layer, and only on it. alt-] solos the next layer and alt-[ the previous one; the
command palette labels include the target layer names. Show All Layers in the command palette
shows every layer and opens the panel.
The panel floats over the canvas, so hiding a layer never hides it. Layers has the
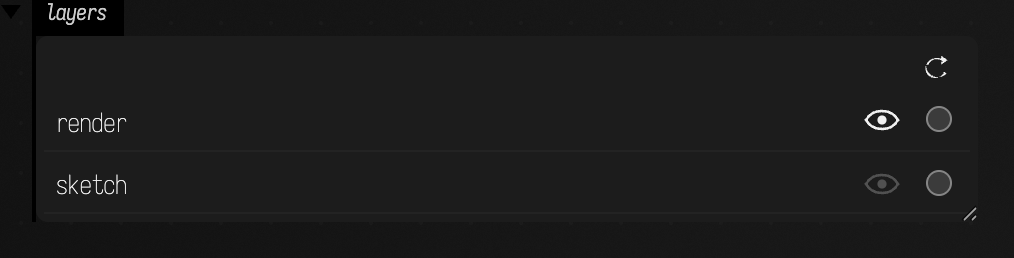
whole story, including a different layout on each layer. showLayers() in a box puts the
same controls in that box's output area instead:
Drawing on the canvas
alt/option-d turns the canvas into a drawing surface: pens, shapes, arrows and text, in Excalidraw's hand-drawn style, right over your boxes. alt/option-d again and you're back with the boxes, and the drawing stays put, panning and zooming along with everything else. Pinch to zoom, by the way; that works everywhere now.
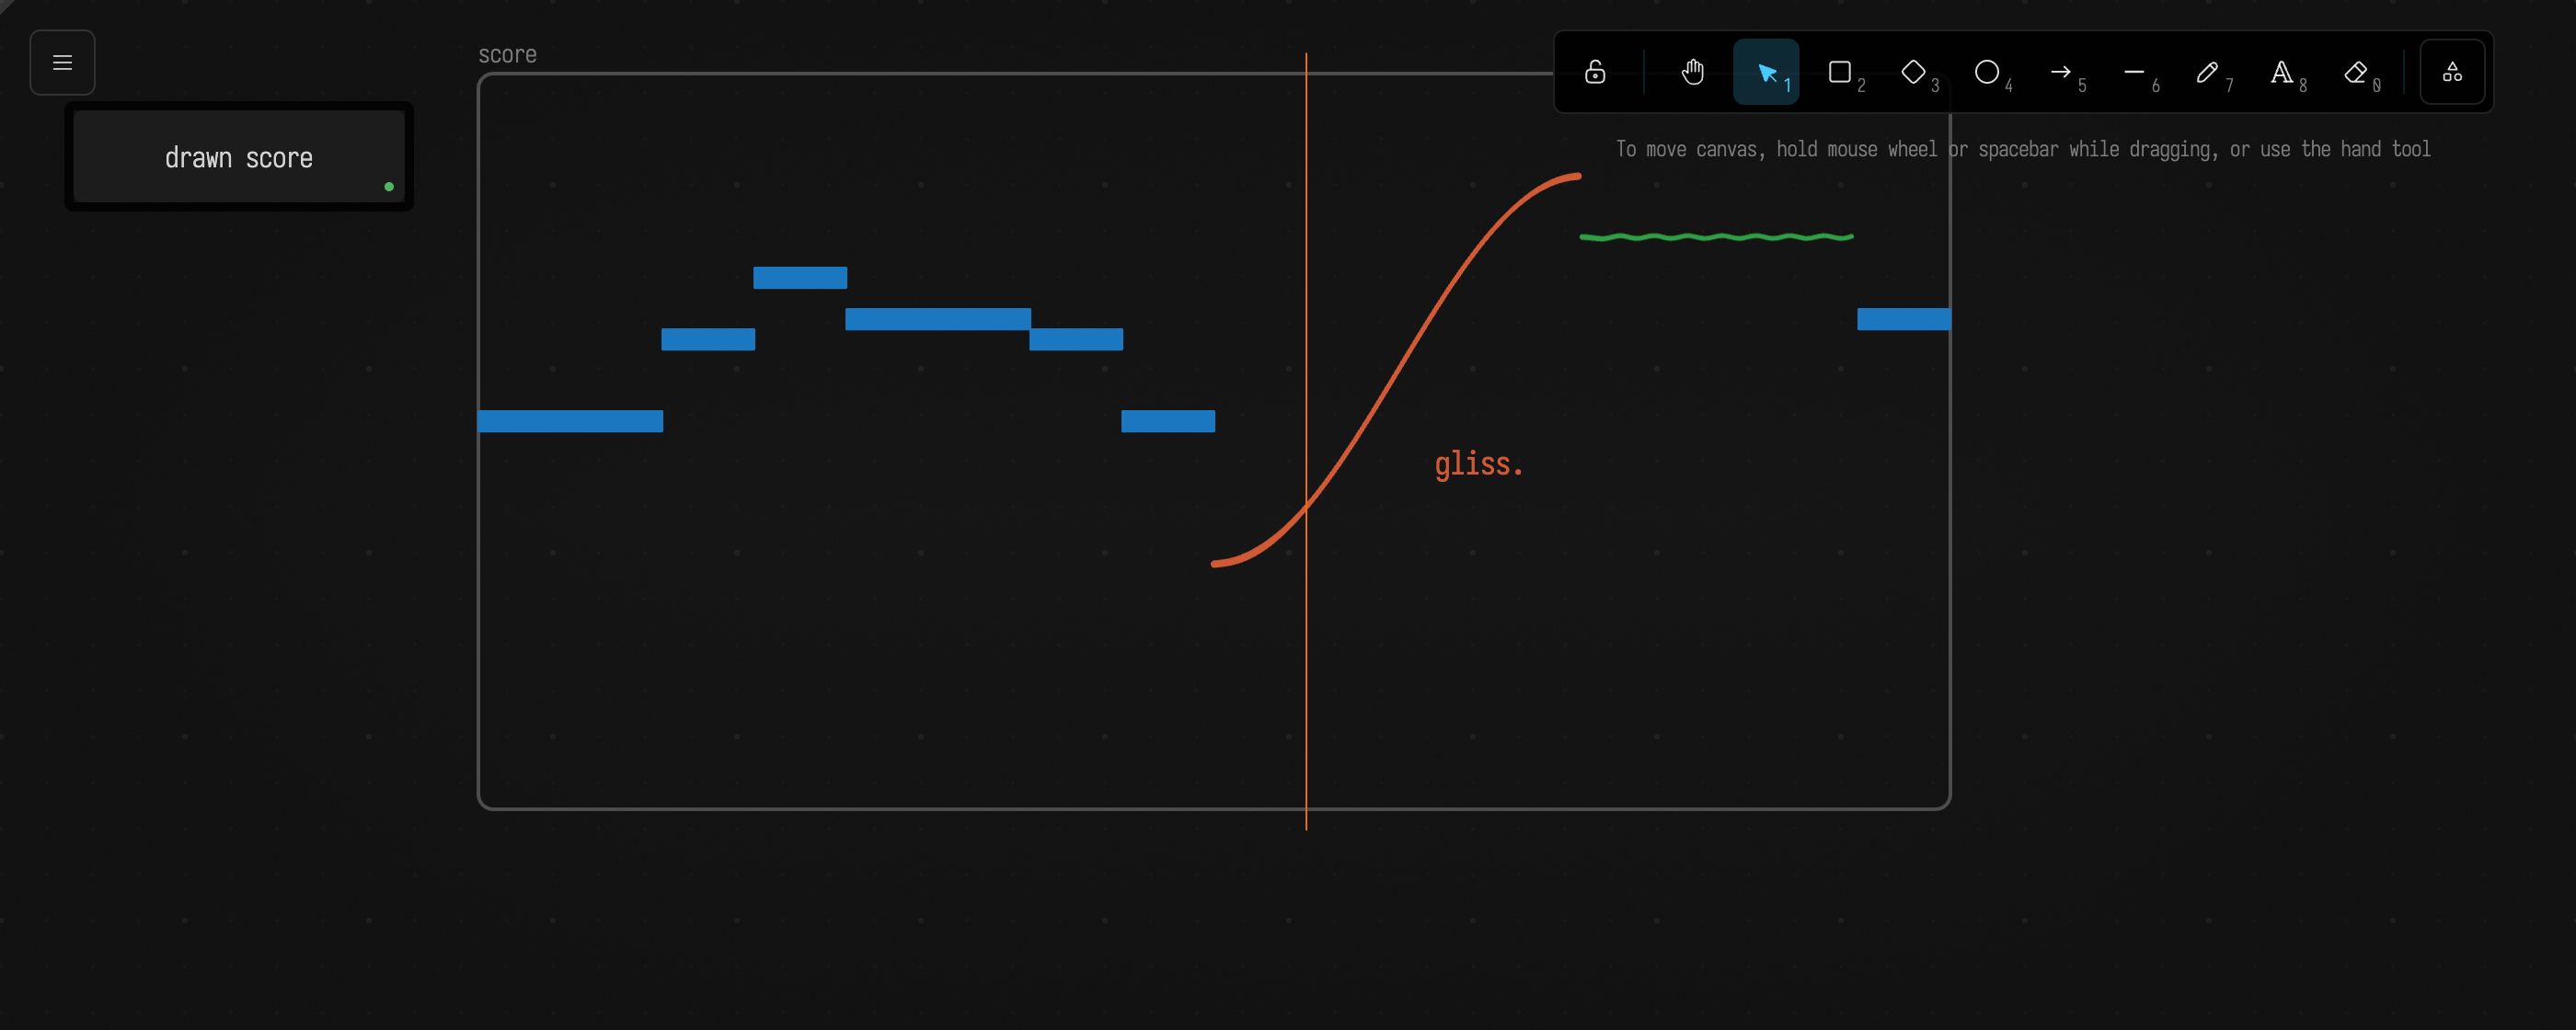
The fun part is that boxes can read the drawing and draw on it. notation { arrow(from = thisBox, to = other) } draws an arrow that follows both boxes around; notation.onStroke { } hears every stroke you make; and notation.space(...) lets you read a region like a score, cutting it at an instant and asking what's there. Here's Cage's Fontana Mix, read by a box:
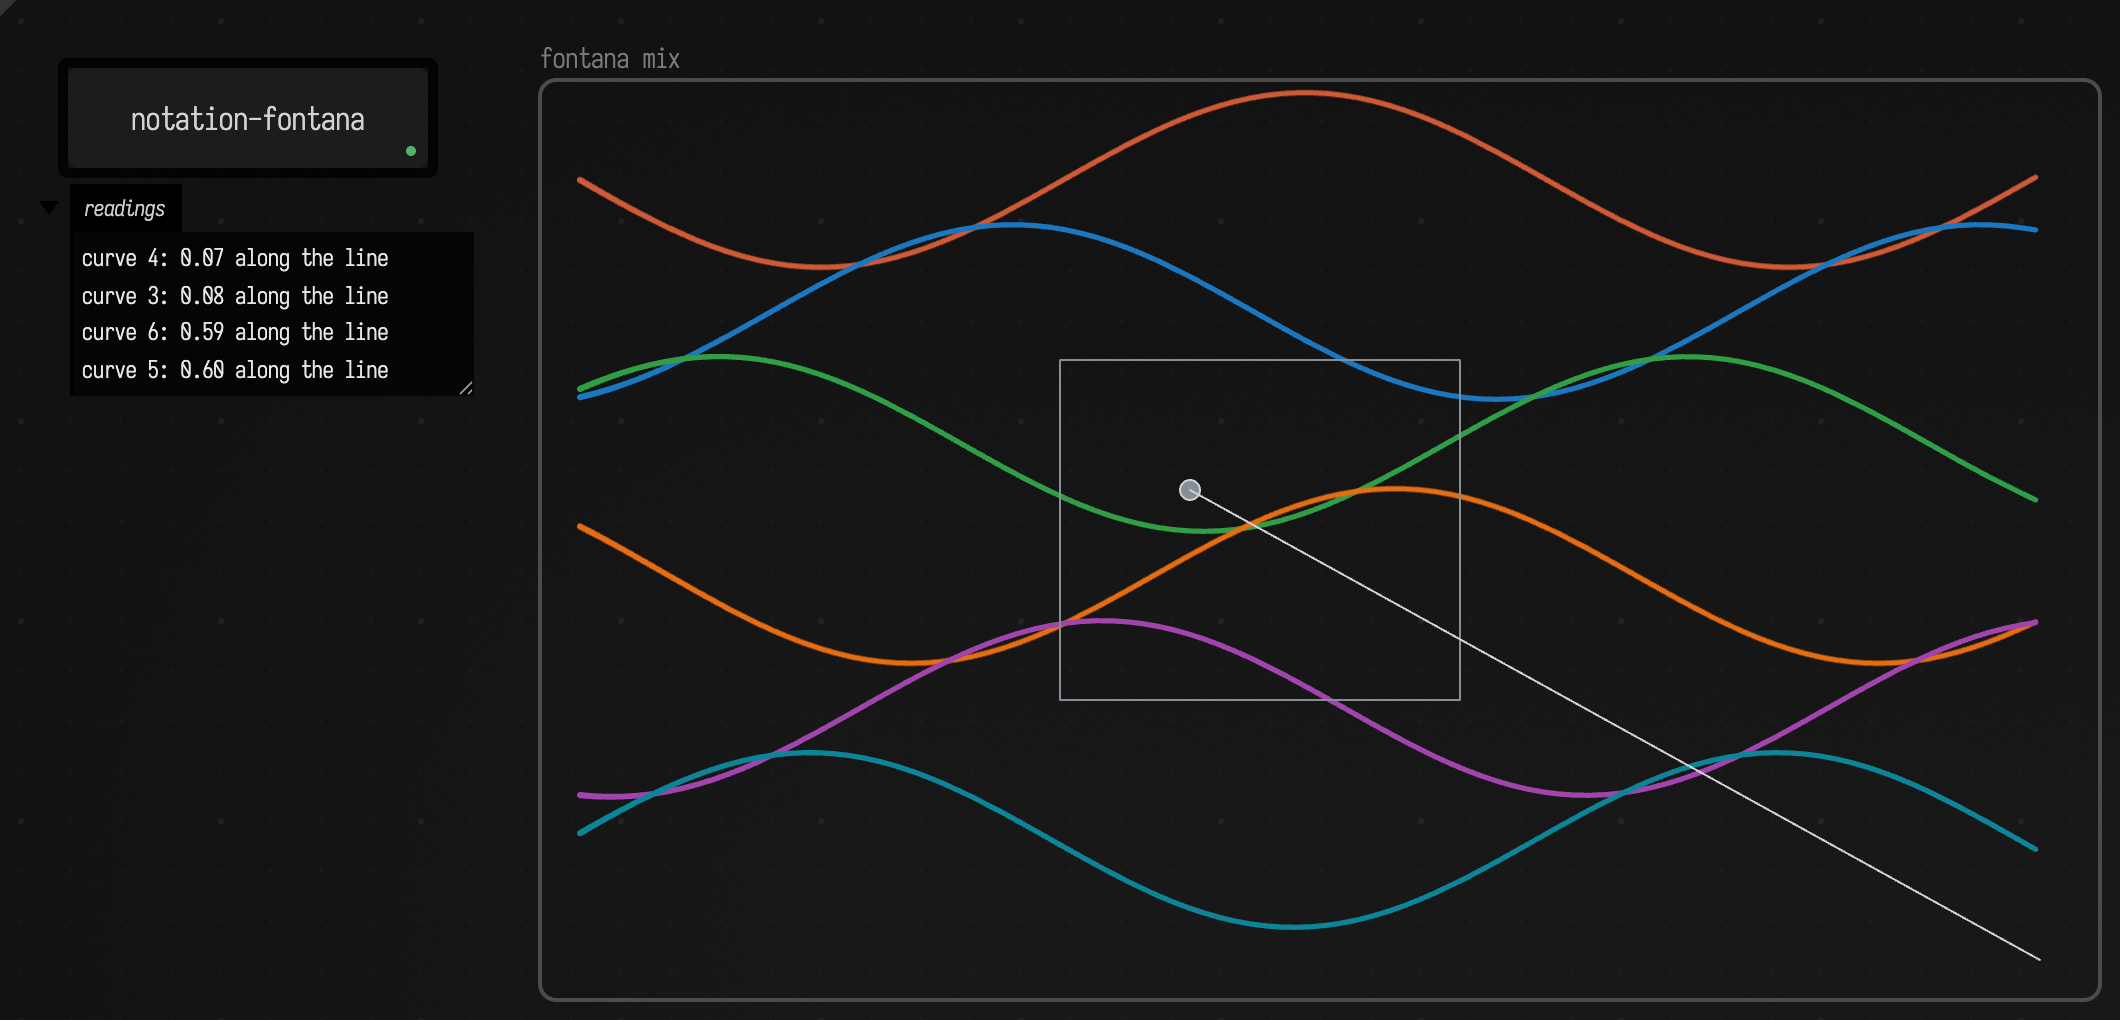
There's a whole page on it: Drawing and Notation.
Keyframes and timelines
One of the reasons that Field even has a 2D infinite canvas for code is so that the space of the boxes can become meaningful. Traditionally, in 'time-goes-from-left-to-right' apps (Premieree, After Effects, DaVinci Resolve, Motion, etc.), there's usually a way to edit a function over time with the mouse. Field has a really very fully featured keyframe editor available for boxes to use:
keyframes(channel = "k", name = "keyframe", defaults = [vec(0.2, 0.5), vec(0.5, 2.0)])gets you started. Run it, and that puts a keyframe editor in the box's output area holding the two default keys.
keyframes(channel = "k", name = "keyframe", defaults = [vec(0.2, 0.5), vec(0.5, 2.0)])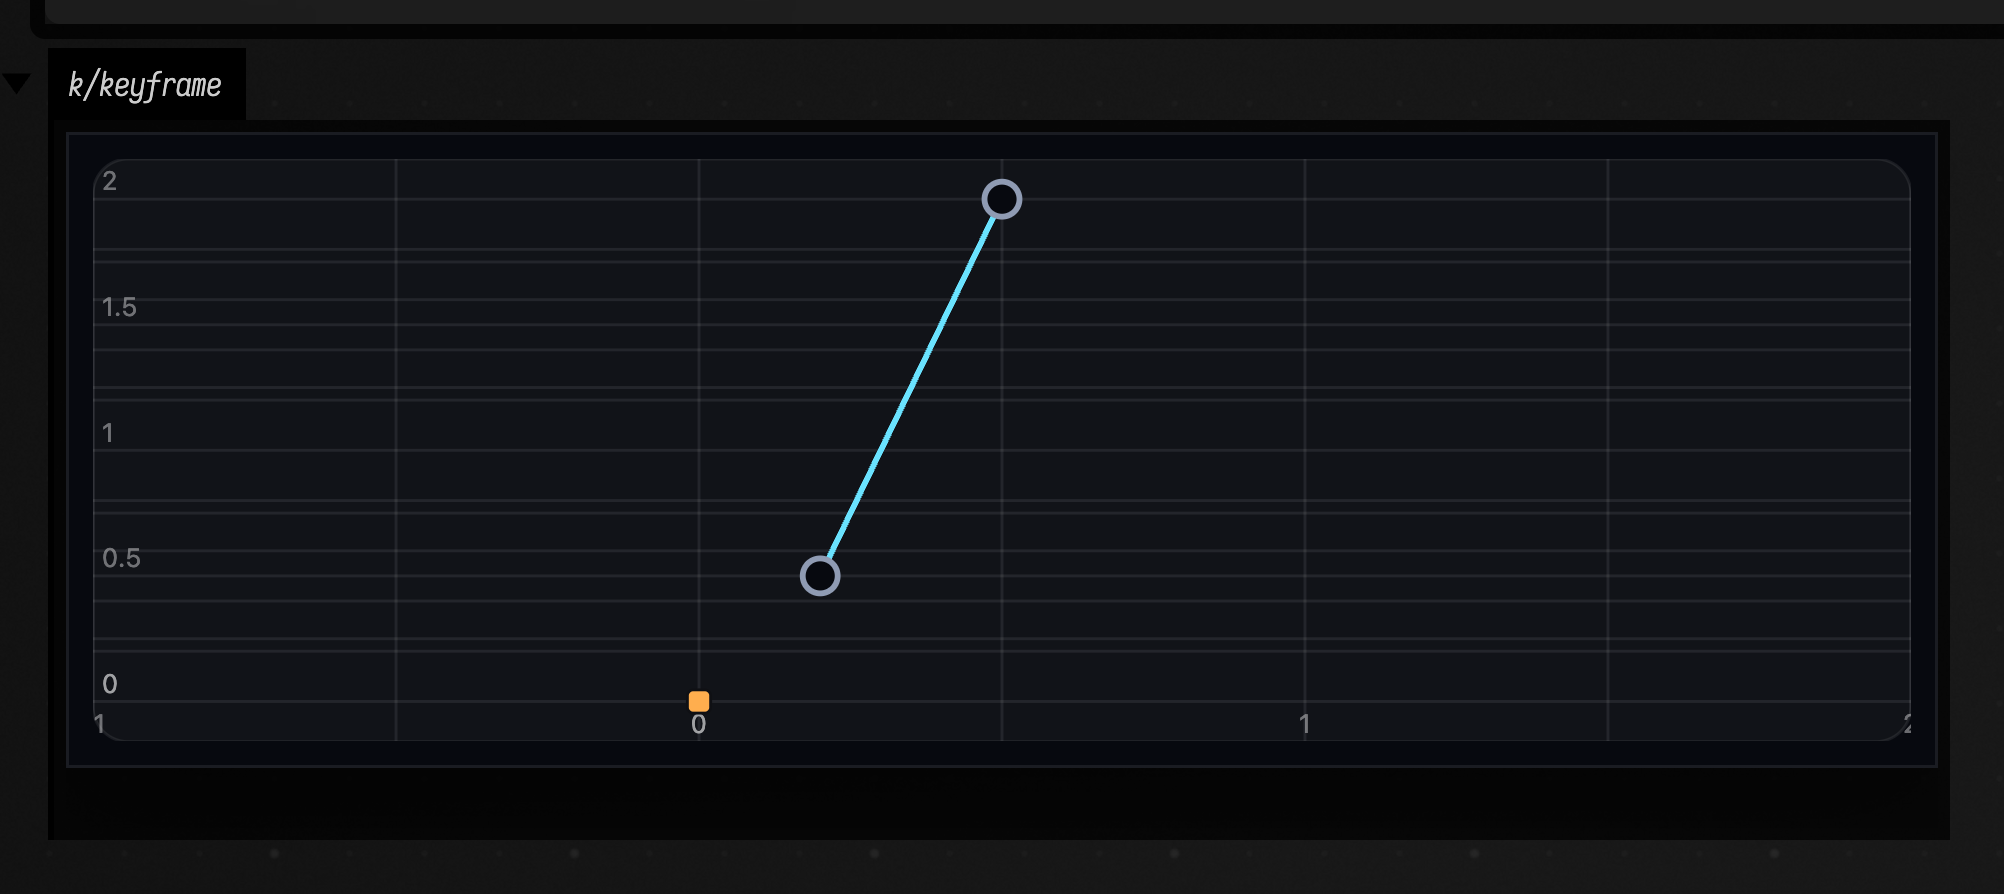
Scroll with scroll gestures, zoom with ctrl-scroll, double-click to add a keyframe, right-click to change the keyframe type.
These boxes are both input and output, so this code, which converts a keyframe set into a Field Fn (see Functions), is:
val k = keyframes(channel = "k", name = "bob", [0.0, 1.0])
val k2 = keyframes(channel = "k", name = "bob2", [0.0, 1.0])

k.onChange = {
    with(Functions) {
        val f = fromKeyframeEditor(it)
        val f2 = gaussianSmooth(f, sigma = 0.1)
        f2
    }
}
This gets you a smoothed curve that's still editable, by editing the underlying keyframes that make it.
Once you have a keyframe, you can do a few things with it:
val k = keyframes(channel = "k", name = "bob", [0.0, 1.0])

k.setTime(0.5) // move the orange playhead
val v: Double = k.evaluateValueAt(0.5)
val dv: Double = k.evaluateDerivativeAt(0.5)
Edited keyframes are stored inside the box — the defaults argument is just there in case the box is new. The keyframe editor has the rest: every gesture, the five key types, overlays, and a starting point to open.
Time sliders & Custom UI
Inserting a field.timeSlider template from the f1 menu gets you a box that a) draws itself as a vertical line and b) launches and stops boxes it passes over:
For the extra curious, this slider is just a regular box with some customizations to its on-canvas appearance and behavior:
// export this box so that any box can now write 'execution' to talk about this box
rootProp<Box>(execution) = thisBox

fun launchFrom(was: Double, now: Double) {

    val all = root.children - thisBox // candidates for execution
    val a = all.filter { it.frame.intersects(was) }
    val b = all.filter { it.frame.intersects(was, now) }
    val c = all.filter { it.frame.intersects(now) }

    val incoming = c - a
    val outgoing = a - c
    val onlyOnce = b - (a + c) // starting and stopping

    incoming.forEach(Box::begin)
    outgoing.forEach(Box::end)

    onlyOnce.forEach {
        inMain {
            it.begin()
            yield()
            it.end()
        }
    }
}

// whenever the viewport changes run this to keep the line covering the view
onViewportChange +=
    "lock_x" to
        { inside, a, b ->
            frame = frame.copy(y = -b.y - 100, h = b.h * 2 - 50, w = 40.0)
        }

// whenever the frame of the box changes run this
onFrameChange +=
    "lock_x" to
        { inside, a, b ->
            launchFrom(a.x, b.x)
            b.copy(y = -inside.viewport.y - 100, w = 40.0)
        }

// just set the width to be 40.0
frame = frame.copy(w = 40.0)

// set a custom border, and lock the height
customization =
    """
    this.style.border = "0px solid transparent"
    this.style.borderLeft = "3px solid red"
    this.style.background = "transparent"
    this.style.marginTop = "0px"
    this.style.paddingTop = "0px"
    this.style.setProperty("--box-border", "0")
    this.style.fontStyle = "italic"
    this.style.color = "white"
    this.lock_w = true
    this.lock_h = true
"""

name = "t"

autorun = true
Custom Marking Menus
There are lots of other ways of customizing Field's front end from within Field. One, higher level, is to introduce a custom marking menu:
customMarking["N" to "bob"] = { print("North!") }
customMarking["SE" to "something"] = { print("se!") }
customMarking["W2" to "the end"] = {
    print("W!")
} // outer ring
You can open and swipe around these callbacks with alt/option-shift-click:
This is nothing more (but also nothing less) than Field speaking to the long tradition of code-writing tools being able to extend and write themselves.
Snapping
When caps-lock is lit, boxes snap to other boxes when you move them around or resize them — good for aligning things when we're in timeline mode.
You'll also find a couple of different 'align' and 'organize' commands in the document-level command palette for tidying up after yourself.
Making bigger things
By default, every box of code is pretty isolated from all of the other boxes. This is often what you want — otherwise, you are constantly wondering if something you write in one box will break another piece of code somewhere else. But sometimes you want boxes to communicate. Field does this in a couple of ways.
Shared properties
We can connect boxes together using the connect command, or by selecting the parent and then the child and pressing g:
(To disconnect, select and then press 'u'.) Now that these two boxes are connected, they can opt into sharing certain things.
In the Parent:
prop<Double>(foo) = 10.0This means that in the children:
print(foo)This prints 10.0. You can think about this mechanism as 'exporting' particular variables (with types) to child boxes. prop here is a macro that expands and runs some set of glue code that makes a real Kotlin property backed by the right kind of storage. This glue code is stored in the preamble property. This code accumulates but it's essentially a layer of inherited auto-regeneratable glue code between boxes and their children.
Anything that has an exportable type in Kotlin can travel — this includes Kotlin lambdas, Vec3 etc. But alas, not types defined inside boxes.
Properties also support lazy initialization:
prop<Vec2>(myVec)

once.myVec {
    // `myVec` will stay the same for this whole session
    vec(1, 2).noise(10.0)
}
once.myVec { ... } computes when the property is null and caches a non-null result on the box.
(null itself is not cached.) This is useful in the graphics system because a box often wants to
create one window and Vulkan renderer, then publish those resources to descendants through prop.
When the value depends on something — a view made for a particular renderer — use
cached<View>(renderer) { View() } instead, which makes a new one (and closes the old) when the key
changes; see cached.
This can end up as a kind of reactive variable system for Kotlin. For the mechanism behind all of this — how prop/once expand, how properties propagate up the box graph, the @exported annotation, the typed accessors moduleHere { } generates, and the //%- fragment break — see Running code in a box.
Nesting
Boxes can be nested inside other boxes: select them, open the command palette (ctrl/command-shift-P) and pick "Nest ...":
This allows you to encapsulate boxes inside other boxes to work together toward a common aim.
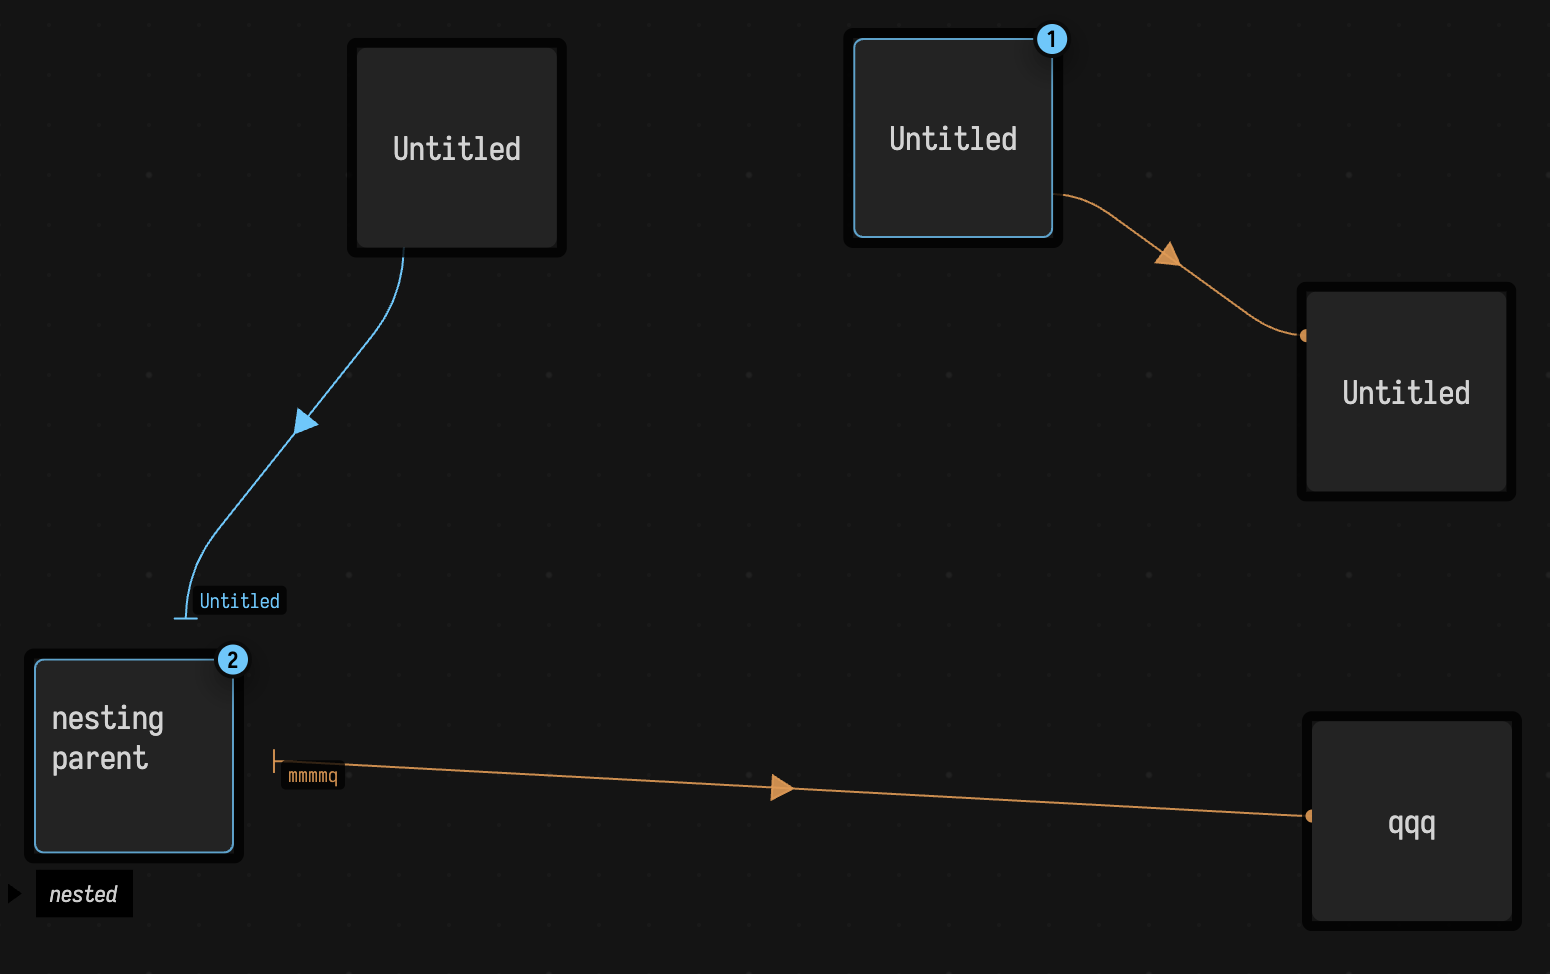
Nested parents can be referenced inside nesting children with nestedIn (Box?) and nesting parents can get a Set<Box> of their nest children with nested. If there are non-visible nesting children that are acting as children or parents to boxes that are visible, that is indicated in the connections: the connection is drawn to the nesting parent instead, ending in a short bar with a label.
Referencing
Finally, named("foo") returns a Box? called "foo", searching from the current box 'downwards' through the hierarchy if it exists. Similarly root.named("foo") searches starting at the root of the document — a virtual parent to all boxes.
Collaborating
Field's back-end just serves pages to any browser that contacts it; it's just usually the case that Field is running on the machine that you are using to look at its interface. But if you can conspire to open a webpage on that server, you can do so from anywhere on earth (OpenEndedGroup particularly likes Tailscale for this, but there are other options).
Multiple browser clients receive the same server-side box and property updates. Field attempts to preserve non-overlapping editor changes, but simultaneous edits to the same text are not a promised conflict-free collaboration protocol.
Multiple editors
The document-level command "Add Editor to Output Area" pins a particular property of a box to that box's output area:
These additional, fully functional editors give you a place to keep code (or outputs embedded in code!) that you keep coming back to.
Extra screen time
The other browser worth pointing at Field is the one in your pocket. Field serves a page at
/controllers that is built for a phone rather than shrunk down to fit one: a large touch pad that
sends X, Y or both into the selected box, the sliders and colour wells that box publishes, its
output areas reformatted into a single narrow column, the real AI4 conversation for it, Open
Anything, and a full Monaco editor on whatever is selected. There is one selection state behind all of
it, shared with the desktop — the phone follows Field's, and a pick made on the phone becomes
Field's — so a piece can be running on a projector while you hold its controls and walk around in
front of it. On the left is a box in the desktop app, its code open in the editor; on the right is the same box on the phone, the Group tab at iPhone size showing the step sequencer it published with controlGroup(...): you sweep the bars and paint the grid with a finger, and the playhead the box drives moves across both. See Sequencer controls for the code:
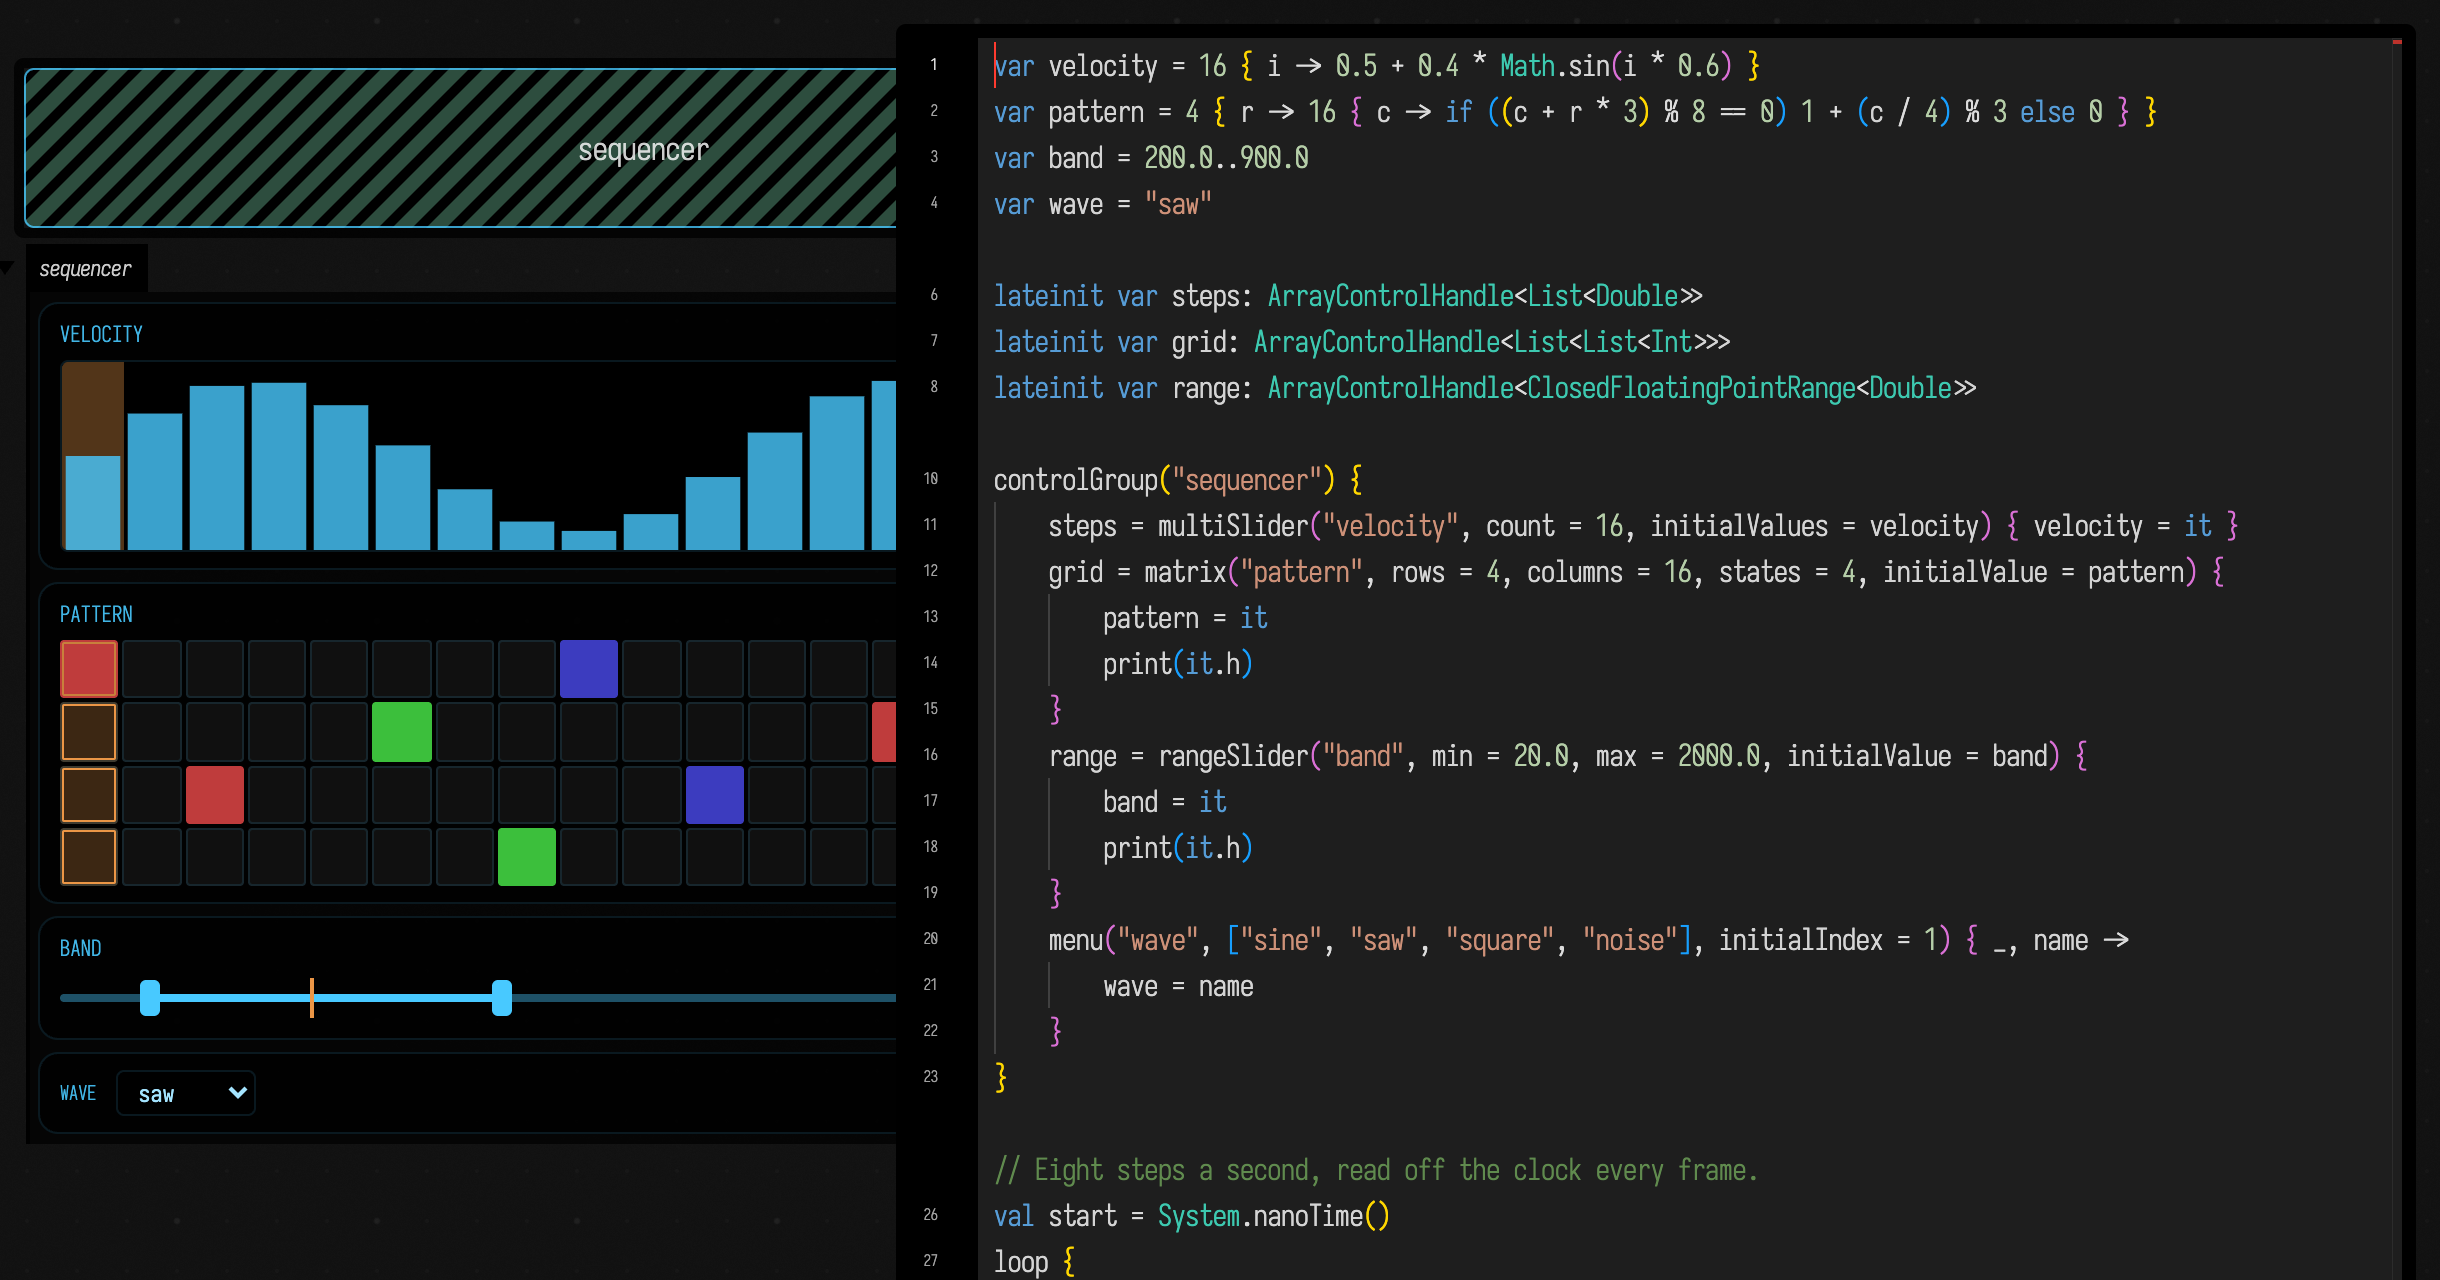
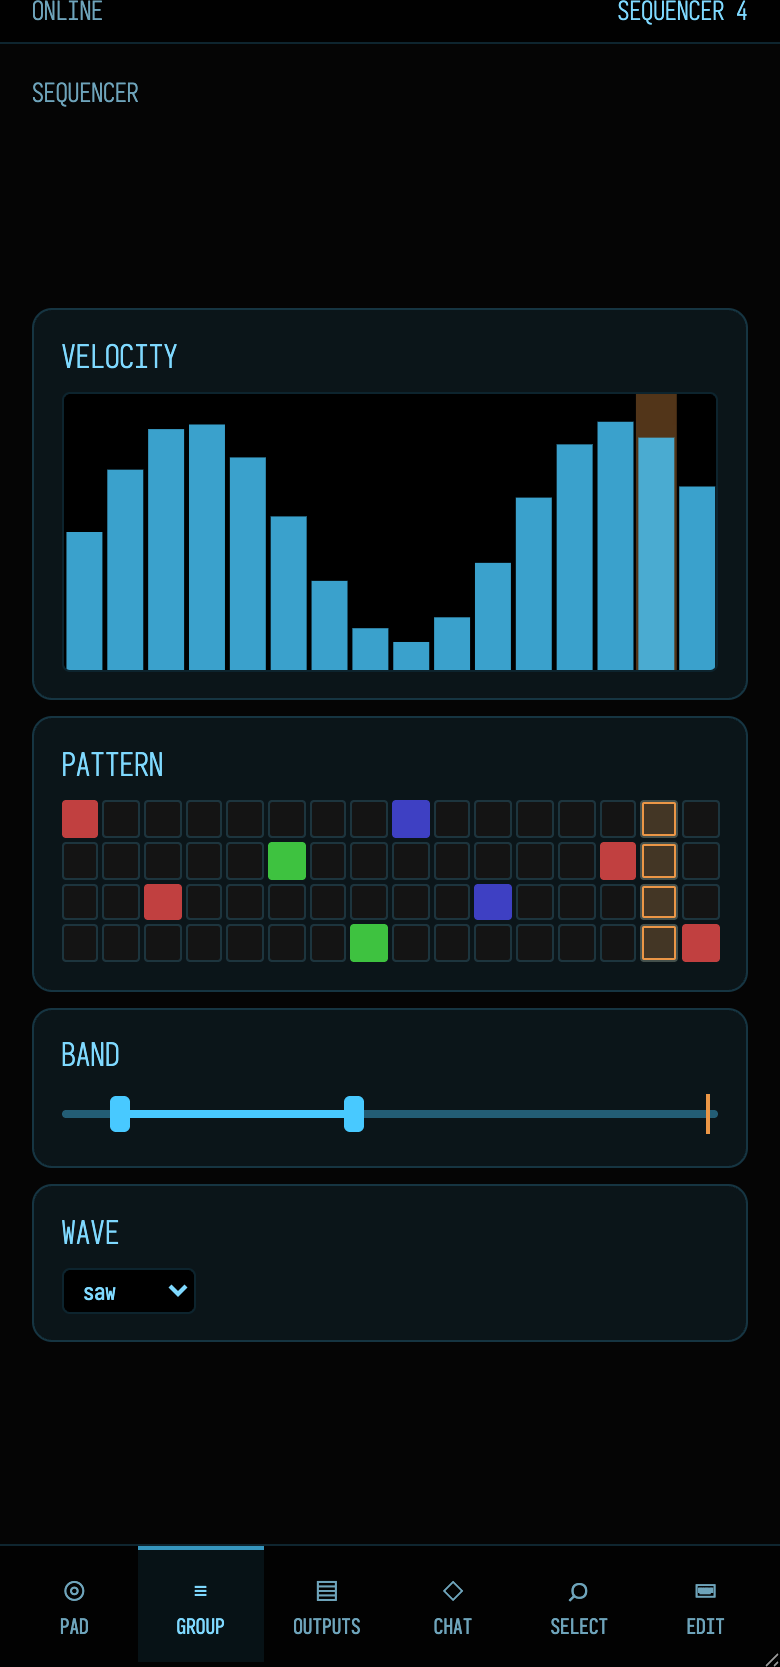
Field from your phone has the URL, what each of the six tabs does, and the warning that goes with any of this: the page can run boxes, edit code and call AI4 tools, so it belongs on a network you trust and never on the open internet.