The Canvas
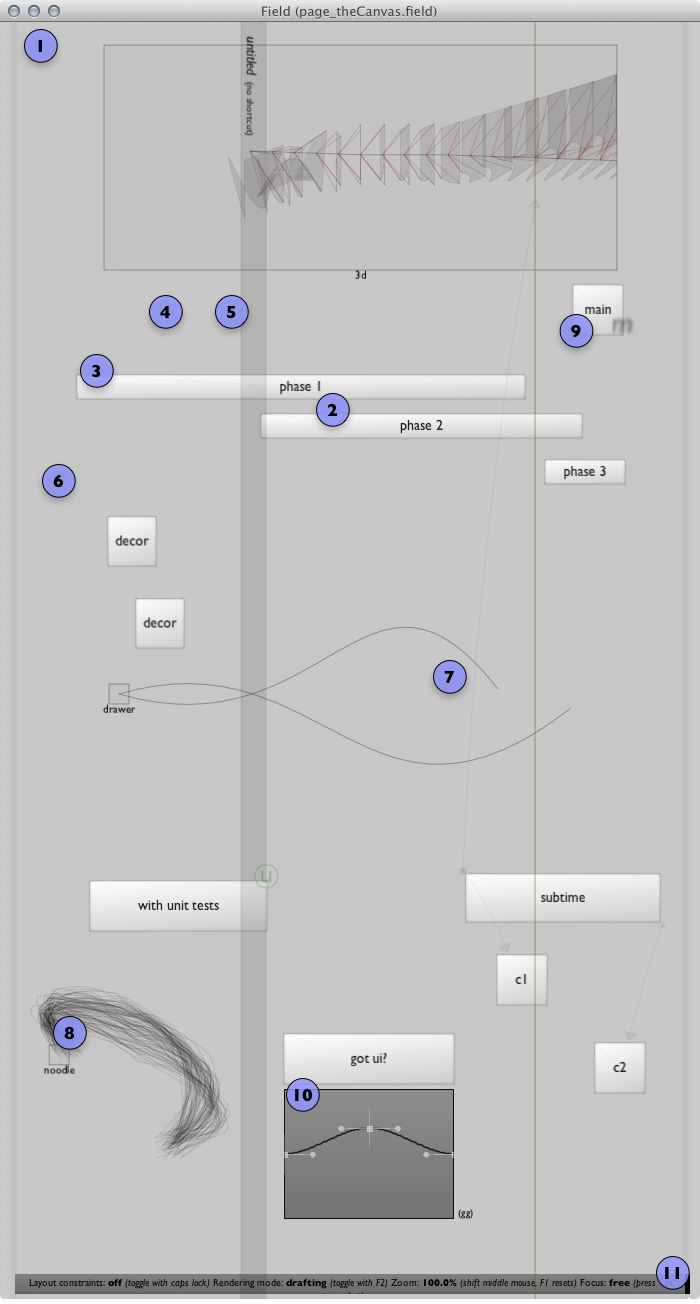
1 — The window itself
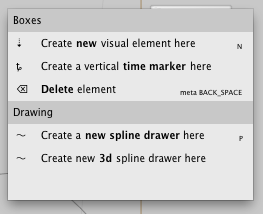
This is the window where you will create, select, organize, manipulate, resize and delete visual elements of various kinds. The right-click contextual menu will get you started with creating some simple visual elements.
Selection is by left-click / shift-left click for multiple selections; Dragging a box around repositions it; dragging with Caps-lock lit gives you guides for alignment.
Marking is by command-left-clicking. Since selecting a visual element makes it the thing you are editing, selection is useless for indicating other elements you'd like to talk about in code. Marked elements are highlighted in red, and a list of them can be obtained at any time (in code) by writing
marked(). A list of elements that are marked in all open sheets can be obtained by writingallMarked(). You can also mark elements by selecting them in the Selection manager.Duplicating is by shift-command-dragging. This will duplicate all selected elements. Copy and Paste works as you'd expect (and is bound to command-c and command-v).
Pan using the middle-mouse button (or two finger drag gestures on a laptop trackpad); Scale using shift-middle-mouse or pinch gestures.
Deleting is by command-delete.
keyboard shortcut: f1 — resets view
- keyboard shortcut: f2 — toggles "preview mode".
2 — A plain box
This is a plain, default, box (or "visual element"). You get one by right-clicking and saying 'new visual element here', or you can just _press 'n'.
3 — An executing box
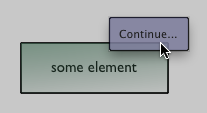
Visual elements contain python code and data stored in their properties. This code can, of course, be executed. Execution is provoked in a variety of ways — most simply in the TextEditor (you can command-enter, command-shift-enter, command-0 etc.). Executing all of the "main code" in an element also happens if you option-click on an element, hit the element with a time slider (see 4 below) &c.
However, visual elements can have more interesting life-cycles than this —they can "turn on" or "turn off". This green box is "on" becuase it intersects with the "Time Slider (4)" (see VisualElementLifecycles).
If you want to execute an element and keep executing it using the mouse, select 'continue running...' from the fly-over that appears when you option click on the element. To stop it, option-click again to get a fly-over that says 'stop'. See OptionClicking:
4 — The "Time Slider"
Time sliders execute elements that they cross. You can drag them around with the mouse, or you can drag them around in code.
*_self.timeSlider will get you the Time Slider element that created by default for the sheet. It's just another box, so you can write _self.timeSlider.frame.x=10 on it.
- Or you can create additional time sliders programatically, and, in doing so, make the default slider ignore certain code boxes, see SubTimeSliders See number the box called "subtime" in the image left. That's a slider that only hits "c1" and "c2".
5 — Some "Time Markers"
Time "markers", visually, are simply vertical points in the canvas that you want to mark. But they also can have keyboard shortcuts assigned to them, and durations governing how long the time slider will take to get there: see their "inspectable properties" in the Inspector window. See the SimpleProcessingTutorial for some examples. Once you've set up some keyboard shortcuts it's easy to drive the Time slider ('4' above) smoothly around with the keyboard.
6,7 & 8 — Drawing
See BasicDrawing, AdHocUI and LineBasedInteraction. Boxes can contain drawing code that add or override their appearence. You can use this to build live notation, visualization and interaction systems directly on the canvas. "6" is a box with some additional annotations, 7 is a "Spline Drawer" box that includes mouse-based editing. 8 is an object that includes vector and image based elements —CoreGraphicsExtensions.
9 Plugin badges
This element is carrying a badge "M". Plugins use this to indicate that this box's execution is handled specially. Currently the MaxPlugin says "M", the ProcessingPlugin says "P" and the OnlinePlugin says "O".
10 On-canvas GUI elements
Just as you can embed GUI elements inside the TextEditor, you can also embed sliders and buttons and graph widgest inside the canvas itself. Field supports two approaches — using the same minimal style widgets as the text editor (see EmbeddingGuiOnCanvas) or using Swing components directly (see SwingIntegration).
11 Window status-bar and editor / inspector drawers
The status bar at the bottom gives you information about various modes. The drawers to either side are hiding the TextEditor and The inspector.