Creating User Interfaces in Field
Field is part programming environment, part UI designer. Creating ad hoc interfaces to your own code as you go along is fundamental to Field's design philosophy. Usually these are pretty rough and ready — traditionally we haven't been interested in creating "user" interfaces for any user other than ourselves — but we've recently added a few features that make Field's canvas more suited to creating more polished, more "finished" interfaces.
This page collects these features together, but you'll also probably want to take a look at the EmbeddingGuiOnCanvas and LineBasedInteraction pages.
- The .field sheet that contains the code for this page can be downloaded here.
Surfacing properties
Field uses properties for all kinds of things. Two things about properties let you easily build interfaces — the _i naming convention and the new sheetProperty function.
Any property that ends with _i will appear in the general inspector. So, for example:
_self.someProperty_i= 10
_self.someName_i= "here"
_self.someColor_i=Vector4(1,0,0,0.3)
_self.someTruth_i=True
When this box is selected these properties will show themselves in the general inspector
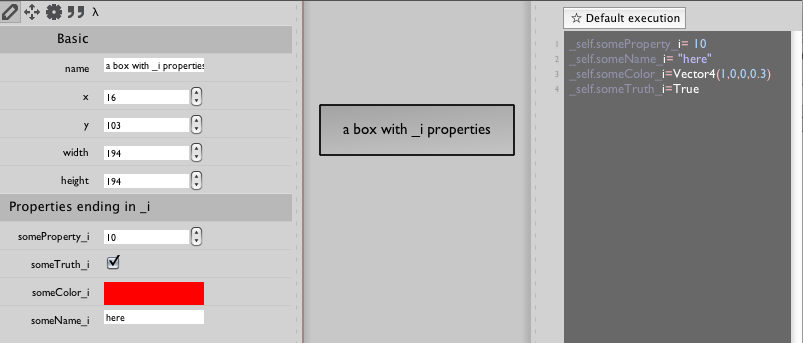
The kind of editing widget that you get comes from the type of the value in the property. Integers become number sliders, text becomes a text box, True and False become a checkbox and Vector4 values become colors (r,g,b,a).
Sometimes the general inspector, while handy, is just too far away on the left hand side of the screen — and much to modal to boot. Can we put these things on the canvas directly? Yes:
_self.someProperty= 10
sheetProperty("someProperty")
_self.someName= "here"
sheetProperty("someName")
_self.someColor=Vector4(1,0,0,0.3)
sheetProperty("someColor")
_self.someTruth=True
sheetProperty("someTruth")
This yields:
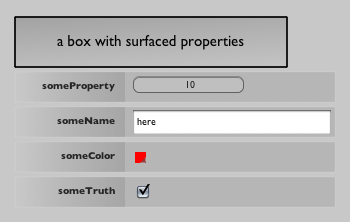
sheetProperty adds the widgets that would appear in the general inspector directly onto the canvas itself. Drag the main box around and the properties will follow.
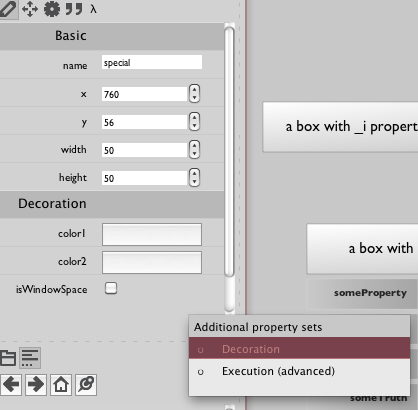
Changing the appearance of boxes
Tired of those grey-on-grey boxes? But reluctant to go all the way into the drawing system? Some recently added properties allow you to incrementally add decorations to your grey boxes.
_self.color1=Vector4(1,0,0,1) # bright red background
_self.color2=Vector4(1,1,0,1) # bright yellow border
By using _self.color1 and _self.color2 you can change the appearance of the boxes:
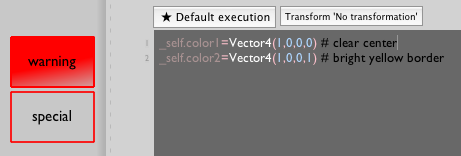
This might be just enough to remind you which box to execute (or which box shouldn't be touched).
Adding decorations
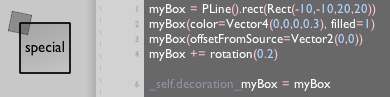
Changing the color is one thing — but we have a whole drawing system at our disposal. Take a look at this code:
myBox = FLine().rect(-10,-10,20,20)
myBox(color=Vector4(0,0,0,0.3), filled=1)
myBox(offsetFromSource=Vector2(0,0))
myBox += CFrame(r=0.2)

_self.decoration_myBox = myBox
This gives:
Let's take a look at these lines of code in turn:
myBox = FLine().rect(-10,-10,20,20)— makes a newFLinethat's a rectanglemyBox(color=Vector4(0,0,0,0.3), filled=1)— sets the color and it's fillmyBox(offsetFromSource=Vector2(0,0))— this tells Field that theFLineshould move with the box that it's in. Specifically it should move with the upper left (0,0) corner of the box. You could writeVector2(0.5, 0.5)to specify that theFLinemoves with the center of the box orVector2(1,0.5)to move with the center of the right-most edge etc._self.decoration_myBox— all properties that start withdecoration_can beFLineor lists ofFLines that simply decorate the box. They have no other function in Field.
So with a combination of offsetFromSource and _self.decoration_xxx you can now make badges for your boxes or draw other user interface elements that move around with boxes. More documentation here.
HUDs
One thing we began to notice recently in our longer pieces is that when Field's canvas is used as a time line it can grow quite large horizontally. This is in direct tension with using Field's boxes as UI — as you pan to the right to edit something your carefully made UI pans off the side of the screen. The solution is to mark boxes as being "stuck" on the window. That way they don't pan when everything else pans.
To do this, simply set _self.isWindowSpace=1 or use the general inspector:
Presentation Mode
While we were taking a close look at Max/MSP we noticed a feature — performance mode. While we're generally resistant to the idea that there's a "work" phase and a "performance" phase that need different kinds of UI we do think that there's something to the idea. Enter Field's presentation mode.
You toggle presentation mode on and off using 'f2' — you can tell if it's on or not by looking at the status bar at the bottom of the canvas:

You might need to look at the status bar because at first you wont notice any difference between the two modes.
The behavior of boxes under presentation mode is controlled by the _self.present property. Specifically you set it to be an instance of a PresentationParameters object. For example:
_self.present = presentationParameters(clickBecomesOptionClick=1)
With this code, this box will interpret clicks as 'option clicks'. With this call, and presentation mode, you've turned a box into a button that executes all the code in it.
Other options follow in a similar vain (and you can get a complete list from auto-complete on presentationParameters)
hidden— set this to True if you want the box to disappear completely in presentation mode.rightClickBecomesSpace— set this to use_self.spaceMenuinstead of Field's right-click menu — see MarkingMenus. This means that you can bury Field's default right-click menu (along with troublesome items like 'delete') while in presentation modefixedHeight,fixedWidth,fixedPosition— set these to '1'/True to constrain how boxes can be resized or repositioned by dragging.notSelectable— set this to '1'/True to make the box unselectable.
Using these options we've been able to come up with pretty solid, "incorruptible" interfaces that, by switching modes, retain the power of Field just below their surfaces.