Drawing FLines 3: Editing & Inspecting Lines
FLines contain a few methods for filtering their contents including .visitPositions, .visitNodes, .visitPolar. These methods are good for performing global transformations on the positions of elements. But there are many things that you can do with FLines that are hard or impossible to formulate in the terms of these functions — what about editing individual nodes? inserting nodes? cutting up FLines into pieces? or even figuring out intermediate points on lines that are not nodes?
The answer to these questions is to use a FLine Cursor. (A word about terminology: "cursor" to suggest your current position in a given line.) The easiest way of obtaining a cursor is directly from the FLine you'd like to inspect or edit:
cursor = someFLine.cursor()
The rest of this page is really the reference documentation for cursors.
Moving the Cursor
A cursor represents a point on a line — that point might be a node (one of the places that you .moveTo or .lineTo), or it might be a point, still on the line, between nodes.
Here's a random FLine that we'll use a cursor to access and modify:
myLine = FLine()
myLine.moveTo(75,75)
for n in range(0, 2):
    myLine.polarCubicTo(1,3*Math.random()-1.5, 1, 1, 50+Math.random()*450,50+Math.random()*450)
    if (Math.random()<0.8):
        myLine.lineTo( * (Vector2(myLine.position).noise(250)))
The first thing we can do with a Cursor is get its position:
def drawPoint(a):
    _self.lines.add(FLine().moveTo(a.x, a.y)(color=Color4(0.5,0,0,0.5), pointed=1, pointSize=10))

myCursor = myLine.cursor();
drawPoint(myCursor.position())
Giving:
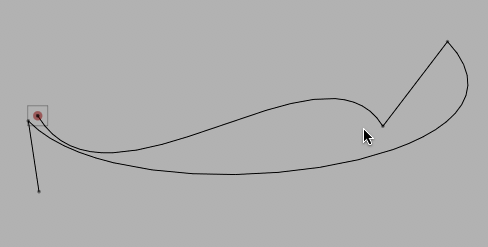
The Cursor returned by .cursor defaults to starting at the beginning of the FLine.
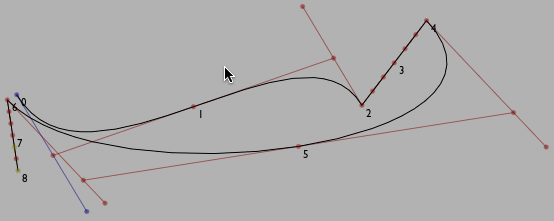
A Cursor can be moved around a FLine; forwards & backwards from its current position, or skipping to a different position entirely.
for n in range(0, 30):
    myCursor.forwardT(0.1)
    drawPoint(myCursor.position())
Draws:
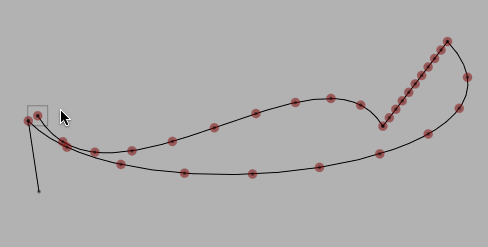
.forwardT(dt) moves a cursor forward by an amount dt (backward for negative dt). There's also .backwardT(dt) which goes the other way. But what units is this 'T' in? Spline Parameter units. Note that each time around the for loop above we move forward by 0.1 — the first 10 points we draw are in the first curve segment, the first 10 are in the next segment (which is a straight line) and so on. 0.1 corresponds to 10% through the curve, regardless of the length of the curve. Thus the points in the second segment are much closer together than the first. In fact the points aren't typically evenly spaced within a curve segment (which you might be able to see in the third curve segment).
Mathematically this comes about because our Spline segments are specified as some function of a parameter (typically called 't' in the literature) which doesn't correspond to length along the curve. It doesn't necessarily correspond to anything at all — it's just a parameter that draws out the curve as it goes from 0 to 1. A drawn line can be thought of as the trace of an 'animation' of the pen that drew it — but all evidence concerning the speed of the pen has been lost. We just pick speeds that are fast and easy mathematically.
Sometimes this variable spacing is perfectly acceptable — if all you need is a point that's roughly in the middle between two nodes then .forwardT(0.5) will do fine.
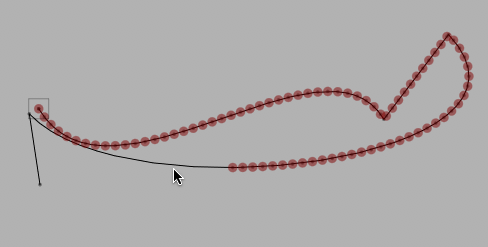
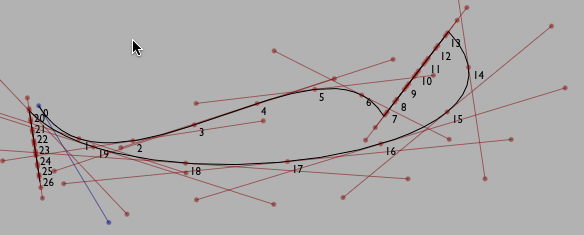
Sometimes, it won't do fine. For those times — .fowardD(distance):
myCursor = myLine.cursor()
drawPoint(myCursor.position())
for n in range(0, 80):
    myCursor.forwardD(10)
    drawPoint(myCursor.position())
Will draw:
Now that you can move around the line via distance, we'll need to know how to convert 'T' units to 'D' units:
myCursor = myLine.cursor()
drawPoint(myCursor.position())

print myCursor.length(), myCursor.lengthT()
#a position that's 10 units along the spline
print myCursor.convertDToT(10)

#a position that's halfway between the 1st and 2nd node
print myCursor.convertTToD(1.5)

#which spline segment is the point 100 along the line in?
print int(myCursor.convertDToT(100))+1
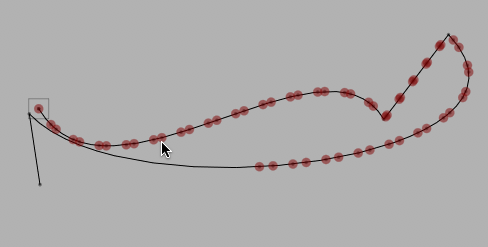
Put these ideas together and you can do something like this:
for n in range(0, 28):
    myCursor.forwardD(20)
    print "at 't' %s" % myCursor.currentT()
    myCursor.forwardT(0.02)
    print "at 'd' %s" % myCursor.currentD()
    drawPoint(myCursor.position())
Draws a more staccato rhythm:
For completeness, we should mention .forwardNode() (and .backwardNode()) as well as
.setT(t) and .setD(d) which allow the Cursor random access to the FLine.
Inspecting the contents of a FLine
Now that we have a point on a line, we can ask the Cursor for information about that point. myCursor.tangentForward() gives the forward tangent. This represents the direction that the line is heading in at that very point. Before a cubic split control point made by .cubicTo(cx1, cy1, cx2, cy2, x2, y2) this will always be equal to (cx1, cy1). But at other points along the line it will be different. There's also myCursor.tangentBackward(). Usually this points the "other way" but in the same direction, though at control points that do not smoothly join sections together, the line connecting .tangentBackward(), .position() and .tangentForward() will not be straight.
Drawing these things at a number of points yields:
Or for a larger number of points:
Since these tangents are really a 'velocity' of how the line is 'moving' at a particular point, we can also build the 'acceleration' — .accelerationForward() and .accelerationBackward(). We can use the curvatures to draw osculating circles:
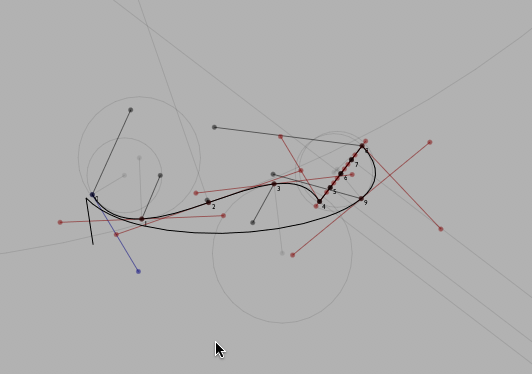
The code to draw this image serves as a nice example use of FLine and Cursor:
cursor = Cursor(myLine)
for n in range(0, 10):
    p = cursor.position()
    #drawPoint(p)
    forwards = cursor.tangentForward()
    backwards = cursor.tangentBackward()
    if (forwards and backwards):
        _self.lines.add(FLine().moveTo(*forwards).lineTo(*p).lineTo(*backwards)(color=Vector4(0.5, 0, 0, 0.5), derived=1, pointed=1))
        _self.lines.add(FLine().moveTo(*(p+Vector2(5,5)))(containsText=1, text_v = "%s"%n, derived=1))
    elif (forwards):
        _self.lines.add(FLine().moveTo(*forwards).lineTo(*p)(color=Vector4(0, 0, 0.5, 0.5), derived=1, pointed=1))
        _self.lines.add(FLine().moveTo(*(p+Vector2(5,5)))(containsText=1, text_v = "%s"%n, derived=1))
    elif (backwards):
        _self.lines.add(FLine().moveTo(*backwards).lineTo(*p)(color=Vector4(0.5, 0.5, 0, 0.5), derived=1, pointed=1))
        _self.lines.add(FLine().moveTo(*(p+Vector2(5,5)))(containsText=1, text_v = "%s"%n, derived=1))

    try:
        curve= cursor.accelerationForward()
        if (curve):
            _self.lines.add(FLine().moveTo(*(curve-p)*0.2+p).lineTo(*p)(color=Vector4(0, 0, 0, 0.5), derived=1, pointed=1))
    except:
        pass

    #print 1/rr
    if (forwards and rr!=0):
        r = cursor.curvatureForward()
        rad = 1/r
        rad /= 1
        print rad
        curve = (forwards-p).orthogonal().normalize().scale(rad)+p
        _self.lines.add(FLine().circle(Math.abs(rad), curve.x, curve.y)(derived=1, color=Vector4(0,0,0,0.1)))
        _self.lines.add(FLine().moveTo(*curve).lineTo(*p)(color=Vector4(0, 0, 1, 0.5), derived=1, pointed=1, color=Vector4(0,0,0,0.1)))

    cursor.forwardT(0.25)
Editing FLines
There are two principle editing operations supported by Cursor as of this writing (we're still in the process of recasting our previous diverse and messy FLine manipulation code in terms of these Cursor objects).
.split()— splits this FLine into two FLines at this Cursor. Returns a 2-tuple of FLine..insert()— inserts a node at this position (and sets theCursorto be at this node).
Visually, neither of these operations appear to do anything. The two lines that .split() creates seamlessly meet in the middle to look just like the old line; and the node that is inserted by .insert() has its parameters set such that the resulting line looks, again, just like the old one.
But having .split() you are free to move the resulting FLine apart, manipulating the individual elements independently:
A random noodle:
From this code example:
myLine = FLine()
myLine.moveTo(75,75)
for n in range(0, 4):
    myLine.polarCubicTo(1,3*Math.random()-1.5, 1, 1, 50+Math.random()*450,50+Math.random()*450)

_self.lines.add(myLine.copy())

def segAndAdd(divBy, show=0):
    left = []
    right = myLine.copy()
    for n in range(0, 10):
        c = Cursor(right)
        c.forwardD(c.length()/divBy)
        if (show): drawPoint(c.position())
        a, b = c.split()
        a, b = FLine(a), FLine(b)
        left.append(a)
        right = b

    index = 0.0
    for ll in left:
        alpha = index/len(left)
        ll+=Vector2(200+(1-alpha)*120,0)
        ll+=rotation(index/12.0)
        ll.visitPositions(lambda x,y : Vector2(x,y).noise(10))
        ll(color=Color4(0,0,0.0, 0.3), pointed=1, pointColor=Color4(0,0,0.0, 0.5), derived=1, pointSize=1)
        index+=1
    return left

_self.lines.addAll( flatten( [segAndAdd(x, x==2) for x in range(2, 48)] ) )
Making cursors by computation
All of the above techniques make a cursor by moving it around a FLine (and perhaps then editing that line in some way). Field has a number of other ways of making cursors, essentially techniques that might yield a point on a line yield a PCursor instead. This is always more useful than, say, a Vector2 that just happens to be on a line.
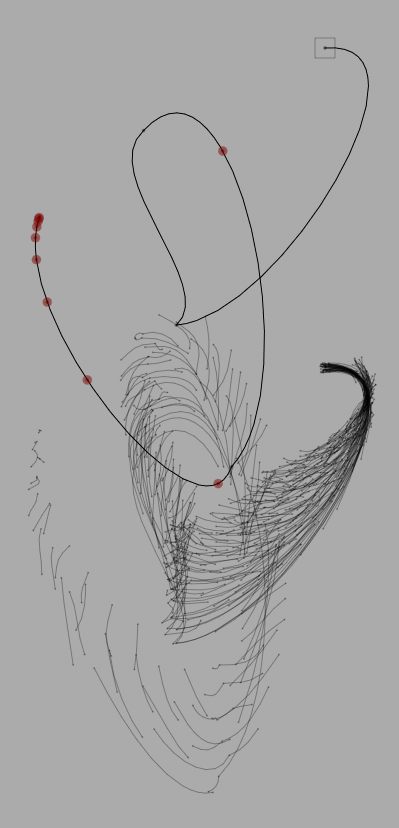
Minimum and minima
For example, what's the closest a line gets to a particular point?: line.closet(point) has one answer, it returns a cursor at the position on a line that's the closest this line gets to that position (a Vector2). Another, related, answer is line.minima(point) — this returns a list of cursors along line that are at locations where the line is at local minima with respect to that point. These are the places (including the closest point) where the line stops heading towards the point and starts heading away from the point.
An illustration:
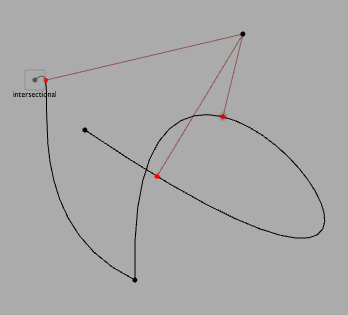
Generated by code like this:
_self.lines.clear()

ll = FLine().moveTo(100,100).relCubicTo(1,-100, -100, 4, 200,300).relCubicTo(2, -400, 500, 300, 150, 150)
ll(pointed=1)
_self.lines.add(ll)

point = FLine().moveTo(400,400)(pointed=1)
_self.lines.add(point)

#that curvy spline in black is hand edited, as is the point that we are looking for
_self.tweaks()

target = (FLine(_self.lines[1]).position)
mins = ll.minima(target)
minIs = ll.closest(target)

for mm in mins:
    pp = FLine().moveTo(*mm.position())(pointed=1, color=Vector4(1,0,0,1))
    _self.lines.add(pp)

    l2 = FLine().moveTo(*mm.position()).lineTo(*target)
    l2(color=Vector4(0.5, 0, 0, 0.5), derived=1)
    _self.lines.add(l2)

_self.lines.add(FLine().moveTo(*minIs.position())(pointed=1, pointSize=10, derived=1, color=Vector4(0,0,0,0.1)))
If we move point that we draw minima and closest points to we can make a drawing like this:
