The Thinking Eye in Field – some places to start
In this page we’ll develop a few more advanced 2d drawing examples for Field. For inspiration we’ll be journeying back to a masterworks of Bauhaus line-drawing pedagogy: Pedagogical Sketchbook, Paul Klee, The Thinking Eye / The Paul Klee Notebooks Vol 1, Paul Klee or Point and Line to Plane, Wassily Kandinsky. A great many of these pages (especially in the Klee) could serve as a call to action for understanding the stakes, and orienting your initial experiments with code-based-image creation.
On this page I’ve collected 5 of by own responses to pages in Klee and Kandinsky, each page is answered by a page of fairly carefully documented code and some thoughts for further extension. You’ll also want to be looking at this documentation here as well, to begin to make sense of how drawing is being done in Field.
But! a warning first. This page is fun if you want to get something on the screen and then play with it a little, or if you want to see something complex for some kind of inspiration. Writing one of these “in one go” isn’t something that I would do and, more importantly, isn’t something that I could do. Rather, these were all made incremementally, in really small steps.
- you have a small idea (based on a page),
- you figure out how you might tell the computer what that idea is,
- you are incrementally expressing that idea and refining it,
- you are getting a little lost,
- you find the moment when something unexpected, unforeseen and perhaps unforeseeable occurs.
At this point, you can play freely with your system’s parameters, and sketch the potential of the system that you have built — and then, perhaps, push it towards animation, and long duration form.
I cannot stress the benefits of approaching computation incrementally enough. If there’s one meta-cognitive lesson that you should grasp it is that surviving the encounter with computation depends on your ability to make small, well tested, understood moves, discovering mistakes and missteps quickly. Don’t let these “complete” examples on this page fool you: not one of these lines of code was written in this order and almost none of them worked first time.
“An active line on a walk…”
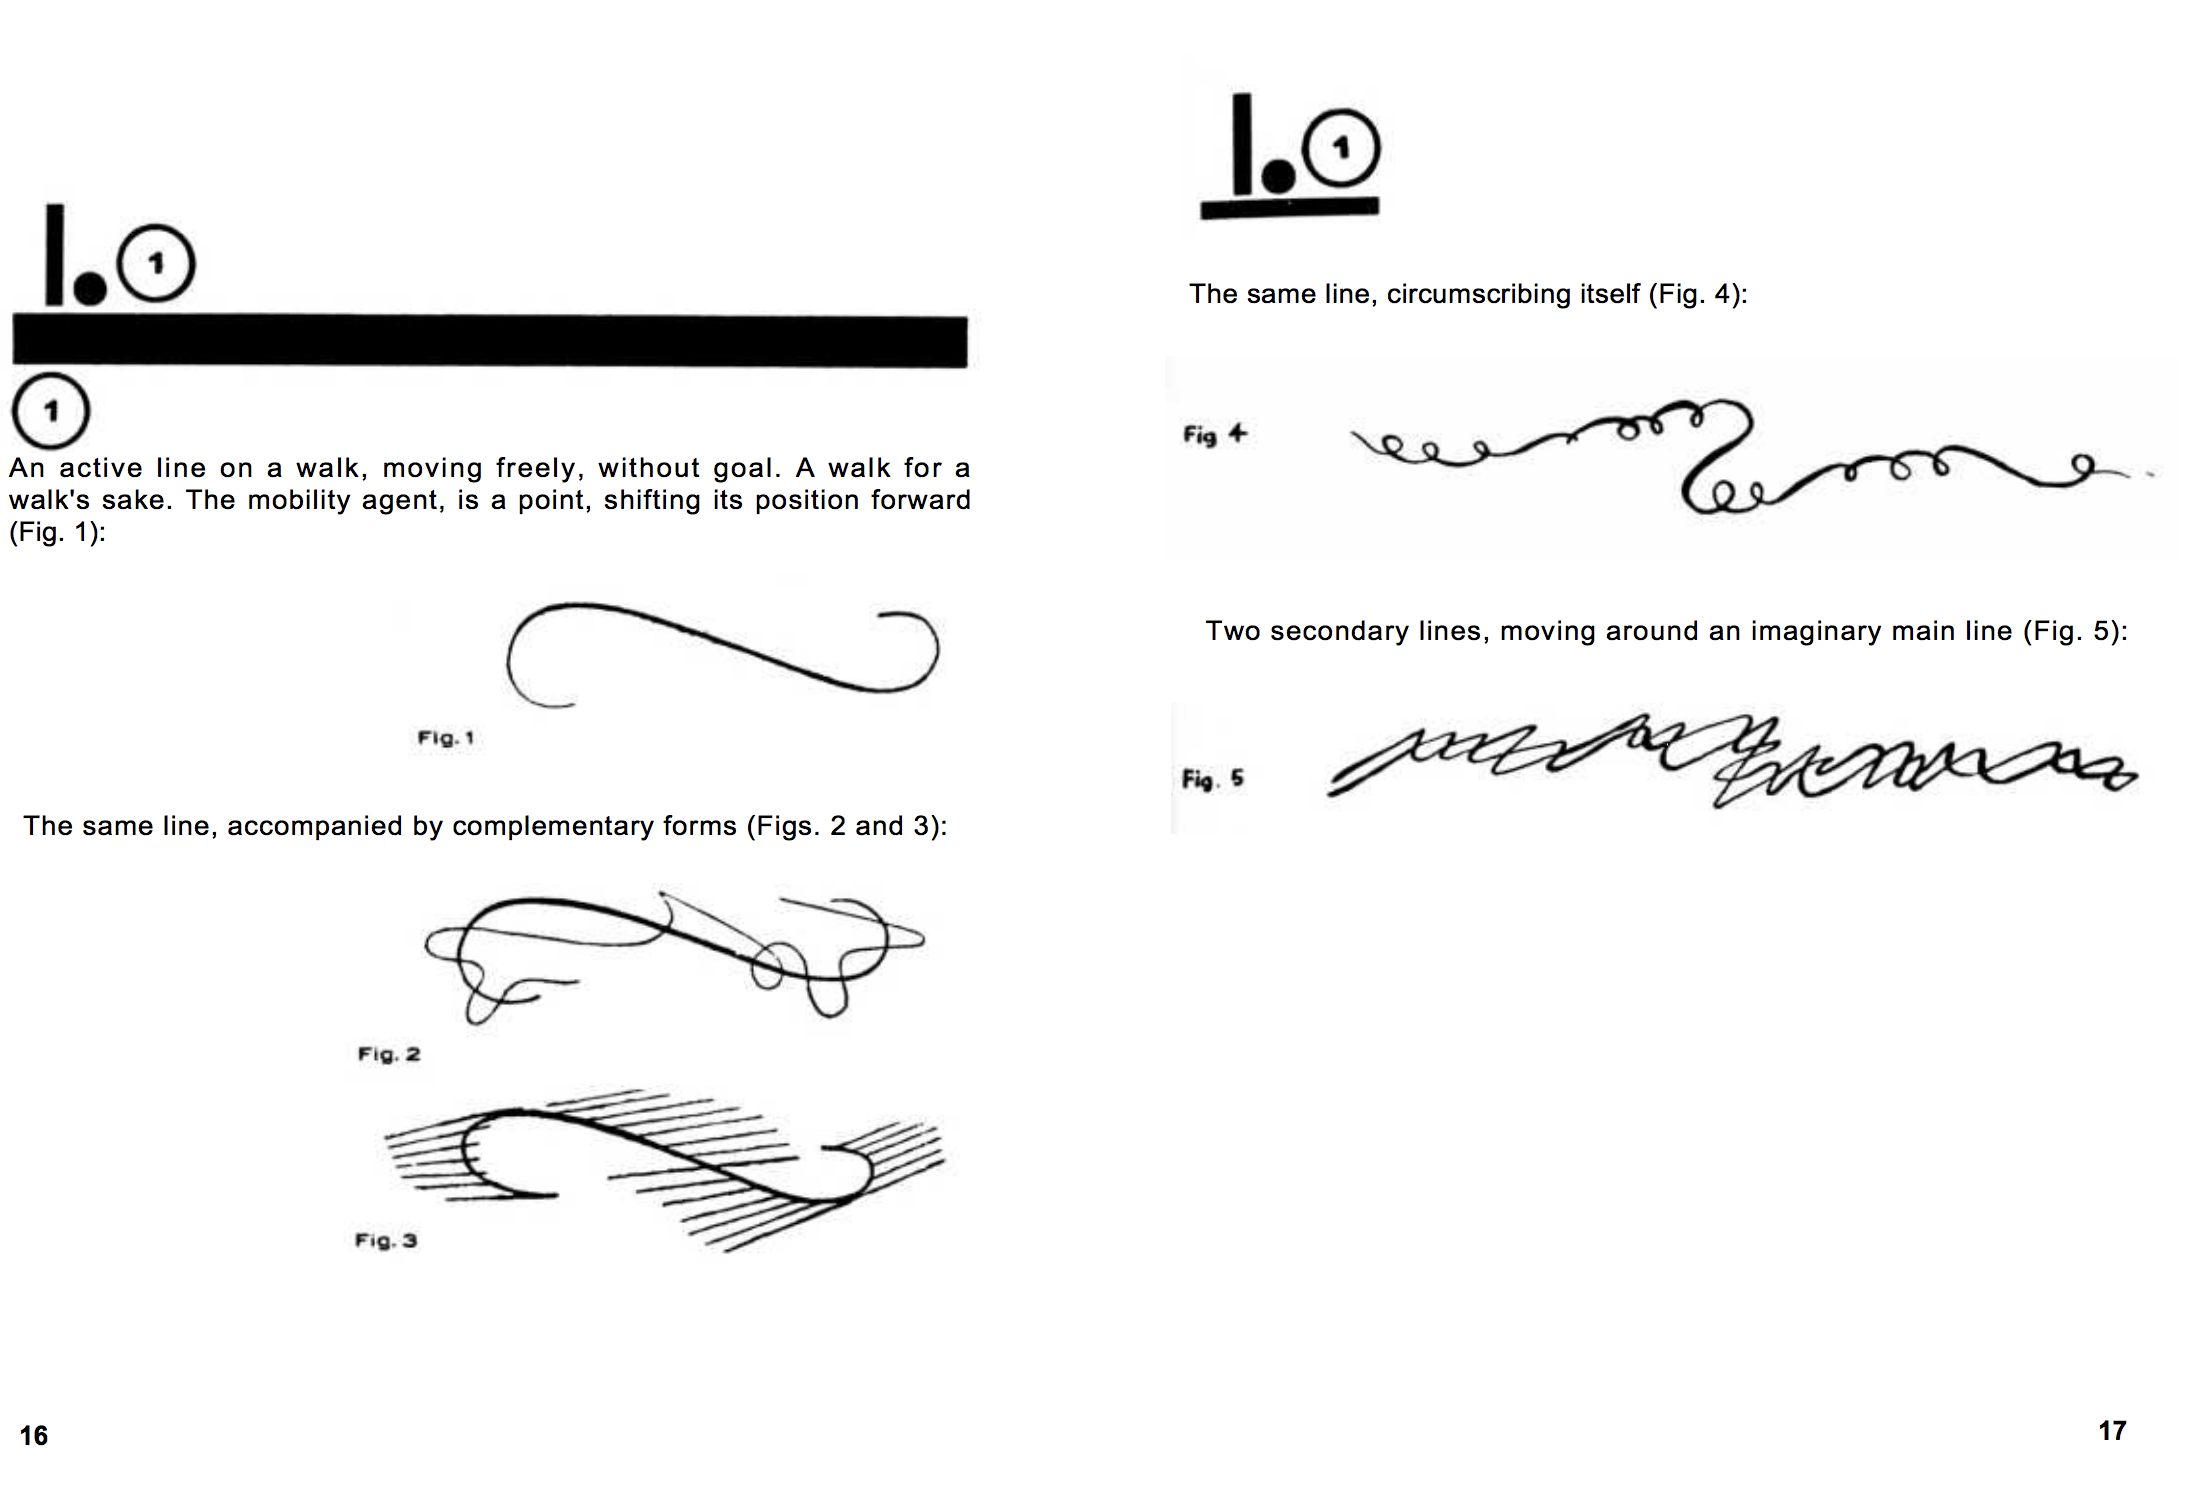
Pedagogical Sketchbook, Paul Klee, pg. 16
// clear everything this box has drawn so far
// this is up here because we expect to run all this code over and over
// as we explore it
_.lines.clear()

// set the background color to something more useful
_.window.background = vec(0.5, 0.5, 0.5)

// build an 'input shape'
var inputShape = new FLine()
	.moveTo(10,10)
	.polarCubicTo(1,100, 2,36.12, 100,100)
	.polarCubicTo(3,53.17,1, 60, 300,200)

// let's give it some thickness
inputShape.nodes[0].tL=1.0 // start thin
inputShape.nodes[1].tL=10.0 // thicker in the middle
inputShape.nodes[2].tL=1.0 // then thin at the end again

// make it editable by the mouse
inputShape.tweaky = true

// actually stick it on the screen
_.lines.inputShape = inputShape

// apply any edits
_.applyTweaks()

// 'inputShape' is now the potentially edited version

// thicken it to draw it
thickened = inputShape.byThickening(1)
thickened.filled=true

// translucent fill
thickened.color=vec(0,0,0,0.2)
_.lines.thickened = thickened

// we are going to traverse this shape (a circle) repeatedly
// while traversing 'inputShape'
var modulationShape = new FLine().circle(0,0,30)

// two lines come out of this this traversal
var wiggled = new FLine()

// hair is for decoration
var hair = new FLine()

// 'a' will go from 0 to 1 in 50 steps
for(var a of Anim.lineRange(0,1,54))
{
	// the inputShape gives the position
	var position = inputShape.sampleAt(a)

	// and the modulation shape the offset
	// %1 means to 'wrap around' at 1
	// we'll go around the circle 20 times
	var direction = modulationShape.sampleAt((a*20)%1)

	// draw the new position
	wiggled.smoothTo(position+direction)

	// with varying thickness
	wiggled.node().t=a*(1-a)*2

	// and also decorate this
	hair.moveTo(position).lineTo(position+direction)
}

// do the thickening
var w = wiggled.byThickening(5)
w.filled=true

_.lines.wiggled = w
_.lines.hair = hair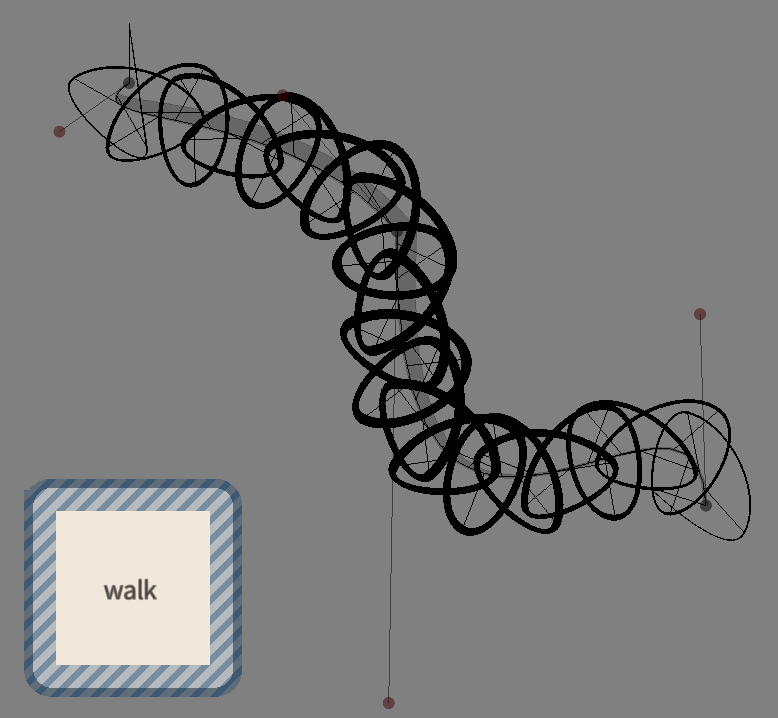
Some points of departure
Think about:
- Other modulation ‘shapes’ (not just a circle)
- Other ways of thickening the line — try drawing multiple thin lines
- Other, less simple, versions of ‘hair’
- Scale ‘direction’ by something gestural
- Turn this into an animation with
_.wait()and_.redraw() - See if you can build pg. 18, figure 6 with a similar approach.
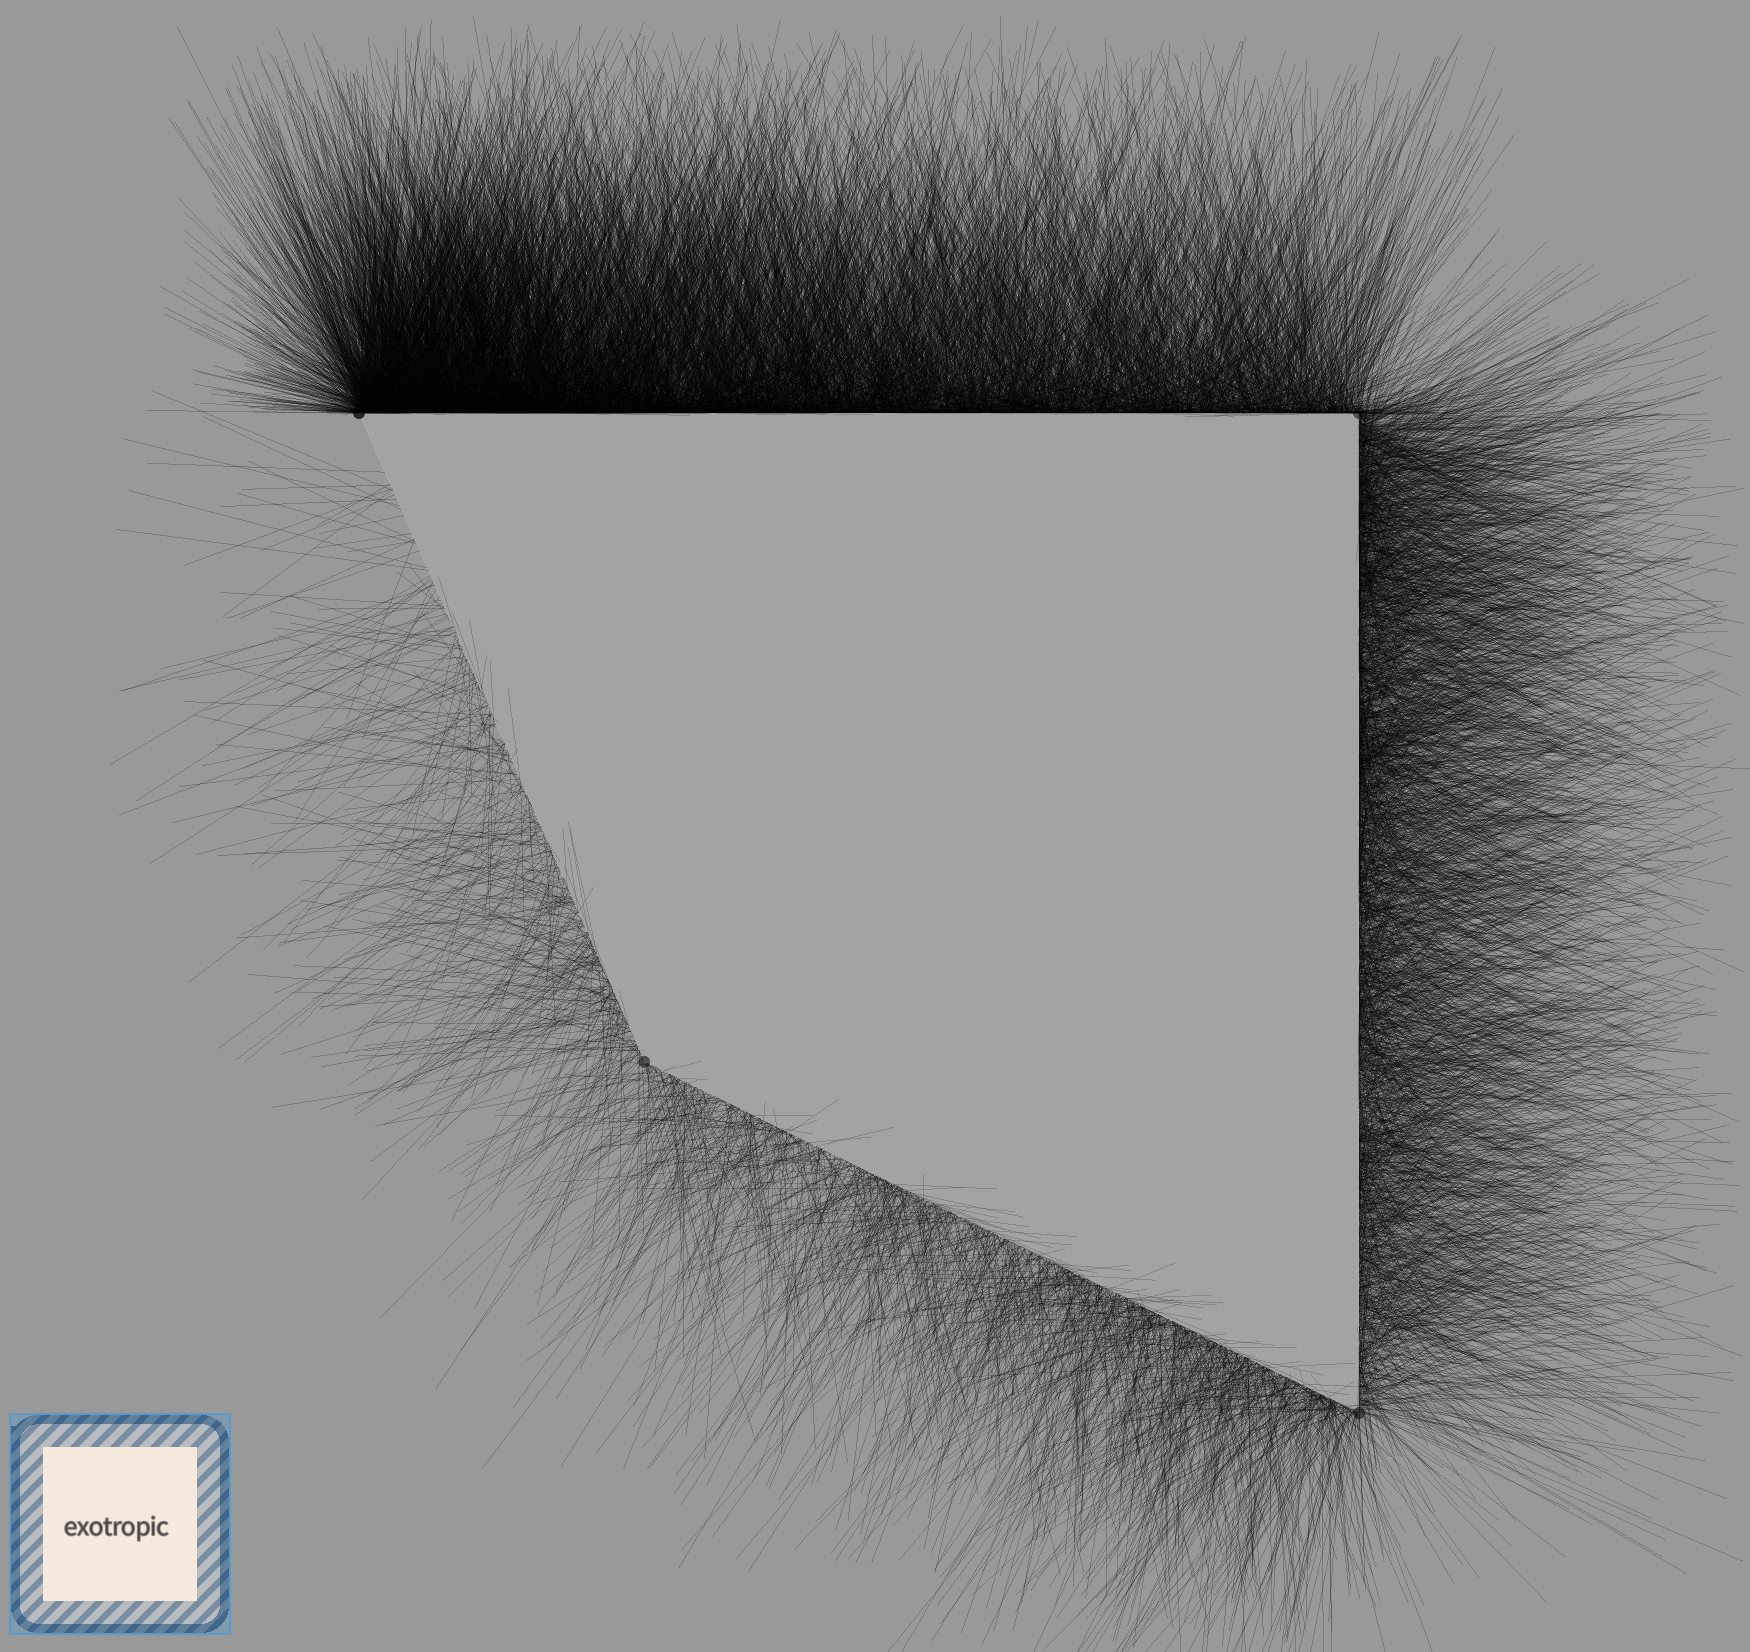
“exotropic treatment”
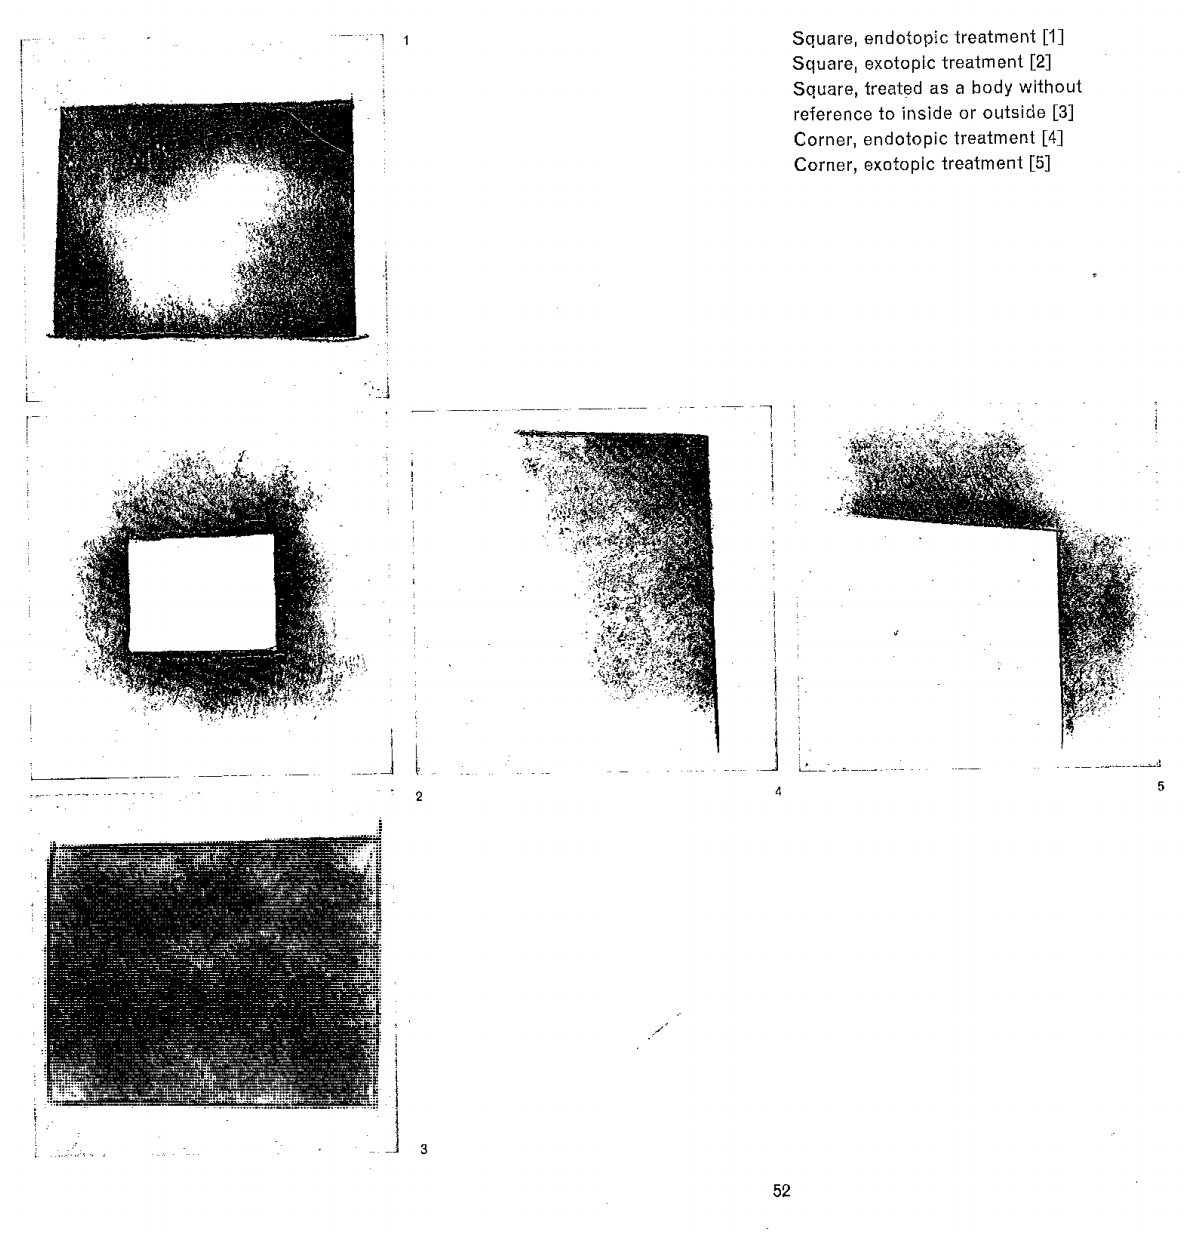
The Thinking Eye, Paul Klee, pg. 52
_.lines.clear()

// first we need a shape that we are going to draw around
// we'll start with a square
var controlShape = new FLine().rect(50,50,500,500)

// but we want this square to be editable with the mouse
controlShape.tweaky = true
controlShape.color = vec(1,1,1,0.1)
controlShape.filled = true

// we'll add it to the screen
_.lines.controlShape = controlShape

// and give field an opportunity to edit it
_.applyTweaks()

// now we want to inspect some aspects of this line. For this
// we use a 'cursor'.
var cursor = controlShape.cursor()

// this is the line that we'll add our hatching instructions to
var hatch = new FLine()

// draw them translucent black
hatch.color = vec(0,0,0,0.2)

// draw 'hatch' as well
_.lines.hatch = hatch

for(var i=0;i<10000;i++)
{
	// move the cursor to a random spot along the line
	cursor.setD(cursor.lengthD()*Math.random())

	// find the 'normal' to the line (a line that points away from it)
	var normal = cursor.normal2()

	// apply noise to the normal
	normal.noise(100).normalize()
	normal.noise(1)

	// draw a line the starts on controlShape and moves away from it
	hatch.moveTo(cursor.position()).lineTo(cursor.position()+normal*100)
}
Some points of departure
- Endotropic – turn this code into something that points inwards rather than outwards.
- Shape – try a different control shape.
- Process – edit this code so that it draws the process as it unfolds (use
_.wait()and_.redraw()). - Noise – modify the distribution of noise along the line.
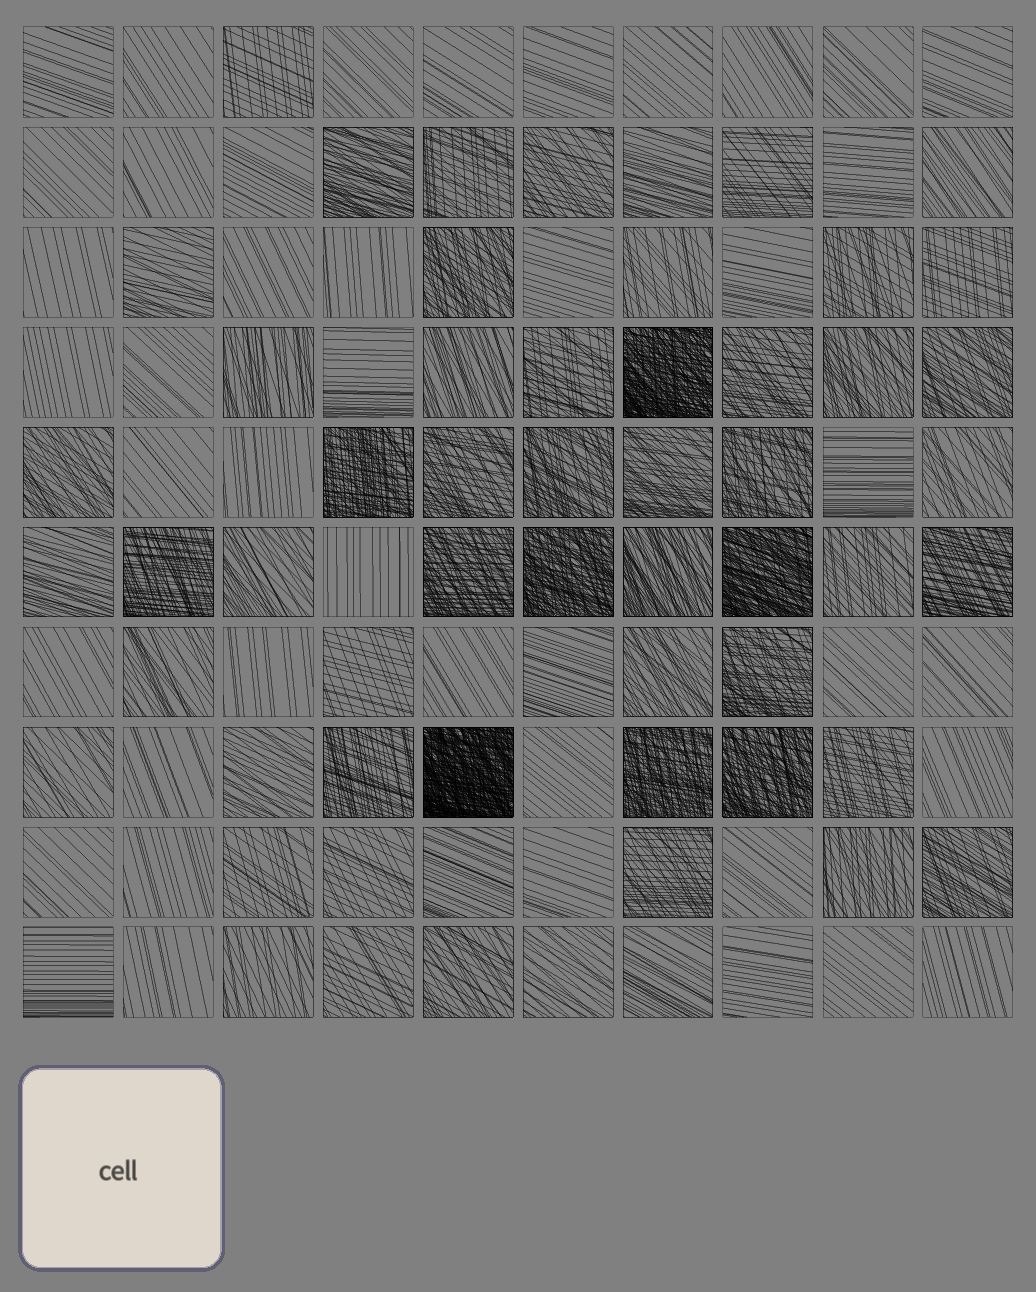
“…the pull from outside in”
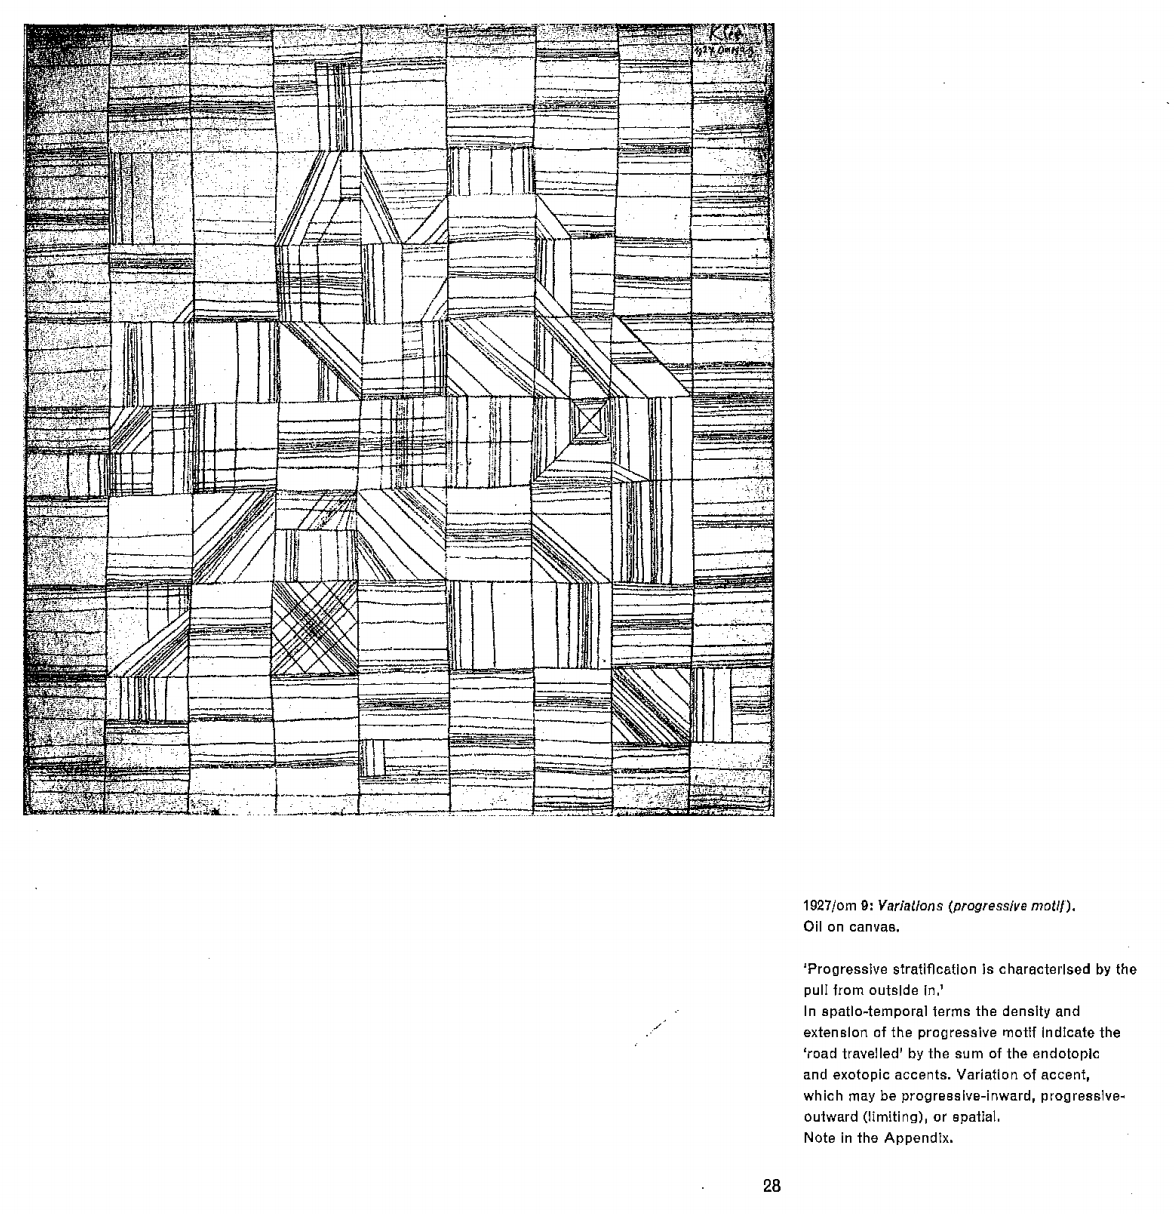
The Thinking Eye, Paul Klee, pg. 28 (but see also pg. 48)
// clear everything that has been drawn so far
_.lines.clear()

// lighten the background a bit so we can see things
_.window.background = vec(0.5, 0.5, 0.5)

// this declares a new function called 'drawCell' that takes
// two parameters 'x, y'
var drawCell = (x,y) => {

    // come up with a random direction
	var dir = vec(0,0).noise(1).normalize()
	if (dir.x<0) dir.x = dir.x*-1
	if (dir.y<0) dir.y = dir.y*-1

    // and the vector perpendicular to this direction
	var perp = vec(dir.y, -dir.x)

	var f = new FLine()

    // draw 100 lines in direction 'dir'
    // while moving in direction 'perp'
	var at = vec(0,0)
	for(var i=0;i<100;i++)
	{
		f.moveTo(at-dir*100)
		f.lineTo(at+dir*100)

        // randomly head in direction 'perp'
		at = at + perp*i*0.2*Math.random()
	}

    // crop to a square in the right spot
	var crop = new FLine().rect(50,-50,50,50)
	crop.color = vec(0,0,0,0.3)

    // translate it to be at x,y
	_.lines.add((crop + vec(x,y) -vec(50,-50)) *scale(0.98, vec(x,y)))

    // you can only intersect things that have an area
    // let's make these really thin lines
	f = f.byThickening(0.1)

    // intersect crop with the line f
	f = f * crop
	f.color = vec(0,0,0,0.3)

	_.lines.add((f + vec(x,y) -vec(50,-50)) * scale(0.98, vec(x,y)))
}

// draw a 10 by 10 grid
for(var x=0;x<10;x++)
{
	for(var y=0;y<10;y++)
	{
		drawCell(x*50,y*50)

        // if we are close to the middle of the grid (5,5) draw many more
		while (Math.random()>(5+ (x-5)*(x-5) + (y-5)*(y-5) )/50)
			drawCell(x*50,y*50)
	}
}
Some points of departure
-
Constrain — the angles differently, right now there are random?
-
Distribute — modify the distribution of over-strokes.
-
Animate — Build a drawing animation with
_.redraw()and_.wait() -
Disorder — Do something other than a grid.
“…progressively spatial…”
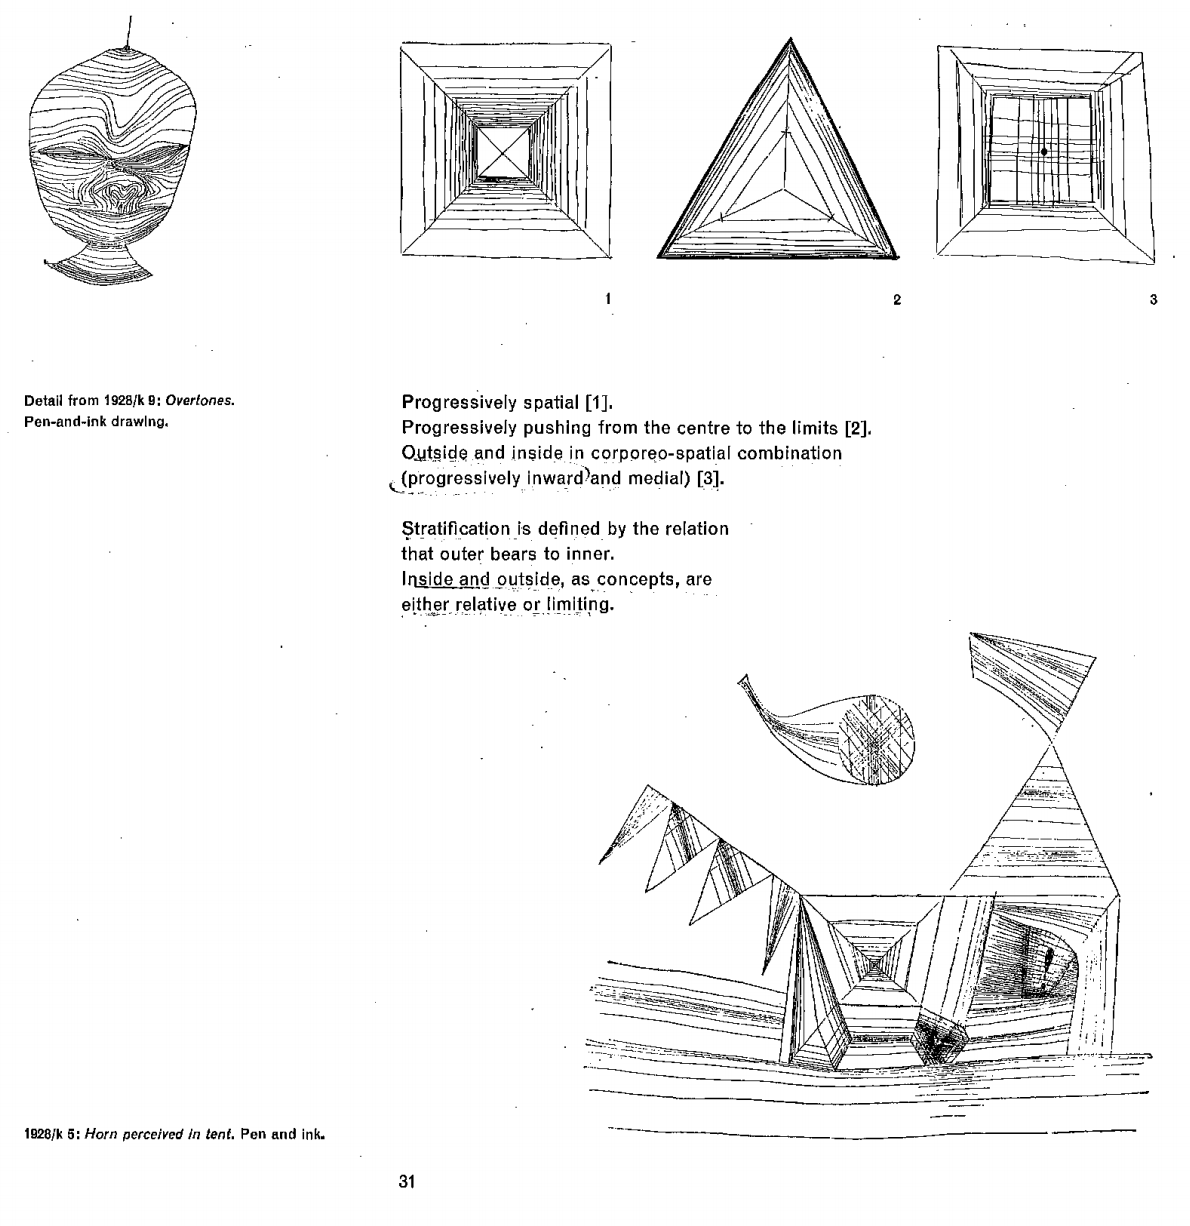
The Thinking Eye, Paul Klee, pg. 31
// clear all lines associated with this box
_.lines.clear()

// a better background color
_.window.background = vec(0.5, 0.5, 0.5)

// again, the 'input' to this process is a shape
var controlShape = new FLine().rect(10,10,500,500)

// which we can edit with the mouse
controlShape.tweaky = true

// translucent white
controlShape.color = vec(1,1,1,0.25)
controlShape.thicken = 1
_.lines.controlShape = controlShape

// make it editable
_.applyTweaks()

// at this point controlShape might no longer be a rectangle, after some edits

// build a list of 'spans' (diagonals between control points)
var spans = []
for(var i=0;i<controlShape.nodes.size()-3;i++)
{
	var a = controlShape.nodes[i].to
	var b = controlShape.nodes[i+2].to
	var span = new FLine().moveTo(a).lineTo(b)
	span.color = vec(0,0,0,1)
	spans.push(span)

	// draw the spans as well
	_.lines.add(span)
}

// defines a function that build's a tour of the spans
tour = (along) => {

	var f = new FLine()

	// we do the spans once
	for(var i=0;i<spans.length;i++) {
		var at = spans[i].sampleAt(along)
		f.lineTo(at)

		// we wobble where we are sampling the span a little
		along += (Math.random()-0.5)*0.05
	}

	// and then do the 'other side'
	for(var i=0;i<spans.length;i++) {
		var at = spans[i].sampleAt(1-along)
		f.lineTo(at)

		// we wobble where we are sampling the span a little
		along += (Math.random()-0.5)*0.05
	}

	// connect with the start of the line again
	f.lineTo(f.nodes[0].to)
	f.color = vec(0,0,0,0.5)

	// and draw it
	_.lines.add(f)
}

// draw 100 tours starting at 0 and ending at 0.5
for(var x of Anim.lineRange(0, 0.5, 100))
	tour(x)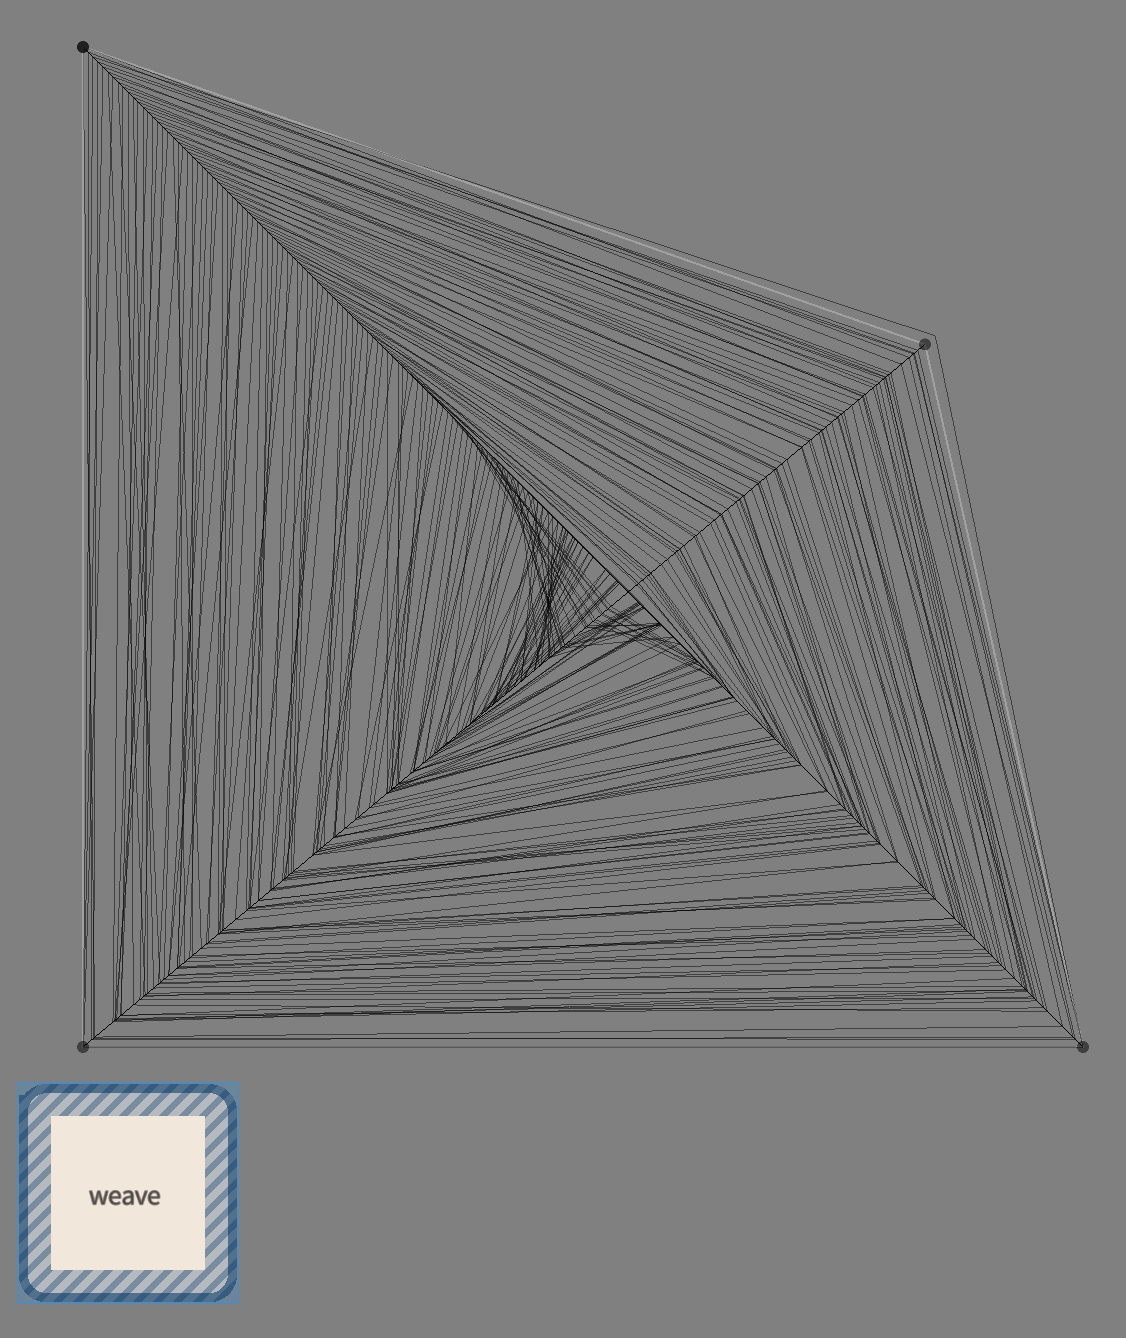
Some points of departure
- shape — try a different input shape
- randomize — every ‘Math.random()’ marks a random distribution that might be worth manipulating
- decorate — the tours further: build a reason to ‘curveTo’ rather than ‘lineTo’
- animate — turn this into an animation with
_.wait()and_.redraw()
“…as determined by the tool used to make it…”
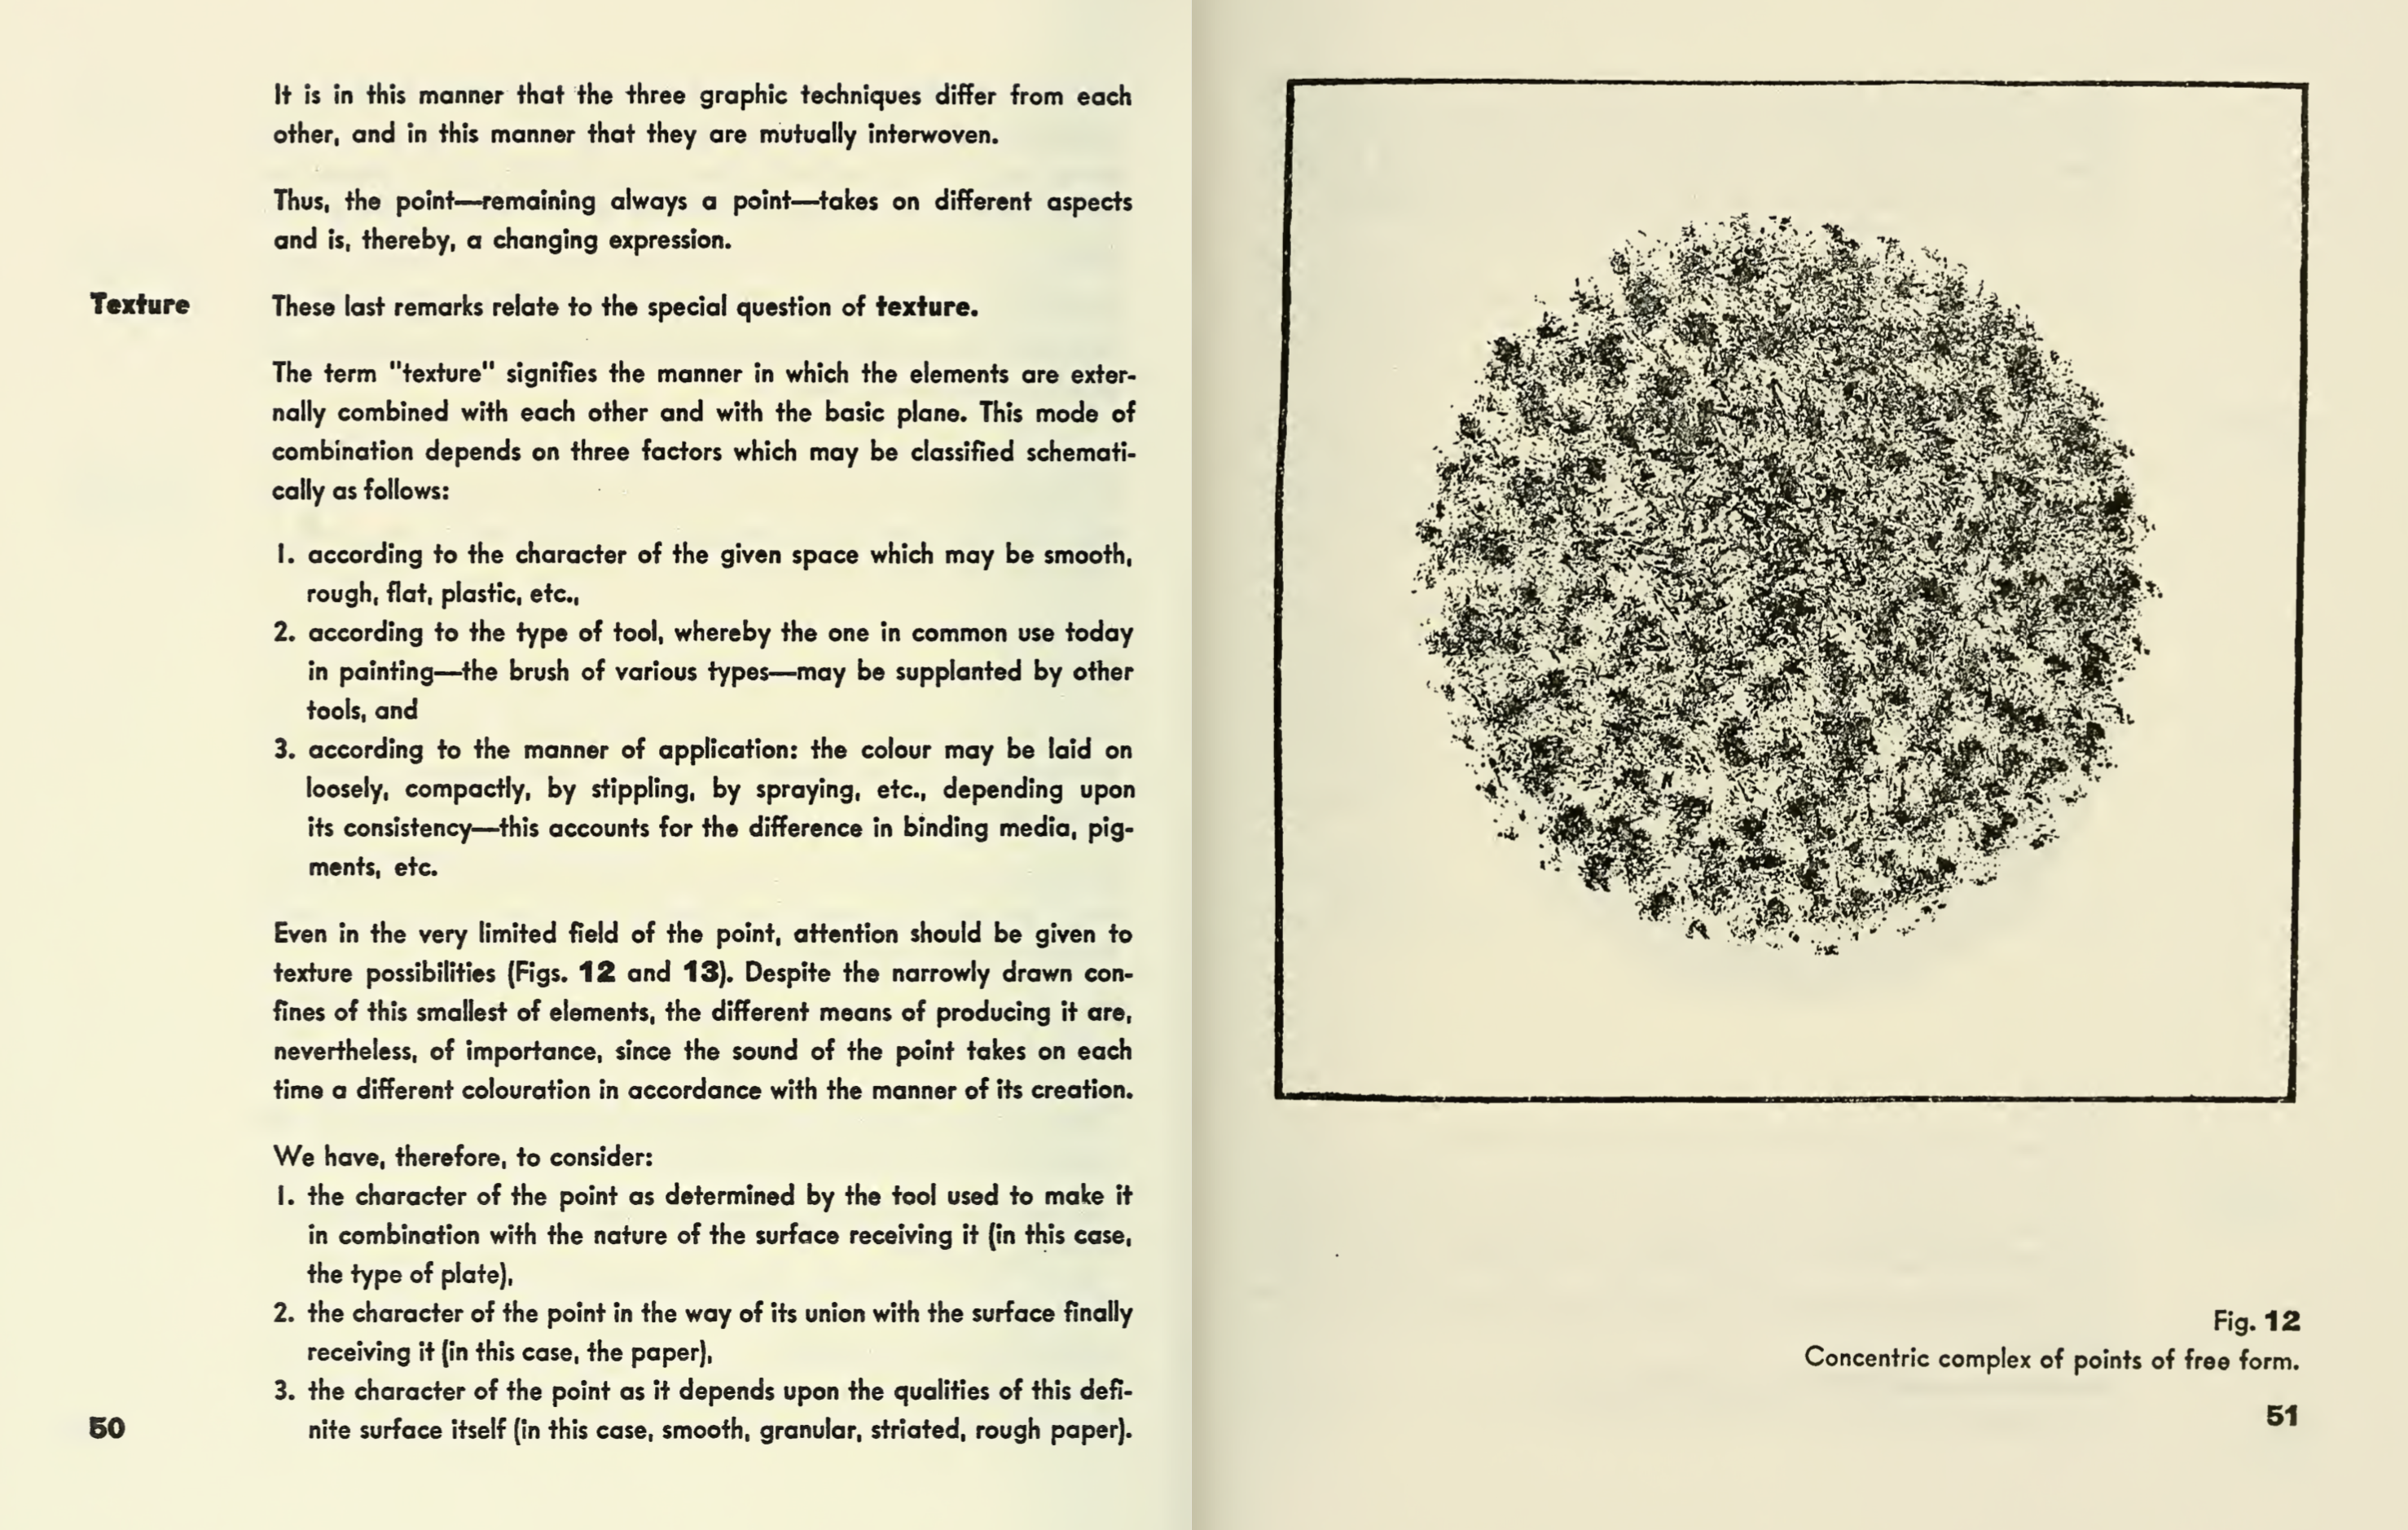
Point and Line to Plane, Kandinsky, pg. 50-1
// clear all the lines in this box
_.lines.clear()

// we are going to draw to 'FLine' -- one with lots of points
var points = new FLine()

// and some 'decorative' connective lines
var littleLines = new FLine()

points.pointed=true
points.pointSize=1
points.color = vec(0,0,0,0.4)

_.lines.points = points
_.lines.little = littleLines

// we'll do 5000 clusters
for(var i=0;i<5000;i++)
{
	// pick a point that's in a square from -1 to 1
	var dir = vec(0,0).noise(1)

	// if it isn't inside a circle, reject it
	if (dir.length()>1) continue

	// choose this as our point (a circle radius 300, centered on 500,500)
	var point = vec(500,500) + dir*300

	// draw 10 points for each cluster
	for(var m=0;m<10;m++)
	{
		// draw little clusters of 'radius' 4 around 'point'
		var dir2 = vec(0,0).noise(4)
		points.moveTo(point+dir2)
		littleLines.moveTo(point).lineTo(point+dir2)
	}
}
Some points of departure
- Animate the process. With
_.redraw()and_.wait() - Modify the ‘decoration’ (
littleLines) - Splotch along a line (perhaps towards pg. 105)