"A tool to build tools" — The Color Matching Tutoral
For the series Depth, OpenEnded Group is getting into making short films, so we're beginning to assemble film and image sequence based tools for our own, idiosyncratic workflows. One task that's quickly arisen during the making of Housebound, which is a stereo-3d piece, is a simple, but surprisingly uncommon, color matching task.
This page is half-tutorial (articulating Field as a tool for building tools, and providing an example of how we can build something) and half us just posting some source-code and some insight into our working patterns. It's not the kind of tutorial where you type the code in and get something that works. This is a tutorial that reveals the philosophy of using Field to get things that you want to do with your own code done.
Color matching as an interpolation problem
In Housebound we have two cameras looking, at slightly different angles, at the same scene. By presenting these two images to each eye of the viewer a sense of depth is achieved. But there's a hitch: our eyes are only, approximately, 6.5cm apart. While our eyes are very good at still getting that 3D feeling from images that are shot from a wide variety of perspective-pairs (with tolerances that depend upon the distance to the focus of the scene and the presentation geometry) it's generally the case for indoor shooting that you need to have the cameras closer together than their physical construction will allow (especially if you start zooming in, which is something our eyes can't do). In our case, shooting with two Sony EX1's, sticking them side by side (or even shooting with the cameras in portrait and then putting them top-to-bottom) won't cut it, the cameras are, compared to our eyes, huge.
The answer: mount one of the cameras vertically looking down and use a half-silvered mirror. This works well enough, but it produces a new problem: the images produced by the two cameras have two different color qualities to them — our half silvered mirror seemed to reflect more green than it transmitted. While, again, the human visual system is surprisingly good at averaging between the eyes, we'd like the erase this difference completely.
So this is a color-grading problem, but not of the kind that Final Cut Pro / After Effects &c want you to think about — they and many other programs will gladly offer you up an interface that lets you tweak the hue and saturation of the lows, mids and highs of an image, and then go in further and tweak various parts of the image or this color-space. Tweak, tweak, tweak...
What we want to do is to eliminate the tweaking altogether and make image(sequence) B "look" just like image(sequence) A (except from a different angle).
Our approach here is to specify the function that maps one color-space onto another, more specifically, we'll use a Radial basis function based function approximator that lets us specify this function by specifying some example points in the mapping — features in one image are pointed to by the other image. If we're particularly clever we'd initialize these examples by some other kind of analysis, but if we have to draw and tweak a little 5 lines or so, so be it. Far better that than a walk through color-transformation space. This, if it works, means that we've reduced the color-mapping search problem down to a user-interface problem: we need some UI that lets us edit pairs of colors that should map to each other.
Color matching as a UI problem
Here's where we're going:
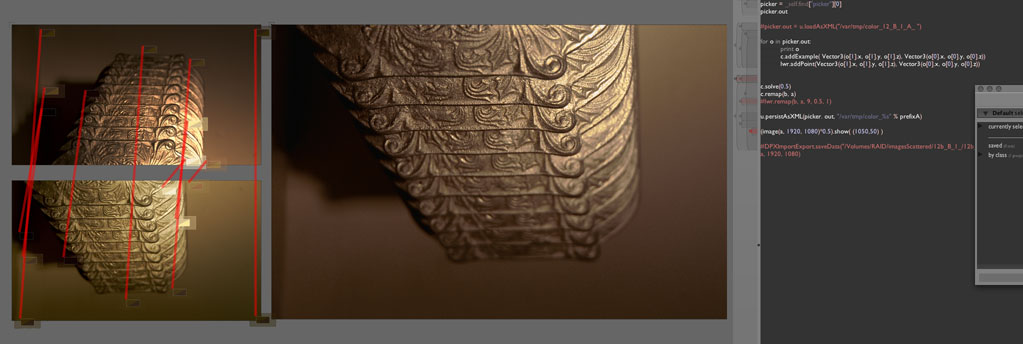
On the left we see the two source images (our half-silvered mirror also flips the image as well). On the right, our remapped image. It should, if everything is going correctly, have the same color quality as the image on the top, but contain the same image as the image on the bottom. Above all, we want to get to the point where we can see if our RBF idea is any good as soon as possible in as little code as possible, but with an interface that, if it does work, we'll have to live with for 60-70 shots.
Writing the code
We'll start in an obvious place: we'll load the two images. In my case I have something like this:
from CoreGraphics import *
from marc.image import *

_self.lines.clear()

prefixA = "lightpole_4_A-2_"
prefixB = "lightpole_4_B_2-2_"
num = "000103"

a = DPXImportExport(File("/Volumes/RAID/imagesScattered/%s/%s%s.dpx" % (prefixA,prefixA, num))).data
b = DPXImportExport(File("/Volumes/RAID/imagesScattered/%s/%s%s.dpx" % (prefixB, prefixB, num))).data

ia = image(a, 1920, 1080)
(ia*0.5).show( (50,50) )

ib = image(b, 1920, 1080)
(ib*0.5).show( (50,650) )
I'm using a class DPXImportExport that I have in my own, personal source tree (this works, because I've told Field to look in my source tree for classes and source files that it can't find elsewhere). This DPX path is ideal here because I'd like to retain all 10-bits of the dynamic range that I have coming out of my 4:2:2 HD-SDI capture path. Finally, after getting the java.nio.FloatBuffers associated with each DPX file — such FloatBuffers are the "ground truth" for all images inside Field — I turn them into Field image's and put them into the canvas so I can see them. Using the image(url) constructor and toFloatBuffer method would work just as well (especially if you were loading OpenEXR's or something).
So far, so simple — this you should have been able to gather from the BasicDrawing and CoreGraphicsExtensions documentation. Next I need a separate visual element that builds up the main attraction: the color picking UI.
Interactive tools in Field
There are lots of ways that you can make interactive control "surfaces" in Field. To one end of the spectrum you might make your own mouse-down-drag-release cycle (and to respond to key-presses) — consider looking at the ModalPlugin. Near the other end of the spectrum (just above using sliders and so on in your code you might consider recasting your interactive problem in terms of things that are already interactive inside Field — frame locations, menu items, or, in this case the BasicDrawing line editor.
Let's build this up:
from CoreGraphics import *

_self.lines.clear()
A standard preamble. When this visual element is executed, we'll make sure we've imported what we need in terms of image drawing support and we'll clear this visual elements list of lines to draw.
Next:
_self.ll = _self.ll or ArrayList()
we'll have a list called ll that's persisted with this document. If it doesn't exist, we'll make an empty array list. This list will store the start and end points of all of our position pairs.
for l in _self.ll:
    pl = PLine().moveTo(*l[0])
    pl.lineTo(*l[1])
    pl.color=Vector4(1,0,0,0.5)
    pl.thickness=2
    _self.lines.add(pl)
For all of the elements in ll draw them as thick-ish, red lines.
_self.tweaks()
This, if you recall from BasicDrawing is the call that essentially "runs" the spline editor built into Field. After this point, the lines in _self.lines have been edited by whatever edits have been accumulated from user input. Now we're in a position to "pick" colors from the starts and ends of these lines and build our model.
First some definitions:
def pick(at):
    t = Vector4()
    for x in range(-3, 4):
        for y in range(-3, 4):
            s1 = SimpleImageDrawing.colorPickFromImage(_self.enclosingFrame.currentContext, Vector2(at[0]+x, at[1]+y))
            if (not s1): return None
            t+=s1
    t.scale(1/49.0)
    return t
Uses the functionality inside SimpleImageDrawing to work out what pixel, if pixel, is under that position. We'll average over a 7x7 neighborhood.
def drawEnd(at, cc1, cc2):
    if (cc1):
        box = PLine().rect(Rect(at.x+3, at.y+1.5, 50, 25))
        box.filled=1
        box.stroked=1
        box.color=cc1
        box.strokeColor=cc1*0.8+Vector4(0.4, 0.4, 0.4, 0.4)
        box.thickness=1
        box.derived=1
        _self.lines.add(box)

        surround= PLine().rect(Rect(at.x+3, at.y+1.5, 50, 25))
        surround *= Vector2(2,2)
        surround.color = Vector4(box.color)
        surround.color.w=0.4
        surround.filled=1
        surround.derived = 1
        _self.lines.add(surround)
    if (cc2):
        box = PLine().moveTo(at.x+53, at.y+1.5)
        box.lineTo(at.x+53, at.y+26.5)
        box.lineTo(at.x+3, at.y+26.5)
        box.stroked=0
        box.filled=1
        box.derived=1
        box.color=cc2
        _self.lines.add(box)
This function given a position and two colors draws a fancy little box that has two triangles inside it (on a transparent surround). This lets you compare at a glance the two colors that you've "connected" with the line.
Finally, the code that calls these functions:
_self.out = ArrayList()

for l in ArrayList(_self.lines):
    start = l.events[0].getDestination(None)
    end= l.events[1].getDestination(None)
    print start, end
    cc1 = pick(start)
    cc2 = pick(end)
    drawEnd(start, cc1, cc2)
    drawEnd(end, cc2, cc1)
    _self.out.add( (cc1, cc2) )
This is the code that actually uses the two definitions above — it cycles through the lines that might have been manipulated by the drawing editor; picks the colors from the start and ends of the lines; draws the colored boxes and adds the colors to a new list, _self.out
Great, now given some lines we can exploit Field line editor to let us move them around (and copy them, and delete them) with the mouse and then decorate them to let us know what's going on and use them as the basis for our color transformation model. But something's missing: how do we get some lines into ll in the first place?
Again, in Field, we have choices. Firstly we could just write and execute some code that adds a line into _self.ll. We could just let this code hang out in python_executionScratch_v (and then select it and command-return execute it when we want to add a line. We could also add a menu item via the properties mechanism (properties inside _self become menu items if they end with _m_). More straightforward would just be a button marked "add sample pair". In Field, we can "print" our UI just like we print a result:
def addSamplePair():
    _self.ll.add( [(150,150), (200,200)] )
    _self()

def resetSamplePairs():
    _self.ll.clear()
    _self.tweak_v = ""
    _self()

OutputInserts.printButton("add sample pair", _self, addSamplePair)
OutputInserts.printButton("reset", _self, resetSamplePairs)
This prints us two buttons that, when pushed, call those functions. Sure, there are many prettier ways of doing this, but the above code is one button, in the right place, per line of code. They appears in the output window just like output text, only buttons.
Finally, one last visual element: the element that computes and shows the result:
_self.lines.clear()

c = ColorRBF()
c.gamma = 1
picker = _self.find["picker"][0]

for o in picker.out:
    print o
    if (o[0] and o[1]):
        c.addExample( Vector3(o[1].x, o[1].y, o[1].z), Vector3(o[0].x, o[0].y, o[0].z))

c.solve(0.05)
c.remap(b, a)

u.persistAsXML(picker. out, "/var/tmp/color_%s" % prefixA)

image(a, 1920, 1080).show( (1050,50) )
Here we construct a new ColorRBF class (which is essentially the main class we are exploring in this tutorial); find the "picker" visual element that we just created; pull out the model that it's holding; use it to populate the ColorRBF instance; tell it to perform the remapping; store the model to disk (since if we like it, we'll want to use it on the whole sequence); and finally put the transformed image on the screen. Done!
Where are we?
It's worth pausing for a moment to see what we've gotten. This application isn't going to replace After Effects any time soon (but then Adobe wasn't going to come to our studio and help us solve our problem any time soon either). It's hard to imagine that we'd be motivated enough to write a whole application, or even a little Swing applet, to do this kind of color-matching. I know I'd have a hard time putting in the hours on that — after all, I'll be onto something unrelated to color matching in a day or two anyway. UI "friendly" conventions like file dialog boxes have been replaced with things like filename-completion — thoroughly adequate for use as a personal tool; carefully designed tool-panels have become buttons that just print out at the bottom of the screen — again, completely sufficient for the task at hand; we even have undo built in from the Field line editor; the canvas is zoom-able and very responsive. This is very Field: it's fast to explore, ad hoc, not polished, personal, completely sufficient, and above all rapid to write.
DPXImportExport and ColorRBF are two classes inside my "personal" codebase — you can drop me an email should you find yourself desperate for them (my DPX parser is incredibly fragile). But the point isn't to add a feature to Field — so now we can proudly say "works with DPX" or "now with advanced color matching". The point is for Field to continue to evolve as a place where programming artists can get to the point in the code where they say "damn it, I need a tool that lets me pick, say, a dozen points in space with lines connecting them and get the colors from the points, and then have that as an array of vector3s right here .... " and just knock it together. It could have been that the ColorRBF approach was a bad idea — and I'll be honest, even with a hyper-plane fit, it sometimes extrapolates poorly — but what I really needed is to get to that point and through it as fast as I could, and I could only do that by trying it.