
XR / Web Browser Reference
FLines
new — new FLine()
An FLine is a container for geometry. You can construct an FLine with new FLine():
var someLine = new FLine()

someLine.moveTo(40,20)
someLine.lineTo(200,50)

stage.aName = someLine
stage — stage.name = myLine
stage — stage.add(myLine)
stage is a place to add FLine once they’ve been made. If you add an FLine to the stage that’s already there it gets updated. If you fail to add an FLine to a stage, you’ll never see it.
moveTo — fline.moveTo(x,y,z=0)
Adds a ‘moveTo’ instruction to a line — this moves the ‘pen’ without drawing. z defaults to 0 if you don’t include it. .moveTo can also consume vectors: fline.moveTo(vec(1,2,3) + vec(3,4,5)). Instructions can be chained together thus: fline.moveTo(0,0,0).lineTo(1,1,1).
lineTo — fline.lineTo(x,y,z=0)
Adds a ‘lineTo’ instruction to a line — this moves the ‘pen’ without drawing. z defaults to 0 if you don’t include it. .lineTo can also consume vectors: fline.lineTo(vec(1,2,3) + vec(3,4,5)). Instructions can be chained together thus: fline.moveTo(0,0,0).lineTo(1,1,1).
cubicTo — fline.cubicTo(cx1, cy1, cz1, cx2, cy2, cz2, x,y,z)
Draws a cubic spline curve to a new position using control points c1 and c2. Vector3 and Vector2 are also accepted. Returns this FLine so you can chain calls together.
filled — fline.filled = false
Controls whether an FLine is filled in (that is: turned into solid shapes) when it is drawn. Defaults to false.
stroked — fline.stroked = true
Controls whether an FLine is filled in (that is: turned into solid shapes) when it is drawn. Defaults to true.
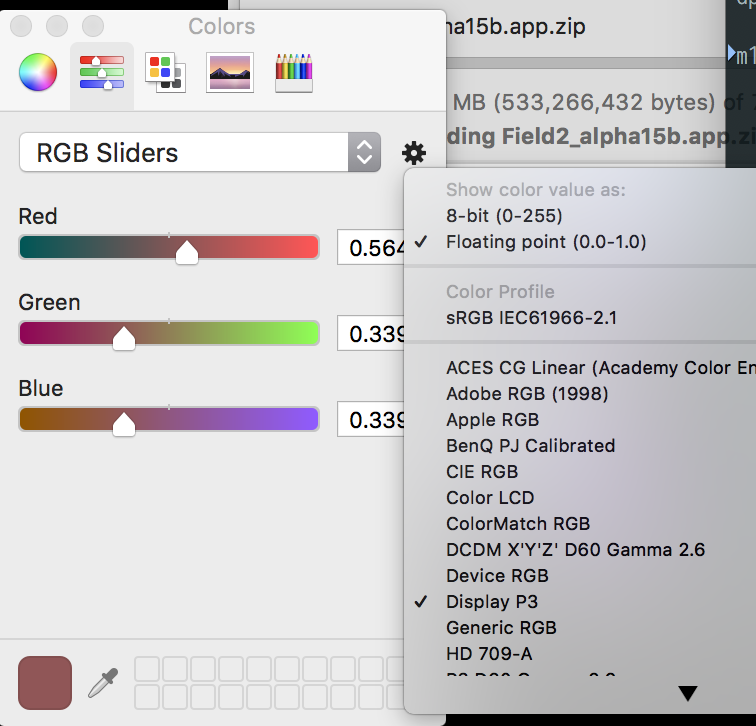
color — fline.color = vec(1,0,0.5, 0.25)
Sets the color of a line. Colors in Field are Vector4, that is vec(Red, Green, Blue, Opacity) with each component ranging from 0.0 (black / transparent) to 1.0 (white / opaque). This is an additive color space. You can also find a good additive color picker built into OS X:
fillColor — fline.fillColor = vec(1,0,0.5, 0.25)
Sets the color of a fill of a line (which otherwise defaults to fline.color. Colors in Field are Vector4, that is vec(Red, Green, Blue, Opacity) with each component ranging from 0.0 (black / transparent) to 1.0 (white / opaque). This is an additive color space.
strokeColor — fline.strokeColor = vec(1,0,0.5, 0.25)
Sets the color of a stroke of a line (which otherwise defaults to fline.color. Colors in Field are Vector4, that is vec(Red, Green, Blue, Opacity) with each component ranging from 0.0 (black / transparent) to 1.0 (white / opaque). This is an additive color space.
byTransforming — fline.byTransforming( (x,y,z) => vec(y,x,z*x) )
Returns a new, independent FLine that has had all of it’s positions transformed by the supplied function.
+ — fline + vec(1,0,0)
Return a new FLine translated by the added vector.
- — fline - vec(1,0,0)
Return a new FLine translated by the subtracted vector.
* — fline * vec(1,0,0), fline * 0.2
Return a new FLine scaled by the added vector or scalar
* — fline * rotate3(vec(0,1,0), 0.2)
Return a new FLine rotated by the supplied transform.
[advanced] fill — fline.fill -> Mesh
After a line has been added to stage the fill property contains the Three.js Mesh object that holds the geometry. You can use this to do all kinds of advanced Three.js tricks.
[advanced] stroke — fline.stroke -> Mesh
After a line has been added to stage the stroke property contains the Three.js Mesh object that holds the line segment geometry of the outline. You can use this to do all kinds of advanced Three.js tricks.
[advanced] mouseDown — fline.mouseDown.myhandler = (event) => {}
FLine can have mouseDown handlers associated with them:
fline.mouseDown.myhandler = (event) => {
    print("clicked!")

    // the position of the camera and direction of the mouse / touch
    print(event.ray.origin)
    print(event.ray.direction)

    // the (optional) hit position on the nearest AR plane in the environment
    print(event.hit)
}
This means that you can make buttons that do things:
clearAll()
var f = new FLine()

f.moveTo(0,0,0)
f.lineTo(1,0,1)
f.lineTo(1,1,0)
f.lineTo(0,1,0)
f.lineTo(0,0,0)

f.filled= true

f.mouseDown.justAStepToTheRight = (event) =>
{
	f = f + vec(0.1, 0, 0)

    // and a random color
	f.color = vec(Math.random(), Math.random(), Math.random(), 0.5)
	f.filled=true

	stage.f = f

}

stage.f = f
This will send a button that changes color when you ‘click’ it and scurries slightly to the right.
Field things
print — print("hello world")
Print sends something back from the web-browser back into the text editor (typically at the bottom or near where you executed something from). If print gets a complex JavaScript object it will try really hard to format it correctly in a way that you can explore using the mouse. Sometimes, if the object is too long or complex it will give up. When this works this is a great way to investigate complex Three.js objects.
For browsers where print is hardwired into a request to actually print the page, you can use log instead.
clearAll — clearAll()
Removes everything Field related from the scene.
clearAFrame — clearAFrame()
Removes everything A-Frame related from the scene.
_.banana = 10
You can set properties that are conceptually ‘inside’ boxes using the _ symbol. For example _.banana=10 sets banana equal to 10. This is a lot like var banana = 10 however properties set on _ can be seen by boxes that are ‘downstream’ of this box. That is: they have arrows coming from this box. You have already seen one example of this. Our AR / in-web-browser boxes are ‘downstream’ of our web-server box.
__.banana = 10
You can make properties globally available by using double underscore __. Once __.banana=10 has been set somewhere, then _.banana==10 in all boxes everywhere.
_.begin('peach') [syntax might change]
This is equivalent to ‘beginning’ a box called ‘peach’. That is, option clicking on it. You can use this to trigger boxes in callbacks for example.
_.end('peach') [syntax might change]
This stops a box called ‘peach’.
launch( function*, name)
Starts a generator function running. This is a little like if you inserted a _r into a new box, but of course doesn’t require you to make a new box and feed all of the variables you need for it to run into a new place. By far the most common use for launch is actually inside over — making little animations that smooth over changes.
But, by way of example, this code here launches a little function that animates the opacity of a line f:
launch( function*() {
		for(var q=0;q<100;q++)
		{
			f.color = vec(1,1,1, 1-q/99)
			stage.f = f
			yield
		}
	})
The key difference here is the yield keyword and the asterix after the function declaration. This makes a different kind of function one that, when it’s called again, execution picks up from after the most recent yield rather than starting again at the top. Now we have a function that runs 100 times and then ends, smoothly animating the opacity of f. An easier way to do this code though is to use over.
The name parameter requires some explaination — only one launched function with a particular name can be running in a box at a time. This helps prevent the case where your code starts spawning long running launched functions that all stomp over each other in strange ways. But, if you want to run two at a time, give them different names.
over(seconds, name, callback)
Calls callback(a) with a moving from 0 to 1 (inclusive) over the next seconds. For example, the example given for launch above is better written as:
over(2, "myOpacityAnimator", (alpha) => {
	f.color = vec(1,1,1, 1-alpha)
	stage.f = f
})
Loading files
mapDirectory — mapDirectory("/Users/marc/Desktop", "/assets")
The mapDirectory function exposes some part of your desktop computer (the machine running Field) to devices connected to our webserver. For example, if we had a file on our desktop called ‘fantastic.gltf’ then this works:
mapDirectory("/Users/marc/Desktop", "/assets")
loadGLTF("/assets/fantastic.gltf")
On Windows you might want something like:
mapDirectory("c:/Users/marc/Desktop", "/assets")
loadGLTF("/assets/fantastic.gltf")
loadFBX — loadFBX(url, name [, callback])
Loads an FBX file stored on the server from url and adds it to the scene. After the fbx file is loaded an object called "name" is filled in with name.animations as a list of data in the file and name.objects representing all of the loaded geometries. This object also gives you animation control over the material that’s loaded. Furthermore the root node of the object tree you load will be called ‘name’.
You can call:
loadFBX("/assets/wonderful.fbx", "great")

// ... sometime later ...

great.play() // starts the animations playing
great.play(false) // starts the animations playing, but doesn't loop
great.stop() // stops them
great.pause() // as it says

// loadFBX automatically names the root object with
// the name you pass in
findByName("great").position.x = 10

great.apply(0.5) // skips to 0.5 seconds into the animation
great.currentTime() // what time are we currently at
great.apply(great.currentTime() + 0.1) // skip forward 0.1 seconds
Since almost nobody remembers to wait for the model to load (and it’s a pain to architect your code such that this happens) there’s an alternative syntax using a callback. Think of this a little like mouseDown and friends - a way of arranging for some code to be called later.
loadFBX("/assets/wonderful.fbx", "great", (great) => {
    great.play() // starts the animations playing
    great.stop() // stops them
    great.pause() // as it says

    // loadFBX automatically names the root object with
    // the name you pass in
    findByName("great").position.x = 10

    great.apply(0.5) // skips to 0.5 seconds into the animation
    great.currentTime() // what time are we currently at
    great.apply(great.currentTime() + 0.1) // skip forward 0.1 seconds
})

// other code goes here, but it might get executed
// before the callback
If you don’t mind a little more syntax the above code is much clearer about making sure that things are executed at the right time.
loadJSONScene — loadJSONScene(url, loaded)
Loads an JSON Scene file (exported from the editor) stored on the server from url and adds it to the scene. After the json scene file is loaded an object called "loaded" is filled in with loaded.animations as a list of data in the file and loaded.objects representing all of the loaded geometries.
You can call:
loadJSONScene("/assets/wonderful.json", "great")

// ... sometime later ...

great.play() // starts the animations playing
great.stop() // stops them
great.apply(0.5) // skips to 0.5 seconds into the animation
loadGLTF — loadJSONScene(url, loaded)
Loads an GLTF Scene file stored on the server from url and adds it to the scene. After the gltf file is loaded an object called "loaded" is filled in with loaded.animations as a list of data in the file and loaded.objects representing all of the loaded geometries.
You can call:
loadGLTF("/assets/wonderful.gltf", "great")

// ... sometime later ...

great.play() // starts the animations playing
great.stop() // stops them
great.apply(0.5) // skips to 0.5 seconds into the animation
findByName — findByName(name)
Finds the first Three.js object in the Scene called ‘name’. Case sensitive, ‘Scene’ is not the same as an object called ‘sceNE’.
findBySearchingFor — findBySearchingFor(pattern)
Finds the first Three.js object in the Scene with a name containing ‘pattern’. E.g findBySearchingFor('ear) matches an object called Pear
addPointLight — addPointLight(name)
Adds a point light to the scene (called “name”). You can move this around with position, e.g:
var light = addPointLight("myLight")

// move it over
light.position.x = 10
Asking for completion (ctrl-period) on light. will give you all kinds of interesting things to set (the color of the light for example…)
addVideoPlane — addVideoPlane(url, name)
Adds a plane with video on it into the scene called ‘name’ (replacing anything else called ‘name’ that’s already there). The video is preloaded, but not started. On iOS video and sound can only play as a result of user interaction. Therefore, currently, you need something like:
var v = addVideoPlane("/someplaceIveMapped/sample.mp4", "myVideoPlane")

mouseDown.startTheVideo = (e) =>
{
	v.video.play()
}

// other things you can try:
v.video.pause()

// move playhead
v.video.currentTime=0.3

// blending
v.material.opacity=0.2
v.material.transparent=true

// don't play audio
v.video.muted=true

// change position
v.mesh.position.x = 1.0
addVideoPlane returns an object containing mesh, video and material which refer to the Three.js and HTML5 video objects. It also contains a mouseDown array which you can use to wrong code when people press on the plane containing the video (see the example for planes below).
Multiple video playback on iOS is supported only on videos that don’t contain sound (or, better yet, explicitly marked as muted=true).
Combining this with some judicious use of __. and _. gives you something like an editing system inside Field.
For example, in one box we’ll have:
mapDirectory("/Users/marc/Desktop/", "/Desktop/")
var v = addVideoPlane("/Desktop/sample.mp4", "myVideoPlane")
__.v = v
That box is going to load a video and put it on a plane in space.
If we connect that box to another:
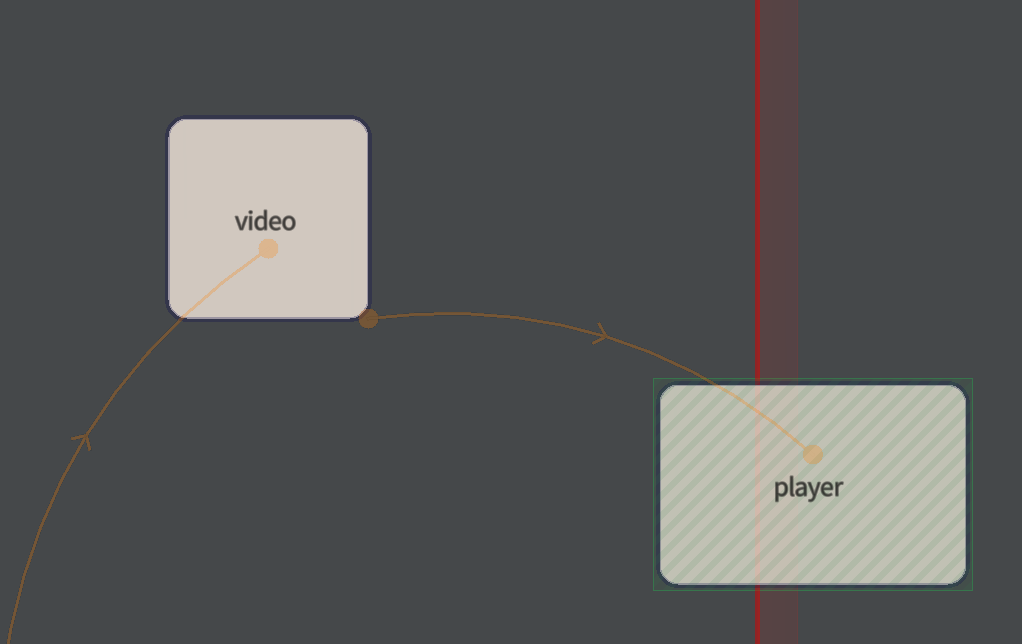
Then that box can access _.v:
// play from the beginning when the box starts

_.v.video.currentTime = 0
_.v.video.play()

// prepare the graphics system for
// a transparent thing
_.v.material.transparent=true

_r = () => {
    // fade up and fade down
	_.v.material.opacity = _t()*(1-_t())*4
}
addImagePlane — addImagePlane(url, name)
Very similar to addVideoPlane above (but lacking the play and pause) functionality. Also includes mouseDown:
mapDirectory("/Users/marc/Desktop/", "/Desktop/")
var v = addImagePlane("/Desktop/myimage.png", "myVideoPlane")

v.mouseDown.clickery = (e) => {
    print("you clicked on the image!")
}
addBox — addBox(name, size=1)
Adds a box to the scene of a certain size. For when you just need to mark a spot in space. It returns something very similar to addImagePlane and addVideoPlane. For example, to set the position of the box:
var v = addBox("myBox")

v.mesh.position.x = -2
// or
findByName("myBox").position.x = -2
Events & Interactions
Field installs some handy uniform event handlers so you can run code when certain events happen. Information about the event is passed to your code as an argument. Note event handlers only fire when there’s nothing selected in the editor.
Event handlers are combined using the same kind of style as the FLine stage:
mouseDown — mouseDown.myHandler = (event) => { ... }
dblClick — dblClick.myHandler = (event) => { ... }
mouseUp — mouseUp.myHandler = (event) => { ... }
mouseMove — mouseMove.myHandler = (event) => { ... }
Called when the mouse (or finder) is pressed, “double-clicked”, released or moved. As well as globally you can also find more focused even handlers on video planes, image planes and FLine instances. Note that dblClick can’t go back in time and prevent the first mouseDown from having happened.
event contains:
event.coordinates
A Vector2(x,y) ranging from -1.0 to 1.0 from left to right, bottom to top.
event.ray.origin
The position of the camera
event.ray.direction
The direction of the mouse click / finger from the camera position.
event.hit
If this isn’t undefined, this is the position in world space where the event hits a AR plane
[mouseDown only] event.intersects
This is a list of Three.js objects that this mouseDown / touch intersects. The list contains elements like:
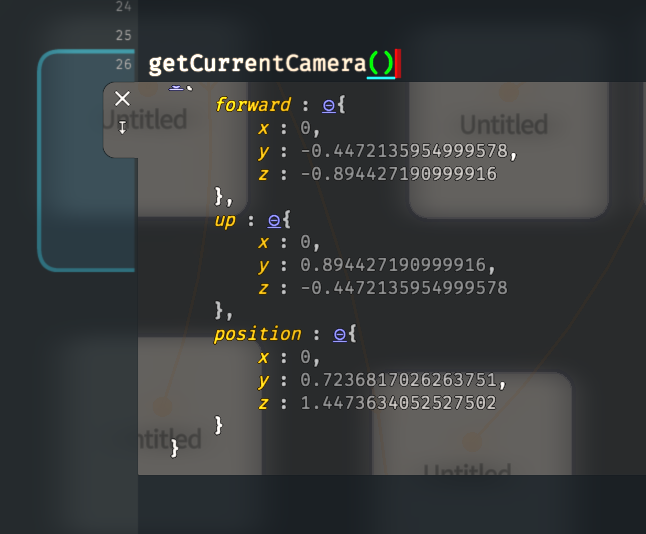
[{ distance, point, face, faceIndex, object } ...]getCurrentCamera getCurrentCamera()
Just like the name suggests, this function returns all of the information that you need to know about the current ‘camera’
getCurrentCamera().forward // is the direction of the gaze
getCurrentCamera().position // is the position of the 'head'
getCurrentCamera().up // is the direction 'up'
e.g:
Use this inside your callbacks and _r to control things based on where the camera is.
For example:
var f = new FLine()
f.moveTo(0,0,0)
f.lineTo(1,0,0)
f.lineTo(1,1,0)
f.lineTo(0,1,0)
f.lineTo(0,0,0)

f.filled=true

stage.f = f

_r = () => {
	a = getCurrentCamera().position.length()/5
	f.color = vec(a,a,a,1)
	stage.f = f
}
Yields:
Image Anchors [ios only for now]
The following code gives you an event callback that’s fired when your phone sees an image in the world for the first time:
clearAll()

// grab an image out of my documents folder
mapDirectory("/Users/marc/Documents/", "/images/")

// call it image "A"
// and say that it is 0.2m wide
createImageAnchor("A", "/images/hubs.png", 0.2, (node) => {

// this is the code that gets called when this happens
	print("hello?")
	box = findByName("Box")
    // move it over by half it's depth so that it sits
    // on the object
	box.position.z = 0.05

    // node is a part of the scene-graph that's all set up to
    // "anchor" to this object
	node.add(box)
})
You have to turn it on in the settings page of the iOS app: “reset world sensing” and “always enable world sensing” must both be on. You’ll have to do this dance every time the IP address of your laptop/desktop changes. This is, again, a “security” feature — your camera is no longer merely building a fairly anonymous dot-map of the world, now it is actively hunting for images; hence the new escalation.
createImageAnchor createImageAnchor(name, url, width, callback)
Creates an image anchor (overwriting any other with name name) from an image stored at url. Width is in meters (and it’s very important, it will overwrite the phone’s idea of how far way from the screen the image is). The callback is supplied with a scene-graph node anchored at the image.
World Map [iOS only]
updateWorldMapPoints updateWorldMapPoints()
Requests that Field updates its copy of the world map. This operates asynchronously, getWorldMapPoints() won’t always immediately change, because the operation takes a while (~50ms). Once it finishes, if there even is a world map (it doesn’t exist early on in the AR ‘startup ritual’), a new copy of the world map will end up stored locally.
worldMapPoints worldMapPoints
worldMapPoints is simply an array-of-arrays representing the points in your phone’s current model of the world. e.g
var somePoint = vec(worldMapPoints[15][0], worldMapPoints[15][1], worldMapPoints[15][2])Spatial Audio
Spatial audio sources are created using makeSource(name, url) — like video, images and 3d models you’ll have to ‘map’ part of your computer to the outside world using mapDirectory.
For example:
clearAll()

mapDirectory("/Users/marc/temp/resonance-audio-web-sdk/examples/resources", "/sounds")

var mySound = makeSource("bird", "/sounds/bird-1_48.wav")

mySound.play()

// scrub around with
mySound.apply(0.5) // seconds
mySound.pause()
mySound.stop()

// set the position of the sound
mySound.source.setPosition(to.x, to.y, to.z)

// the 'source' has lots of different options
// use completion on mySound.source. to see them
mySound.source.setMaxDistance(5)

// export this sound to connected boxes
__.mySound = mySound
_makeSource mysource = makeSource(name, url)
Creates a sound source, returning an object that lets you control playback, position, and range of a source as well a lets you gain access to analysis information concerning the source.
_.play() mySource.play()
_.pause() mySource.pause()
_.stop() mySource.stop()
_.volume() mySource.volume()
Returns the instantaneous volume of a source (when measured at the source) — in dB.
_.waveformData() mySource.waveformData()
Returns an array (typically, but always, 1024 elements long) consisting of the instantaneous raw waveform of the sound.
_.frequencyData() mySource.frequencyData()
Returns an array (typically, but always, 1024 elements long) consisting of the instantaneous raw frequency analysis of the sound (in some-kind-of-dB)
For example, the following draws a live spectrum of a sound
// import the sound from some other box
// we only want to load it once
var mySound = _.mySound

// play it
mySound.play()


// for every frame do this:
_r = () => {
	var data = mySound.frequencyData()

	var f = new FLine()

	for(var i=0;i<data.length;i++)
	{
		f.lineTo(i/1024, 0, 1+data[i]*0.01)
	}

	stage.f = f
}
Three.js trapdoors and escape routes
Field’s web rendering engine is actually a wrapper around Three.js — strictly, the live-coding, running, animation, variables, linear-algebra and FLine part is Field and the actually drawing things is Three.js. Often parts of Three.js show through, and this is deliberate. This offers a trapdoor, away from Field into a bigger, broader more complex graphics system. We (or you) can wrap these things up in tighter, simpler functions if they end up being useful.
Trapdoors include fline.fill and fline.stroke which return THREE.Mesh objects, addVideoPlane( ... ) and addImagePlane( ... ) functions that return objects that contain mesh, material etc. and the findByX( ... ) series of methods which return whatever THREE.Object3d happens to match that name. Sometimes when somebody asks how to do some certain rendering thing the answer really ought to be, look at this Three.js code. This section compiles these miscellanous recipes.
Adding texture / fixing broken Texture Maps
Missing a texture map on an object (perhaps because your FBX file isn’t quite loading textures correctly):
myMesh.material.map = new THREE.TextureLoader().load("/myfiles/greatImage.jpg")
myMesh.material.needsUpdate = true
Remember: that’s a URL not a desktop path — it goes through the mapDirectory logic.
We can extend this syntax to other image parts of the material. This is how you alpha mask a piece of geometry — useful for videos!
For a video plane v:
v.mesh.material.alphaMap = new THREE.TextureLoader().load("/desk/mask2.jpg")
v.mesh.material.transparent=true
v.mesh.material.needsUpdate=true
Deleting particular things
As you know Object3Ds exist in a scene-graph / hierarchy. To remove parts of the scene call .remove on their parent:
findByName("Lamp").parent.remove(findByName("Lamp"))Removes “Lamp” from it’s parent, and thus from the scene itself.
Stenciling
Remember the Ah Ha video? The key there is that there’s a magic window through which a 3d scene is visible. This can be easily achieved using ‘stenciling’ by this inscrutable late 1980s low-level code. This code breaks through not only the layer between Field and Three.js, but the layer between Three.js and WebGL, the lower-level graphics library used by web-browsers for hardware accelerated drawing.
// this plane is going to be our window
var p = findByName("Plane")

// this box is going to be 'inside' the window
var box = findByName("Box")

// add make plane, make box etc

p.onBeforeRender = (renderer) => {
	var gl = renderer.context
	gl.enable( gl.STENCIL_TEST );
	gl.depthMask(false)
	gl.stencilFunc( gl.ALWAYS, 1, 0xff );
	gl.stencilOp( gl.REPLACE, gl.REPLACE, gl.REPLACE );
}

p.onAfterRender = (renderer) => {
	var gl = renderer.context
	gl.disable( gl.STENCIL_TEST );
	gl.depthMask(true)
	gl.stencilFunc( gl.ALWAYS, 1, 0xff );
	gl.stencilOp( gl.KEEP, gl.KEEP, gl.KEEP );

}

box.onBeforeRender = (renderer) => {
	var gl = renderer.context
	gl.enable( gl.STENCIL_TEST );
	gl.stencilFunc( gl.EQUAL, 1, 0xff );
	gl.stencilOp( gl.KEEP, gl.KEEP, gl.KEEP );
}


box.onAfterRender = (renderer) => {
	var gl = renderer.context
	gl.disable( gl.STENCIL_TEST );
	gl.depthMask(true)
	gl.stencilFunc( gl.ALWAYS, 1, 0xff );
	gl.stencilOp( gl.KEEP, gl.KEEP, gl.KEEP );
}
Gives us:
We can understand this code by thinking about a hidden ‘stencil’ image that goes along with the image that we see. In the first function the plane ALWAYS draws into this stencil image the value ‘1’ (it starts off all zeros); in the third function we only draw if the image is EQUAL to 1. The second and fourth functions simply return your graphics card to the state it found it as a curtesy to anything else trying to get drawn. You can extend this to multiple stenciling and stenciled objects if you like.